Original Link: https://www.anandtech.com/show/2157
abit was the top manufacturer of enthusiast level boards a few short years ago, but after they expanded into areas where they didn't have the manufacturing expertise or cost advantages to compete with the larger tier one manufacturers they fell on hard times. As a result, abit lost market share as well as mind share. Fortunately, abit entered into a long-term partnership with USI about a year ago that ensures their financial health for the near future, and they also had a minor name change. Universal abit is the successor to the Abit motherboard brand name and represents a partnership with USI for their manufacturing and engineering expertise. Along with the name change comes a grassroots movement to return the company to the forefront of the computer enthusiast, extreme overclocker, and high performance markets.
The first wave of products last summer from Universal abit was interesting to say the least. In some cases like the abit AW9D-MAX they released a top performer that reminded us of the old Abit; in other areas, however, we found boards like the AB9 Pro represented a crossroads in abit's new product launch. Would this series of motherboards continue the downward spiral of being late to market with average performing products like the previous product launches, or would the new Universal abit have products that would capture the minds and hearts of the enthusiast community once again?
The AB9 Pro held great promise in our early looks, but it quickly turned into disappointment at launch and finally redeemed itself near the end of its product cycle with the 1.6 BIOS. abit took tremendous criticism for the AB9's poor layout and early BIOS issues when the product launched. The layout and hardware component issues could not be addressed after product release but after several BIOS releases most of the initial performance and compatibility issues were solved. While the board layout and pink BIOS setup screen did nothing for us (or probably anyone else for that matter), the fact that abit engineering took the time to properly address performance and compatibility issues impressed us. They also promised to correct the mistakes of the past with the next P965 product release.
The $64,000 question once again is: Did they learn from history and thus avoid repeat condemnation?" The answer is yes and no. The abit AB9 QuadGT's layout, choice of components, feature set, and BIOS options appear to have been developed in an alternate universe when compared to the AB9 Pro. Sadly, the BIOS engineering and quality assurance groups appear to have taken two steps backwards and remain firmly stationed in the current universe. We will discuss these issues shortly but for now let's take a first look at the board's feature set and initial performance results.
Feature Set
| abit AB9 QuadGT | |
| Market Segment: | Enthusiast Performance - $219.99 |
| CPU Interface: | Socket T (Socket 775) |
| CPU Support: | LGA775-based Pentium 4, Celeron D, Pentium D, Pentium EE, Core 2 Duo, Core 2 Extreme |
| Chipset: | Intel P965 + ICH8R |
| Bus Speeds: | 133 to 600 in 1MHz increments |
| Northbridge Strap: | CPU, 1066, 800, 533 |
| Memory Speeds: | SPD, 533, 667, 800 |
| PCIe Speeds: | 100 to 200 in 1MHz increments |
| PCI: | Fixed |
| Core Voltage: | Default, Base to 1.9250V in +.0100V increments |
| CPU Clock Multiplier: | Auto, 6x-11x in 1X increments if CPU is unlocked, Core 2 Duo downward unlocked |
| DRAM Voltage: | 1.800V to 3.000V in +.025V increments |
| DRAM- Ref Voltage: | +2%, 0%, -2%, -4% |
| DRAM Timing Control: | SPD, Manual, Auto or Manual for 6 DRAM Timing Options including Command Rate |
| MCH Voltage: | 1.25V to 1.70V in +.05V increments |
| CPU VTT Voltage: | 1.20V, 1.30V, 1.40V, 1.50V |
| ICH Voltage: | 1.05V, 1.10V, 1.15V, 1.20V |
| ICH IO Voltage: | 1.50V to 1.70V in +.05V increments |
| Memory Slots: | Four 240-pin DDR2 DIMM Slots Dual-Channel Configuration Regular Unbuffered Memory to 8GB Total |
| Expansion Slots: | 1 - PCIe x16 1 - PCIe x4 (x16 Physical) 1 - PCIe x1 2 - PCI Slot 2.3 |
| Onboard SATA/RAID: | 6 SATA 3Gbps Ports - RAID 0, 1, 5, 10 - Intel ICH8R 2 e-SATA 3Gbps Port - RAID 0, 1, JBOD - JMicron JMB363 |
| Onboard IDE: | 1 ATA133/100/66 Port (2 drives) - JMicron JMB363 |
| Onboard USB 2.0/IEEE-1394: | 10 USB 2.0 Ports - 4 I/O Panel - 6 via Headers IEEE 1394 - TI TSB43AB22A |
| Onboard LAN: | Realtek RTL8810SC - PCI Express Gigabit Controller |
| Onboard Audio: | Realtek ALC888 8-Channel HD Audio Codec |
| Power Connectors: | ATX 24-pin, 8-pin EATX 12V, 4-pin Molex |
| I/O Panel: | 1 x PS/2 Keyboard 1 x PS/2 Mouse 1 x CMOS Clear Switch 2 x S/PDIF Optical - In and Out 1 x IEEE 1394 Port 2 x e-SATA Port 1 x Audio Panel 1 x RJ45 4 x USB 2.0/1.1 |
| BIOS Revision: | Award 12/11/06 6A79LA1EC-10 |
abit has equipped this motherboard with a bevy of top end features and it is currently selling in the $219 range. The board features the Realtek ALC888 HD audio codec, Realtek RTL8810SC Gigabit Ethernet controller, dual e-SATA ports via the JMicron JMB363 chipset, and IEEE 1394 Firewire support. The accessory kit contains the basic SATA and IDE cables, external USB/Firewire bracket, and extensive documentation on the motherboard and µGuru functionality. However, abit did not include e-SATA cables and considering the cost of the kit we believe this in an omission.
The BIOS options for the AB9 QuadGT are fairly extensive for a motherboard in this sector, and of course the board features abit's excellent µGuru technology. The voltage options and availability of choices within each option will please the majority of enthusiasts. Besides memory voltage options up to 3.00V, the board also features the ability to change the command rate to 1T. In our initial testing we could not get 1T operation stable at DDR2-800 but were successful at DDR2-667 with a wide variety of Micron D9 based modules. However, we had trouble with several DDR2-667 modules based on Promos and Elpida memory ICs. The performance at DDR2-667 1T was equal to or up to 4% slower in several benchmarks when compared to DDR2-800 2T at the same memory latency timings. We believe abit still has significant tuning to complete to get 1T operating at DDR2-800 in a stable manner.
Board Layout and Features
 |
| Click to enlarge |
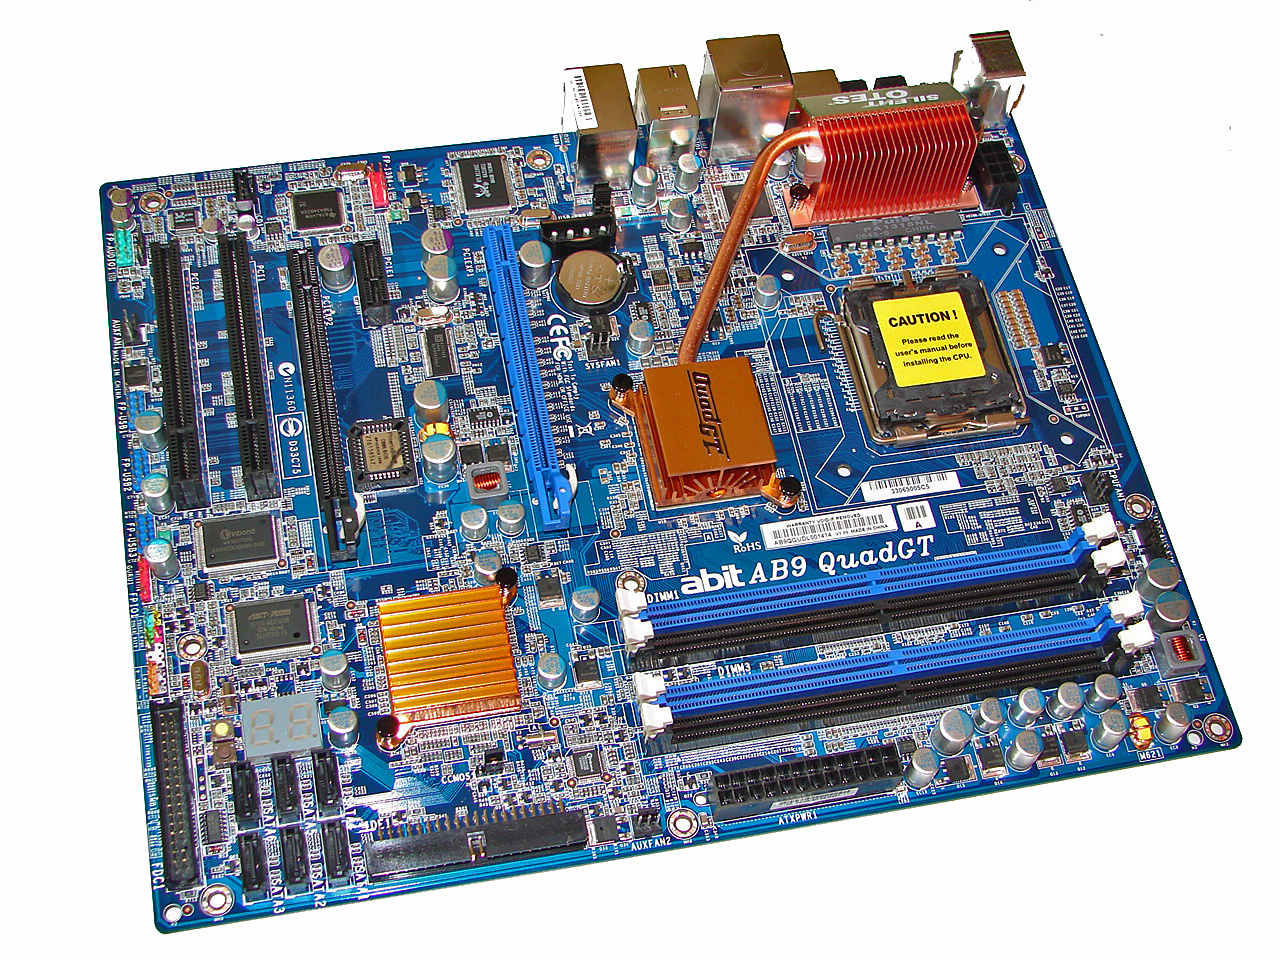
abit really did an excellent job with the layout of this board and the color combination is elegant when compared to some of the more garish schemes we have seen recently on other boards. The board was very easy to install in our Cooler Master CM Stacker 830. Cable management was excellent with our only concern being the location of the floppy drive connector at the bottom of the board. The board features a total of five fan headers that are controlled via µGuru. The board also includes a digital PWM controller and 100% Conductive Polymer Aluminum Solid Capacitors that provided absolutely superb stability throughout testing.
The DIMM module slots' color coordination is correct for dual channel setup based upon the premise of installing DIMMs in the same colored slots for dual-channel operation. It was very easy to install memory modules with a full size video card placed in the top PCI Express x16 slot. abit places the CPU and two auxiliary fan headers above and to the right of the first DIMM slots respectively. The 24-pin ATX power connector is located below the number three and four DIMM slots.
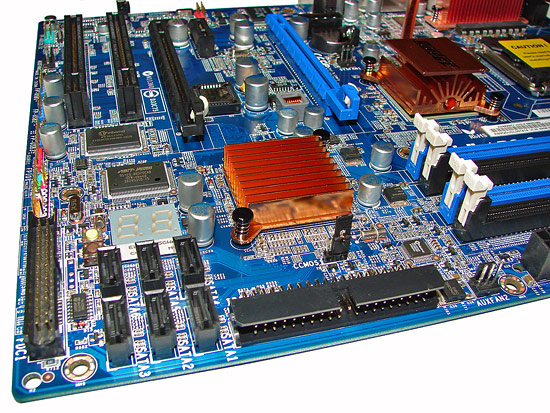
The six Intel ICH8R SATA ports are black and are conveniently located between the IDE and Floppy drive connectors. The SATA ports feature the newer clamp and latch design. We found the positioning of the SATA ports to be very good when utilizing the PCI or second PCI-E x16 physical slot, although we had to bend our SATA cable a little when using the first and second port with our X1950XT video card and we would expect similar issues with other dual-slot GPUs.
The ICH8R is passively cooled and remained cool to the touch throughout testing. abit includes an LED based POST code display and power and reset buttons. The standard clear CMOS jumper is located below the ICH8R chipset with another fan header being located between the IDE and 24-pin ATX connectors. We really would like to see more companies replace the CMOS jumper with a button instead, as it can be very difficult to access the jumper with expansion cards installed, and luckily abit did just that, as we'll see in a moment.
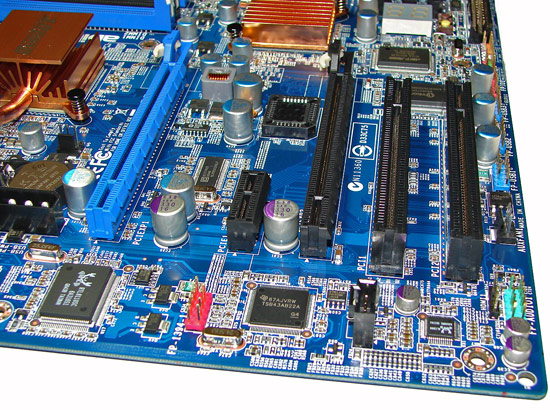
The board comes with one PCI Express x16 connector, one PCI Express x4 (x16 physical), one PCI Express x1, and two PCI 2.3 connectors. The layout of this design offers one of the better dual x16 connector designs we have worked with to date. Only the first PCI slot will be physically unavailable if you use a double slot video card in the second PCI Express x16 physical slot. There is a four-pin 12V Molex connector that is required for dual graphic card operation. We confirmed the PCI Express x4 slot can be used with a wide variety of x1, x2, and x4 cards.
Something else worth noting are the audio features. The black three pin header next to the number two PCI slot and the green front panel audio header is an HDMI Audio header that allows output to a HDMI capable video card. A few HTPC enthusiasts might find that feature to be useful.
 |
| Click to enlarge |
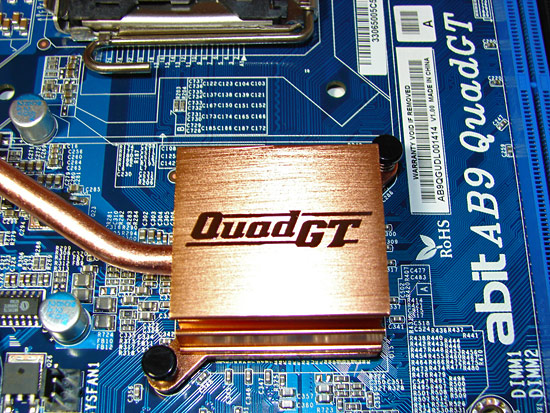
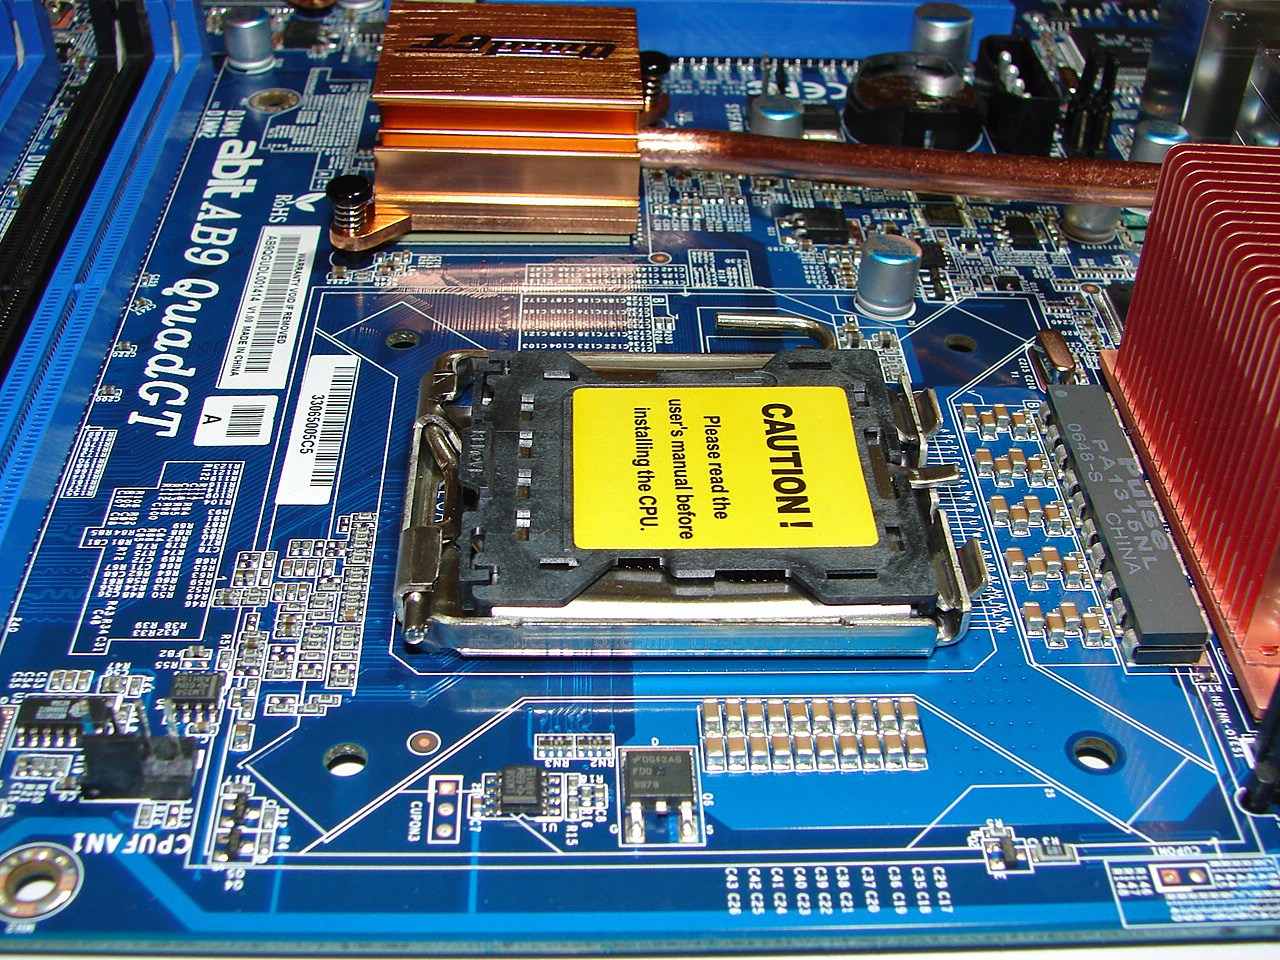
Getting back to CPU socket area, we find an excellent amount of room for alternative cooling solutions. We utilized the stock heatsink/fan in our normal testing but also verified a few larger Socket-775 air cooling solutions would fit in this area during our overclocking tests. The Intel P965 MCH chipset is passively cooled with a mid-rise heatsink unit that did not interfere with any installed peripherals and is connected to the digital PWM area via a heat pipe that worked without issue during testing.
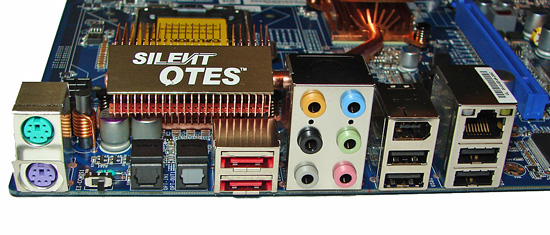
The rear panel contains the standard PS/2 mouse and keyboard ports, LAN port, and 4 USB 2.0 ports. The LAN (RJ-45) port has two LED indicators representing Activity and Speed of the connection through the Realtek Gigabit PCI-E chipset. The audio panel consists of 6 ports that can be configured for 2, 4, 6, and 8-channel audio connections for the Realtek ALC 888 HD codec along with S/PDIF optical out and in ports. The IO panel also features two e-SATA ports, an IEEE 1394 port, and a Clear CMOS switch.
The innovative clear CMOS switch is located next to the PS/2 ports and proved very handy during testing as the BIOS recovery system did not work consistently. With most motherboards lacking parallel and serial ports these days, the I/O panel tends to have quite a bit of unused space, and we would really love to see more companies include a clear CMOS button like this abit board - the only other time we have seen such a button is on several SFF systems.
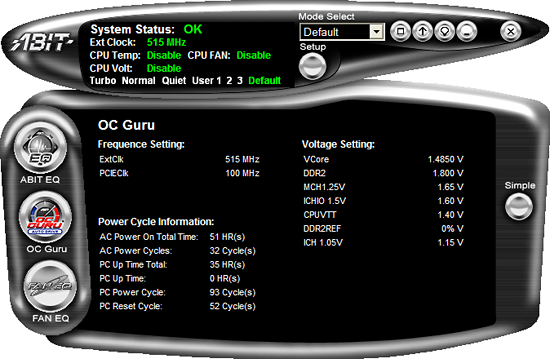
abit includes their µGuru utility which is absolutely the best Windows based software application for overclocking and hardware monitoring... or at least it was until we tried it on this board. Our primary issue is that the memory voltage readings are incorrect and if you change the voltage it will over volt your BIOS settings. We always found the µGuru utility read our memory about .2V to.4V under the BIOS setting. Unfortunately, we fried a pair of Corsair's best 6400C3 1GB modules by increasing the voltage to 2.400V in µGuru which ended up being an actual BIOS setting of 2.7V. Needless to say, our Orthos testing session ended early. Until abit resolves this issue, we strongly advise that you do not use µGuru to change memory voltages. Our testing of the other voltage settings did not reveal any issues, except on occasion the board would lock up if we dropped our CPU core voltage.
FSB Overclocking Results
| abit AB9 QuadGT Overclocking Testbed |
|
| Processor: | Intel Core 2 Duo E6300 Dual Core, 1.86GHz, 2MB Unified Cache 1066FSB, 7x Multiplier |
| CPU Voltage: | 1.4850V (default 1.3250V) |
| Cooling: | Tuniq Tower 120 |
| Power Supply: | OCZ GameXStream 700W |
| Memory: | GeIL PC2-6400 800MHz Plus (2x1GB - GX22GB6400PDC) (Micron Memory Chips) |
| Video Cards: | 1 x MSI X1950XTX |
| Hard Drive: | Seagate 320GB 7200RPM SATA2 16MB Buffer |
| Optical Drive: | Sony 18X AW-Q170A-B2 |
| Case: | Cooler Master CM Stacker 830 |
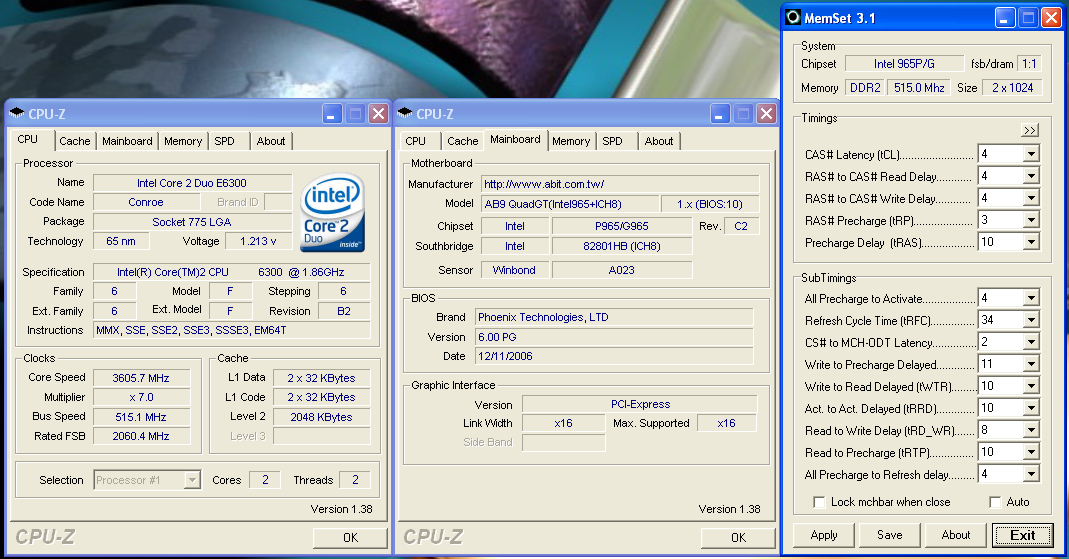
| Maximum CPU OC: | 515x7 (4-4-4-12, 1:1, 2.400V), CPU 1.4850V 3605MHz (+93%) |
| . | |
 |
| Click to enlarge |
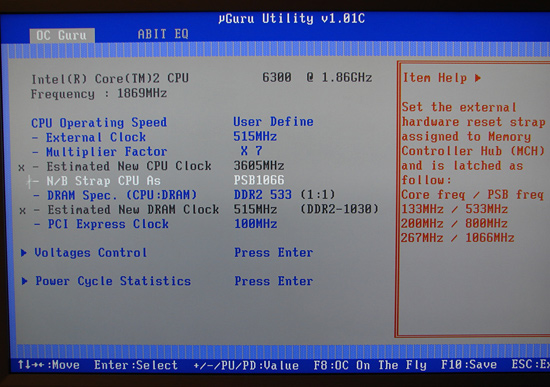
We were able to reach a final benchmark stable setting of 7x515 FSB resulting in a clock speed of 3605MHz. The board was capable of running up to 7x525 FSB but would consistently fail our Dual Prime95 test, although it passed all our game and synthetic benchmarks. We settled on the 7x515 FSB setting and set our VCore to an acceptable 1.4850V with Vdroop being around .02V during load testing. We were able to operate our GEIL memory at 4-4-4-12 at 2.4V with these settings.
The BIOS allows you to manipulate the MCH strap and memory speeds resulting in a wide variety of performance options based on your components. The current BIOS allows you to stay in the 1067 strap up to the 525FSB ceiling with our E6300 and E6400 chips, and this allows for some incredible memory and system performance at the higher FSB settings. Our E6600 has hit 7x550FSB in initial testing at this time. Our board was extremely stable throughout testing although we noticed the requirement for slightly higher memory voltages at the upper FSB rates due to the tight sub-timings. During overclocking we generally found that at 7x400 and above with our E6300 and the memory set at a 1:1 ratio (800 DDR2) that 4-4-4 timings were up to 7% faster in our benchmarks than forcing the memory latencies to 3-3-3 as the sub-timings were set tighter resulting in improved throughput.
 |
| Click to enlarge |
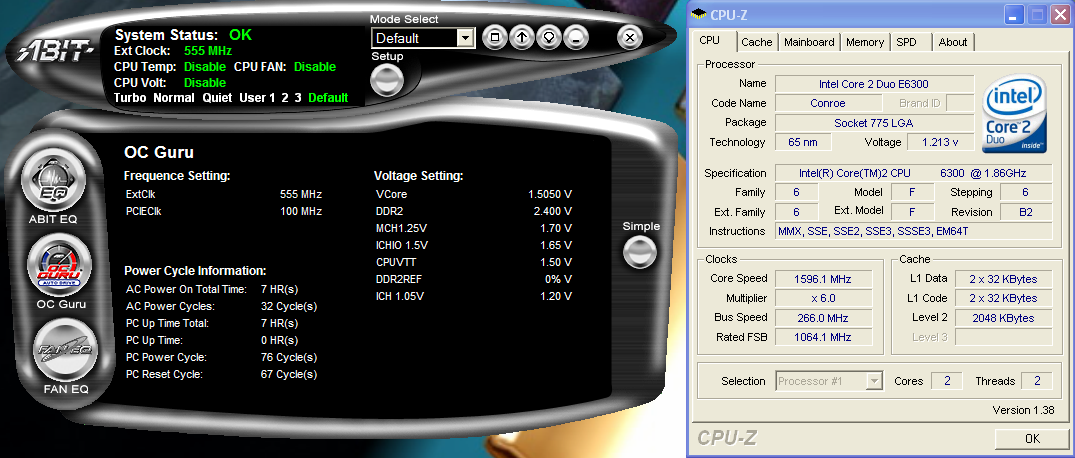
One minor issue we noticed with µGuru is that any setting over the 525FSB limit at this time would still result in the board be able to POST and boot into XP while generating FSB and clock rates that were not real. In our example we set the board to 6x555FSB. It would POST and display 6x555 along with the corresponding memory speed, and once in Windows the µGuru utility would show the same BIOS settings and allow changes to it. However, the system actually would default to the base 266FSB speed with memory at the base settings also.
Memory Stress Testing
 |
| Click to enlarge |
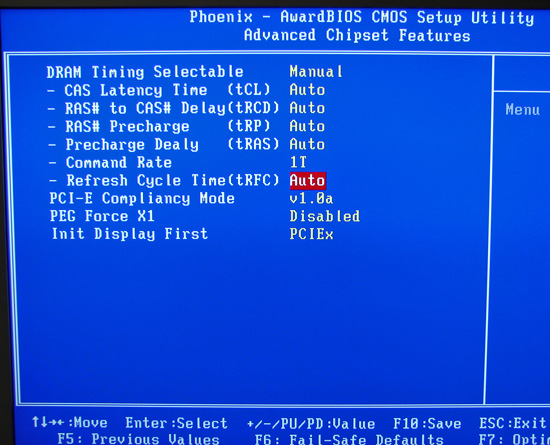
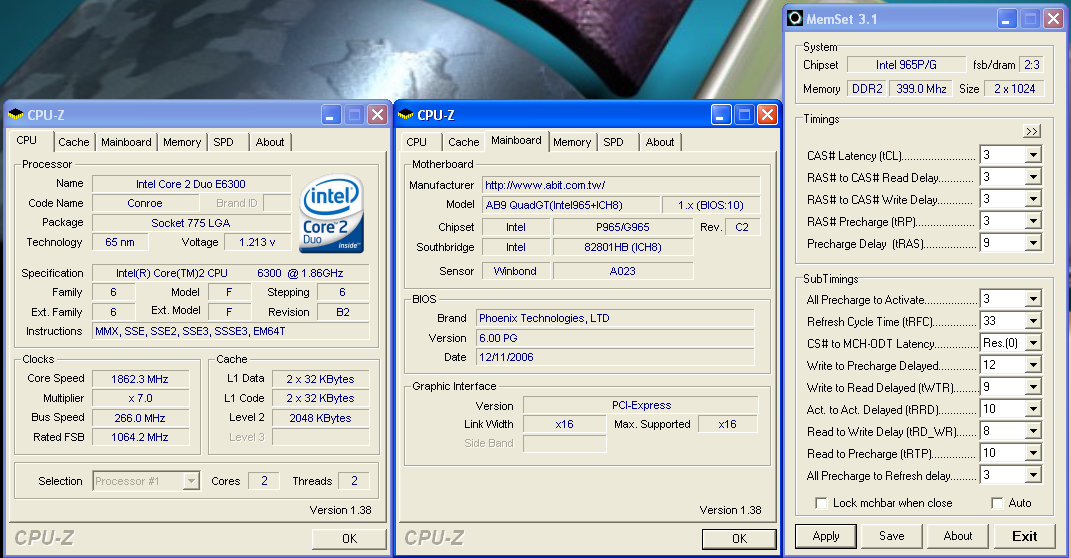
We take a look now at seeing how well our GEIL PC2-6400 memory operates in this board in both two and four DIMM testing. The screenshot above shows the actual memory settings used in our benchmark tests of the board. We do not modify the memory timings beyond the four major settings in our charts. The balance of memory settings are implemented automatically via the BIOS. abit implements slightly tighter memory and MCH timings than some of the other P965 boards we have tested.
| abit AB9 QuadGT Stable DDR2-800 Timings - 2 DIMMs (2/4 slots populated - 1 Dual-Channel Bank) |
|
| Clock Speed: | 800MHz |
| CAS Latency: | 3 |
| RAS to CAS Delay: | 3 |
| RAS Precharge: | 3 |
| RAS Cycle Time: | 9 |
| Voltage: | 2.20V |
We were able to set our timings to 3-3-3-9 by increasing the memory voltage to 2.20V with our GEIL memory. We were able to hold these timings up to DDR2-880 on this board before switching over to timings of 4-4-4-12 up to DDR2-1030 at 1:1 timings. We then switched to 5-5-5-15 timings at a 7x465 with a 4:5 ratio that resulted in a maximum stable memory speed of DDR2-1163. We tried out our Corsair Dominator PC-8888 and OCZ Flex XT memory but could not get the board stable at memory speeds greater than DDR2-1163.
| abit AB9 QuadGT Stable DDR2-800 Timings - 4 DIMMs (4/4 slots populated - 2 Dual-Channel Bank) |
|
| Clock Speed: | 800MHz |
| CAS Latency: | 3 |
| RAS to CAS Delay: | 4 |
| RAS Precharge: | 4 |
| RAS Cycle Time: | 12 |
| Voltage: | 2.275V |
Our settings of 3-4-4-12 at 2.275V were not quite as good as our ASUS P5B-E 1.02G settings of 3-4-3-10, but due to fairly tight memory timings elsewhere the benchmark results were actually better. We were able to keep this setting up to DDR2-860 before switching over to 4-4-4-12 settings that held stable until we reached DDR2-960 during our overclocking tests. The board was able to handle settings of 5-4-4-12 up to DDR2-1010. Our final settings of 5-5-4-15 at DDR2-1030 required a voltage increase to 2.325V.
Benchmark Setup
Our abit AB9 QuadGT motherboard fully supports the current range of socket 775 Intel processors. We chose an E6300 for testing as we feel this will be a very popular Core 2 Duo CPU choice with the P965 motherboards. (Granted that many people looking at a $200+ motherboard like this abit are likely to opt for a more expensive CPU as well, but with the more budget-oriented P965 boards the choice makes sense, and we continue to use this CPU for purposes of consistency.)
| Standard Test Bed Performance Test Configuration |
|
| Processor: | Intel Core 2 Duo E6300 Dual Core, 1.86GHz, 2MB Unified Cache 1066FSB, 7x Multiplier |
| RAM: | Geil PC2-6400 800MHz Plus (2x1GB - GX22GB6400PDC) (Micron Memory Chips) |
| Hard Drive: | Seagate 320GB 7200RPM SATA2 16MB Buffer |
| System Platform Drivers: | Intel - 8.1.1.1010 |
| Video Cards: | 1 x MSI X1950XTX |
| Video Drivers: | ATI Catalyst 6.11 |
| CPU Cooling: | Scythe Infinity |
| Power Supply: | OCZ GameXstream 700W |
| Optical Drive: | Sony 18X AW-Q170A-B2 |
| Case: | Cooler Master CM Stacker 830 |
| Motherboards: | ASUS P5B-Deluxe WiFi (Intel P965 C2, 1.01G) - BIOS 0804 abit AB9-Pro (Intel P965 C1) - BIOS 1.5 abit AB9 QuadGT (Intel P965 C2) - BIOS 10 Biostar T-Force 965 Deluxe (Intel P965 C1) - BIOS IP96a803 Gigabyte GA-965P-DQ6 (Intel P965 C2) - BIOS F7 MSI P965 Platinum - (Intel P965 C2) - BIOS 1.2 |
| Operating System: | Windows XP Professional SP2 |
| . | |
A 2GB memory configuration is now standard in the AT test bed as most enthusiasts are currently purchasing this amount of memory. Our choice of DDR2-800 memory from GEIL offered a very wide range of memory settings during our stock and overclocked test runs. Our memory timings are set based upon determining the best memory bandwidth via our test application results.
We are utilizing the MSI X1950XTX video card to ensure our 1280x1024 resolutions are not completely GPU bound for our motherboard test results. We did find in testing that applying a 4xAA/8xAF setting in most of today's latest games created a situation where the performance of the system starts becoming GPU limited. Our video tests are run at 1280x1024 resolution for this preview article at standard settings.
Synthetic and Application Performance
We are utilizing an abbreviated test suite for our first look at the abit AB9 QuadGT motherboard. We will present full test results in our next article that will look at new P965 boards from ASUS and Gigabyte.
 |
| Click to enlarge |
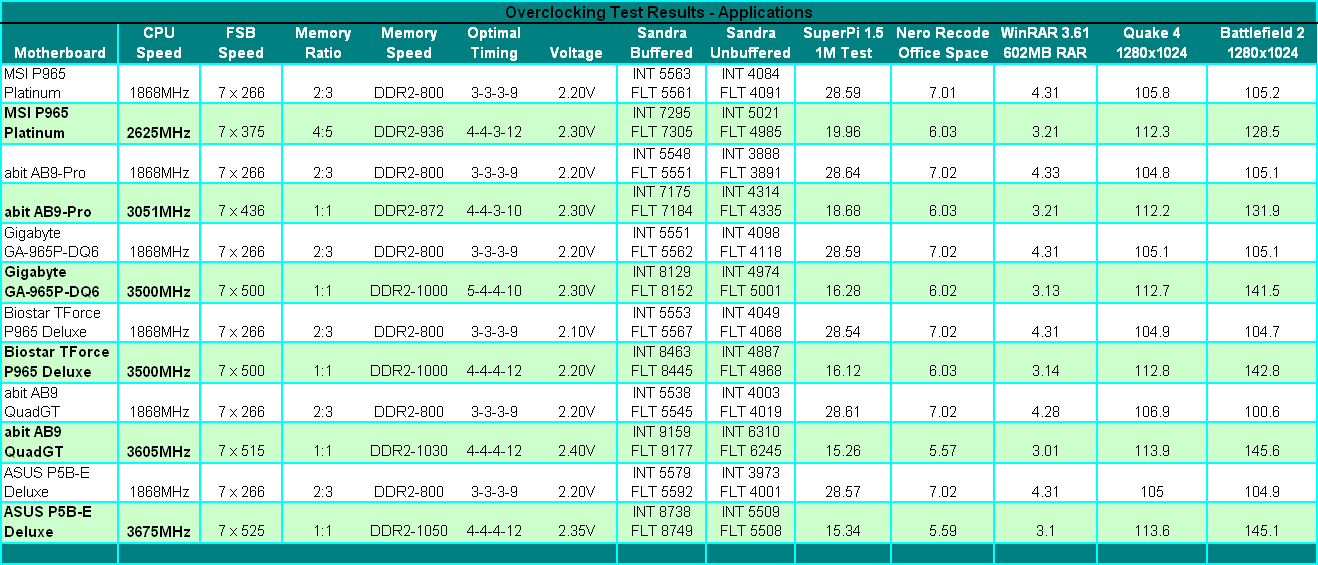
At stock speeds the AB9 QuadGT motherboard posts the best WinRAR and Quake 4 scores, and it's SuperPI and Nero Recode scores are near the top as well. We had performance issues with Battlefield 2 at stock settings as the frame rates were consistently about 5fps below the other boards. The game also stuttered at various points in the benchmark and dropped online connections three out of five times. We finally traced the issue down to the BIOS and JMicron controller. After setting our memory latencies to 3-4-3-10 and loading the JMicron RAID driver instead the standard XP IDE driver our scores improved to 104.8.
Although not listed, we noticed a drop of about 200~300 points in PCMark 2005 when compared to our other P965 motherboards. The solution was once again to switch the JMicron controller from IDE to RAID and load the JMicron RAID driver set. Our scores improved from 5664 to 5962 while our disk intensive WinRAR and Nero Recode scores improved by a couple of percent.
In our overclocking tests the AB9 QuadGT was absolutely superb and offered the best overall performance even though the ASUS P5B-Deluxe has a 70MHz CPU speed advantage. This performance is a direct result of the 1067 strap settings and aggressive memory sub-timings. Stability was also excellent during overclocking, although we continued to have issues with BF2 until we changed the JMicron driver. Once the driver was changed our overclocked BF2 fps score improved to 151.3.
We have not encountered any performance issues with our Quad Core (QX6800), E6600, or E4300 in limited testing to date. We will provide a performance update with these processors in our next P965 comparison article. Overall, this board clearly performed very well in our limited testing.
First Impressions
abit has done a wonderful job in the design and inclusion of high quality components on the AB9 QuadGT when compared to the AB9 Pro. The layout, feature set, performance, and BIOS options obviously place this board at or near the top of the Intel P965 product offerings. We really like the board and were impressed with its overall performance. In fact, the board just seems to be light years ahead of the AB9 Pro, but an otherwise excellent design is ruined by an immature BIOS. The issues we discovered during testing make us wonder if the light is on at abit's quality assurance department. We have briefly described some of the problems we faced during testing but there are more.
In our USB testing we found if the BIOS was changed from USB Keyboard or Mouse support via OS to BIOS then Windows XP would refuse to load if it was installed or if we tried a new installation from the CD drive. Additional USB testing revealed that any USB drive attached that is not a bootable device will result in the same behavior with XP not loading.
During storage drive testing we noticed the board would not run our Optical drives in DMA mode and defaulted to PIO mode regardless of how the JMicron controller was setup when utilizing the latest firmware and driver updates on our test image. We had to complete a new XP SP2 install with the JMicron controller setup as a RAID device in the BIOS and load the driver set via the F6 command in order to get DMA support for the Optical drives.
We also noticed IDE support from the JMicron controller was not available if we were using a RAID setup on the Intel ICH8R controller. We have noticed this before on other motherboards utilizing the JMicron chipset. However, this issue has generally been solved so we expect abit to have a solution shortly. For now, we recommend purchasing a SATA DVD drive and turning off the JMicron controller altogether unless you need the e-SATA support. If you use a SATA optical drive on the Intel controller the board will not recognized the drive if you have RAID enabled so this a catch 22 situation.
The JMicron fiascoes have hit every board manufacturer at one time or another and if you want to blame somebody then start at the doorstep of Intel for shipping a chipset without native IDE support before the market was ready for it. Of course, the motherboard suppliers could have opted for the VIA IDE controller that Biostar uses without issue, but then e-SATA or additional SATA port availability would not be on the option list. Considering most people would rather have at least one solid IDE controller rather than a couple more SATA ports that they often won't use, Biostar's decision seems to make the most sense, even if it doesn't look as good on the feature table comparisons.
Our retail sample was also delivered with the incorrect I/O panel shield so it appears to us that somebody was sleeping or watching Oprah during the packaging operation. Besides the issues listed above and the ones mentioned during the article we have to say the worst offense committed by abit is the memory voltage setting issue with the µGuru utility. The inability of the current µGuru application to correctly read and display the memory voltages set in the BIOS could directly lead to product failure as in our example.
Normally, we test each option and software switch and then reboot to ensure the BIOS setting matches the application in use. Unfortunately, after using version three of this application for the past few weeks we trusted it would work correctly. Instead of checking each setting before starting our benchmarks we assumed our memory voltage settings were correct after increasing our voltage slightly during the overclocking stability tests. We will no longer assume that µGuru and the abit BIOS are working in tandem before we start our test sessions. Needless to say, frying memory that costs over twice as much as the motherboard being reviewed was not a pleasant experience.
Overall, our initial experiences with the AB9 QuadGT have led us into a love and hate relationship with the board. We love the layout, performance, stability, and overall quality of the motherboard. This motherboard has tremendous potential and is a board we want to own for a long time. We hate the obviously early release of the product and the issues encountered to date as they should not be occurring. Several of the issues discovered in our initial testing can be blamed on an immature BIOS release and should be solved quickly, but we have to wonder why these issues even exist. It seems as if part of abit did not learn from the AB9 Pro launch while others took those same issues to heart and solved them. This situation reminds us of an old saying, "Those who do not remember the past are condemned to repeat it." After spending a few days with this product we can attest this saying has never been truer.


