Original Link: https://www.anandtech.com/show/5714/990fx-motherboard-roundup-with-thuban-and-bulldozer-a-second-wind-for-asus-gigabyte-msi-and-biostar
990FX Motherboard Roundup with Thuban and Bulldozer – A Second Wind for ASUS, Gigabyte, MSI and Biostar
by Ian Cutress on April 5, 2012 11:00 AM ESTEver since the launch of the Bulldozer range and 9-series motherboards, the initial reviews of the processors were not encouraging to say the least. Since then, AMD has decided to pull out of the enthusiast end of the CPU market, to focus in on the mainstream and low power processors. This is despite the fact that Windows 7 (and Windows 8, natively) is now receiving updates so the operating system can understand the processor architecture a little better, and hopefully boost performance. This gives a second wind to those owning (or thinking of owning) a Bulldozer based processor, and in turn, a 900-series motherboard. With the updates in hand, today we are looking at five 990FX boards that may feature on the consumer or system builders’ radar. This roundup has been on the cards for a long time, but unfortunately has had to be continually pushed back and then retests applied with latest BIOS updates – but as belated as it might be (and as deeply apologetic as I am), here it is!
9-Series Overview
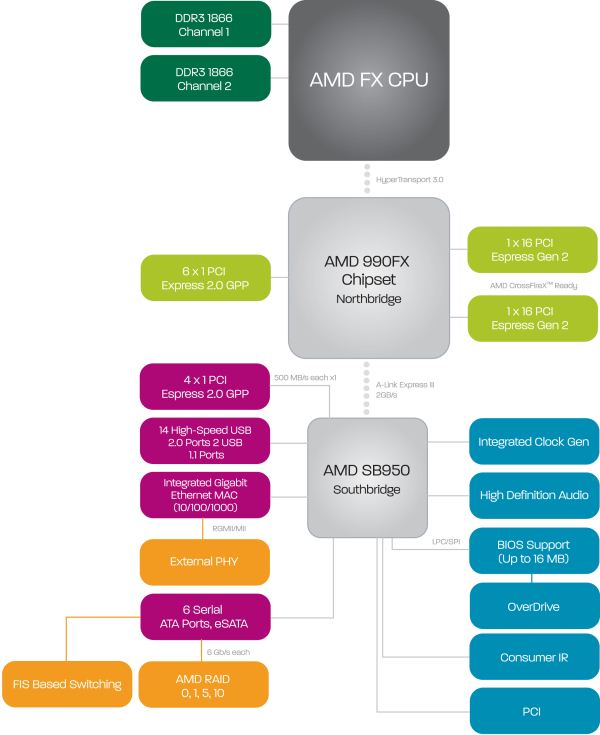
In a trend of compatibility, today’s Bulldozer architecture and Zambezi processors are all wrapped up in our 942-pin AM3+ socket, coupled with either the 990FX, 990X or 970 chipsets. For all intents and purposes, these chipsets are identical to their 800-series brethren, with two differences: guaranteed support of processors based on the Bulldozer architecture (BIOS update may be required), and SLI licensing for motherboards that can take advantage of multi-GPU setups.
| 990FX | 990X | 970 | |
| PCIe Lanes | 32 | 16 | 16 |
| PCIe Configuration |
x16/x16 x16/x8/x8 x8/x8/x8/x8 |
x16 or x8/x8 | x16 |
| TDP | 19.6 W | 14 W | 13.6 W |
| South Bridge | SB950 | SB950 | SB950 or SB920 |
|
SATA 6 Gbps (from South Bridge) |
6 | 6 | 6 |
| SLI | Yes | Yes | No |
| CrossFire | Yes | Yes | On a single card |
The 990FX chipset is our focus today, which comes with 32 lanes for graphics (usually in x16/x16, x16/x8/x8 or x8/x8/x8/x8 distributions) and is paired up with the SB950 Southbridge. This Southbridge makes sure that all the motherboards come with six SATA 6 Gbps ports with RAID 0/1/5/10 support and 14 USB 2.0 ports (USB 3.0 comes from controllers) for only another 6 watts of power consumption.
We are still limited to dual channel memory, compared to AMD’s high end server offerings which give quad channel and Intel’s various memory channel designs. This is partly cost, keeping AMD chipsets relatively cheaper, and design – moving to a larger number of memory channels would require more pins and routes from the CPU, and thus a new CPU socket.
Speaking of sockets, the AM3+ (or AM3r2) and 942-pin design is still with us for the near future. The second generation Bulldozer (Bulldozer Enhanced) and FX processors will still be on the same pin layout and 900 series boards will work with them – the processor should merely benefit from a workload throughput increase. The third generation FX processor, codename Steamroller, is still reported (not confirmed) to use AM3+, meaning that there are still quite a few years left in this platform when taking the AMD route.
By default the 890FX and 990FX HyperTransport 3.0 should enjoy transfer rates of up to 5.2 GT/s, unless you use an appropriate processor when HyperTransport 3.1 kicks in to give a 6.4 GT/s transfer rate. With the 900-series, users now have access to a graphical UEFI BIOS, similar to recent Intel chipsets, and also have full support of 2.2+ TB devices.
With all that in mind, for this article we are testing and reviewing the following products and prices:
$215 - ASUS Crosshair V Formula
$185 - ASUS Sabertooth 990FX
$180 - Gigabyte 990FXA-UD5
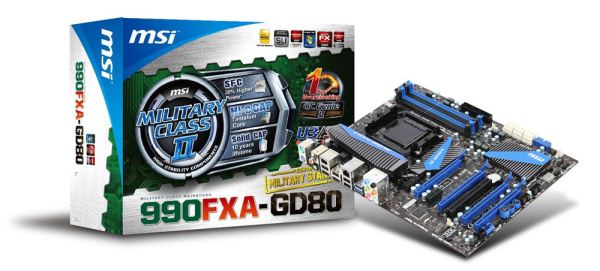
$195 - MSI 990FXA-GD80
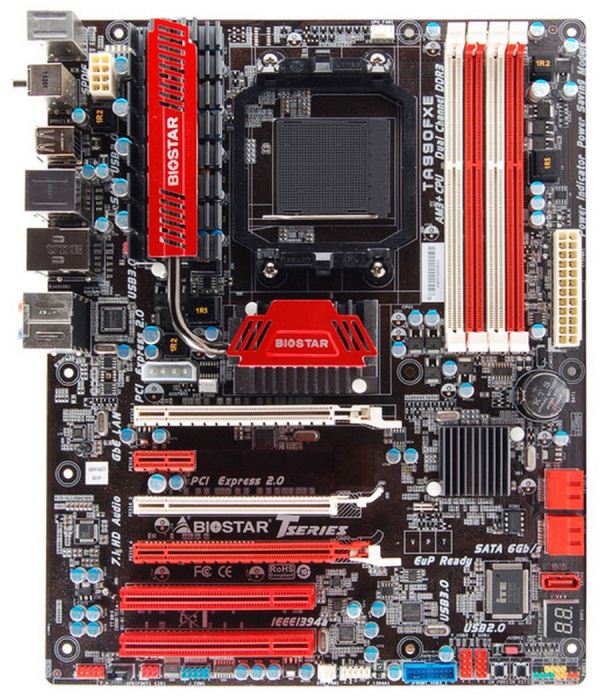
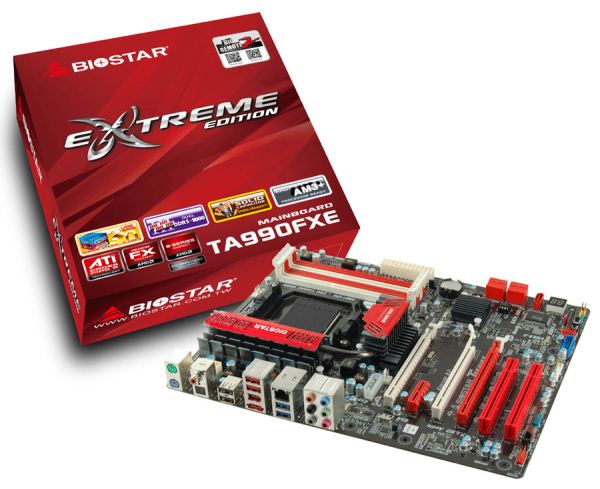
$130 - Biostar TA990FXE
These boards will be tested with both a previous generation Thuban processor (the X6 1100T) and a high end Bulldozer processor (FX-8150), under AMD’s all-in-one liquid cooling solution (which is made by Asetek, and is essentially their take on the Corsair H80). With a wide range of price points and feature sets, let us see what they can do, starting with the ASUS Republic of Gamers Crosshair V Formula.
ASUS Crosshair V Formula - Overview
Last year was a bleak year for reviewing ROG boards at AnandTech; however we intend to change that this time around, starting with the Crosshair V Formula. The ROG (Republic of Gamers) line of ASUS products come in three flavors – Extreme, Formula and Gene (ATX, ATX and mATX respectively). The boards are aimed at two primary markets – firstly gamers, and then also overclockers. These products have their own section on ASUS’ website, their own forums, and dedicated technical marketers for support. The ROG philosophy at ASUS is to provide a level of product to the gamer and the consumer beyond the standard. It is up to the user however to grasp that extra support with both hands and venture online to find overclocking guides and answers to questions.
This leaves us with the Crosshair V Formula. I will not hide anything from you – when AMD initially released the Bulldozer processor line, everyone on AMD’s list in the media business who deals with reviewing processors and motherboards gets a media kit. This usually contains a processor, a motherboard, and sometimes a CPU cooler (I received AMD’s all-in-one liquid cooler with this media kit). With Intel chipsets, this means an Intel motherboard. As AMD do not directly make in any volume a competitive motherboard, they pair with a motherboard manufacturer to provide the optimum experience. (This also explains the reason that on a new socket release why almost all the web reviews in the first week are of one certain motherboard only, e.g. the Intel DX79SI with Sandy Bridge-E.) In this case, it was ASUS, with the Crosshair V Formula.
ROG boards, as with most motherboards from ASUS, are designed to be part of a system which just works, and works well. If a user wants a solid system underneath, it has to be done with little fuss and provide the extra performance through auto-overclocking. However there also has to be a way for enthusiasts to tinker and modify as appropriate. As such, ASUS deck out the BIOS with vast arrays of options, which I am sure very few people outside the AMD chipset team or motherboard engineers know about. But if a random overclocker finds setting XYZ to boost performance 10%, then it is a win-win for ASUS.
That being said, I had relatively few issues with the Crosshair V Formula going though my test suite. It worked well out of the box, and looking at the notes I write during testing there are very few minor issues relating to application and design which I will go into later. Performance is good (as you would hope from an expensive 990FX board), and several of the enhanced features (Intel NIC, upgraded audio) are the main selling points of this product.
Visual Inspection
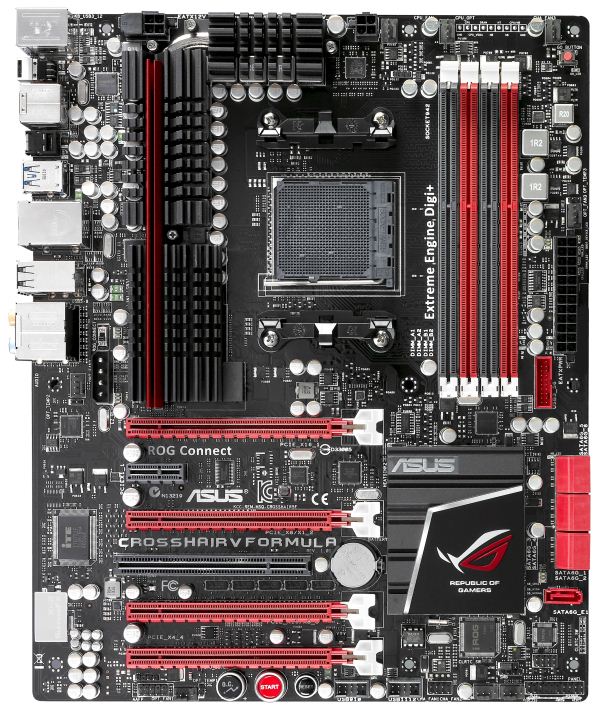
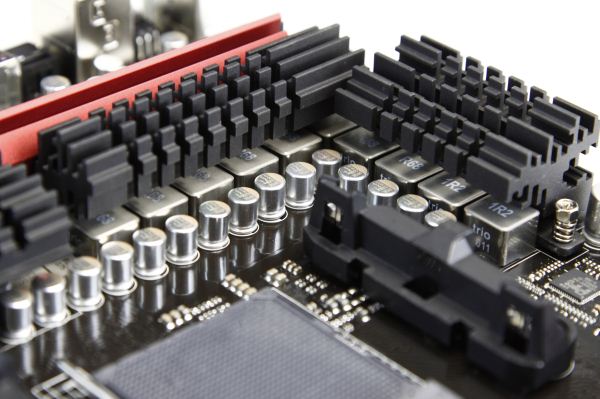
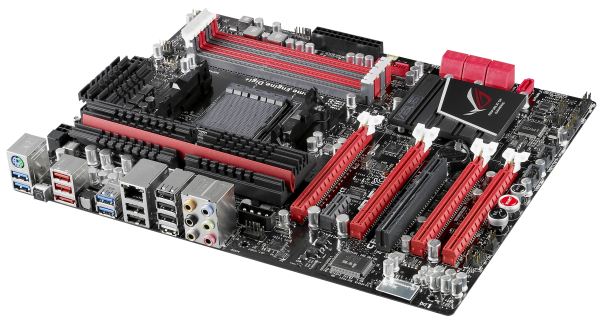
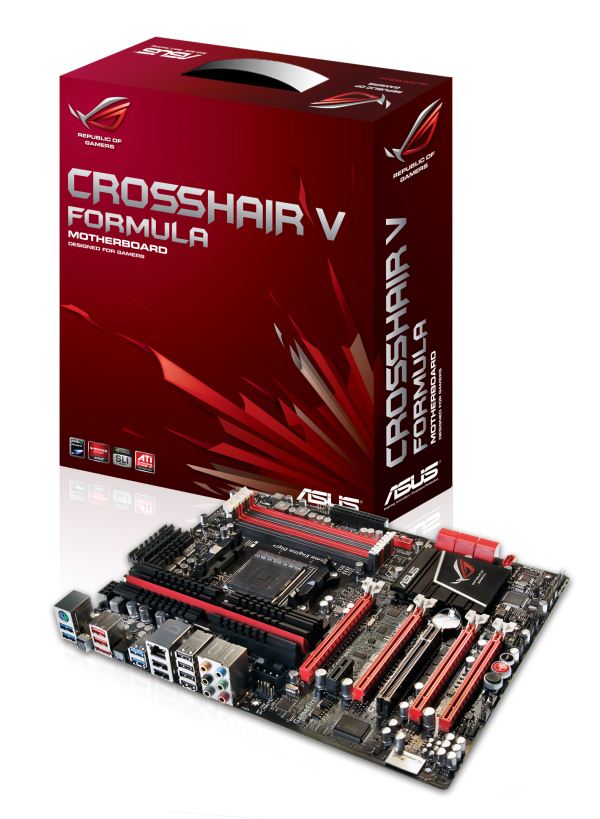
If you want features, out of the boards I am looking at today, the ASUS has got almost all of them. Sporting a red and black livery that is quintessential of the ROG range, ASUS has developed a low profile heatsink with a large surface area to cover the VRMs. Combined with the AM3+ socket which is so generously proportioned, there should not be much trouble fitting the beefiest of air coolers to satisfy 130W+ processors from the Thuban or Bulldozer ranges.
The board is populated with four DIMM slots meaning two per channel, and fan headers are frequent – a total of eight of them (all four-pin) on this board. That starts with two for the CPU (just above the socket) and three labeled as chassis fans (one in the top right corner, two in the bottom right). The final three are labeled as optional (one in the middle right above the 24-pin ATX connector, one on the bottom towards the left near the power/reset switches, and another to the left of the 4-pin molex connector above the PCIe slots). For anyone’s needs, that is usually more than enough, unless an enthusiast wishes to make a wind tunnel with some powerful fans.
The USB 3.0 header is situated beside the 24-pin ATX power connector, in prime position for front panel USB 3.0 ports. Underneath this, we have the six SATA 6 Gbps ports from the chipset at right angles to the board, and another SATA 6 Gbps port from an ASMedia controller. Out of the boards tested today, only the Gigabyte has more SATA 6 Gbps ports available on the board (discounting eSATA).
Along the bottom of the board are the standard front panel and USB headers. Also here are the Power/Reset buttons, next to an overclock button. This is a one button selection for a system overclock, equivalent to the ‘Fast’ overclock setting in the ASUS software. What is a little disappointing is that there is no two-digit debug on board for diagnostics – should overclockers use this board, it is often a handy tool to have. Overclockers do have other options though – the iROG and ROG Connect options are valid on this board.
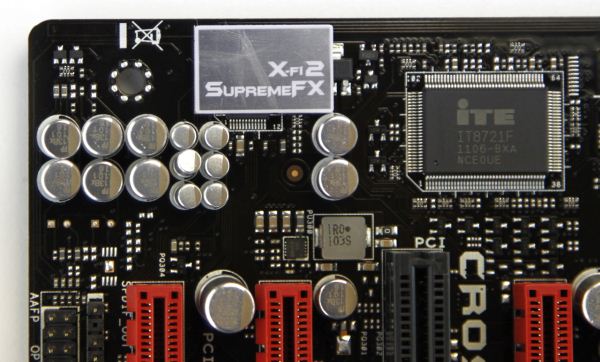
In the bottom left we find one of the primary marketing features of the Crosshair V Formula – the audio solution. On around 98% of modern chipset motherboards available for consumers, we typically see a Realtek solution, varying from the ALC887 up to the ALC898. On the rare occasion, we get something more – as it is here with the Crosshair V Formula, which sports the X-Fi 2 SupremeFX audio solution. Personally, I am not an audiophile, however out of the usual marketing bumpf that comes from corporate entities; this is one which should be advertised.
PCIe layout is designed to maximize airflow and GPU lanes – from the top, an x16, an x1, an x8, a PCI, an x16 (x8 when the x8 is populated), and an x4. This gives tri-card users enough space to put three cards in and still use all the headers at the bottom of the board – but only just. Why do I say only just? Well, the user has to ideally populate these ports before plugging in the second card. My case in point is to deal with AMD’s all-in-one liquid cooler, which uses a USB port onboard to power the pump. With this connector in, I placed a second GPU in the board, which essentially locked the pump connector in place, almost impossible to remove without taking the second GPU out first. If a user has three GPUs on board, then they all need to be taken out to put anything like this connector into the USB power ports. It is an obscure issue (depending on how many people use these type of coolers or USB headers), but it is here nonetheless. Perhaps it is time for motherboard manufacturers to put a USB header next to the 24-pin ATX connector?
The IO back panel is fully featured – we start with a combination PS/2 port above a pair of USB 3.0 ports in blue. Next to this is the Clear CMOS button, alongside a pair of USB 2.0 ports above an eSATA 6 Gbps port. We also have a SPDIF output, another pair of USB 3.0 ports, gigabit Ethernet, four more USB 2.0 ports (the one in white is the ROG Connect port), and a set of audio jacks.
ASUS Crosshair V Formula BIOS
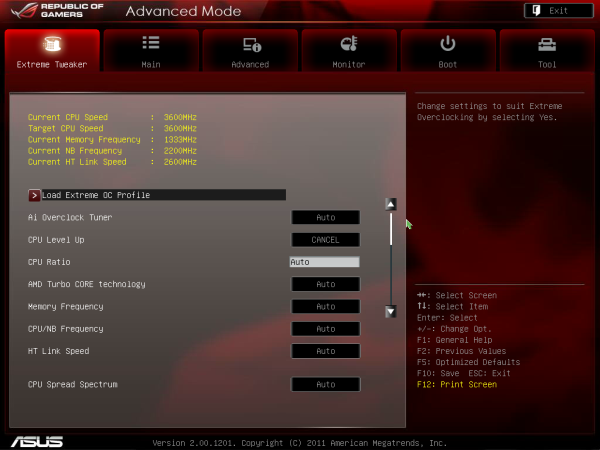
Republic of Gamers BIOSes are great. Millions of options, not a whole lot of people know what they do, if they do anything at all. What we get is the standard ASUS graphical BIOS with a lot of heavy after-market modification. First thing that catches a user's eye will be the change to a red theme to be consistent with ROG advertising, but also that the BIOS defaults to the advanced mode rather than the EZ mode of other non-ROG boards.
As a result we do not get the bevy of information on the front screen that I would personally like, such as CPU model, CPU temperatures and voltages all in a neatly packaged visual section. However this decision is most likely due to extreme overclockers wanting to use the board, and get to the overclocking options as quickly as possible.
There are two types of option in a ROG BIOS – ones that you know what they do (CPU multiplier, voltage, fan speed), and memory ones that you do not know (in my case, for example, the CS/ODT fine delay). For all your memory needs, Rajinder’s article for AnandTech back in August 2010 is still a fine read to get into the nitty gritty and would probably help understand a few of these options. But truth be told, ASUS seem to have put everything under the sun from the chipset manual available in the BIOS.
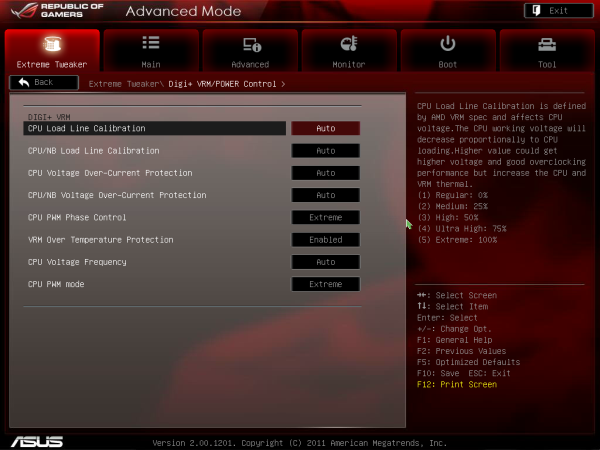
However for the likes of Johnny System Builder, or Katie Enthusiast, overclocking on the Crosshair V Formula is similar to any previous AMD system. We have options for all the standard typical AMD worries – CPU multiplier, CPU base frequency, voltages, HyperTransport links, NB frequency, memory straps, and options to enable/disable AMD’s Turbo Core. Even the Digi+ VRM solution options are present, allowing a little extra range for the power delivery components. In order to probe any XMP for your memory, ASUS has developed D.O.C.P, an option under ‘AI Overclock Tuner’ which adapts various options to try and match your memory profile. I will go through my overclocking with both Thuban and Bulldozer below.
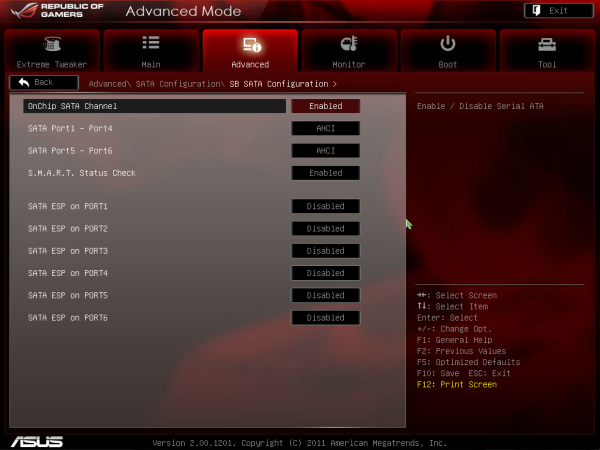
As is standard with the high end of ASUS’ range of motherboards, AHCI is enabled for SATA devices by default, which in my mind is a good thing. Also on the Crosshair V Formula is ASUS Core Unlocker, to allow users of ‘crippled’ processors to unlock cores that have been disabled. To clarify what I mean by a crippled processor, I refer to a processor that is internally a quad core, but one core is disabled as it did not conform to specifications and the package is sold as a tri-core. This technique is being used more and more in the semiconductor industry as it allows a greater proportion of CPU dies from a production wafer to be sold, reducing waste and increasing yields (at the expense of each die being a little bigger as it contains extra cores). Of course, these cores are disabled for a reason, so your mileage may vary – the processor you have may have a core disabled purely because AMD needed to increase stock numbers of one part, rather than one core being slightly malformed in the manufacturing processes. But I digress…
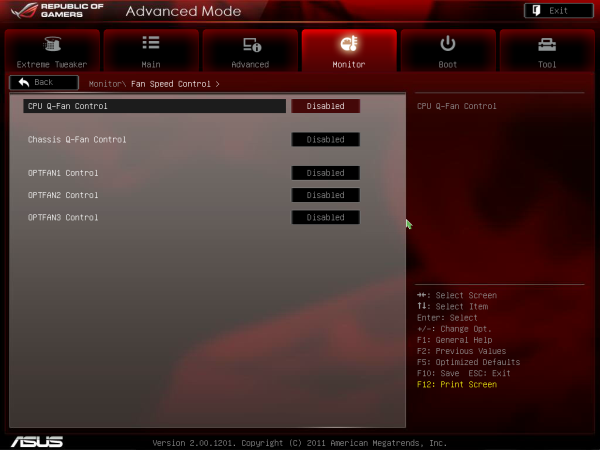
Fan controls on ASUS products are always top notch due to the more expensive but better fan controllers they use. For us in the BIOS, the CPU fans come under one setting of their own, the three chassis fans also have a single setting, but the option fans can be controlled individually as required.
Overclocking
I will level with you all – AMD overclocking on an ‘enthusiast’ level is not something I have done in a while. Fusion and Llano were low power and mainstream platforms respectively, and I was unprepared for AMD overclocking. However, after a crash course and some practice, I was able to overclock both a Thuban X6 1100T processor and the Bulldozer FX-8150 to reasonable levels with ease.
Thuban X6 1100T
The X6-1100T starts life as a 3.3 GHz component, resulting in a 16.5x multiplier at 200 MHz base frequency.
OC Button: Using ASUS’ onboard OC button, this applied a 10%/20 MHz base frequency overclock (16.5x @ 220 MHz = 3625 MHz) and raised the CPU voltage to 1.4 V. Memory likewise is increased – it was moved to the 1600 MHz strap, then as the base frequency was raised 10%, so did the memory, to 1760 MHz. The system was clever enough to also probe the XMP settings, giving sub timings at 1760 MHz at 9-11-9 sub timings. (This is despite the fact that the memory used is rated for 2133 9-11-9, meaning that 1760 9-11-9 should be a breeze.) This overclock was Blender stable, reaching 50ºC peak temperature.
AI Suite: Using the AI Suite software in the operating system, the Fast setting gave exactly the same as the OC button. The Extreme setting was a little more complex, giving the system a series of stress tests and raising the frequency until an error was encountered. There were a few downsides to this – while the system is fairly clever, it never adjusted the multiplier of the CPU, and when the system crashed it considered that the end and gave that overclock. As a result, we only got an overclock 1 MHz (0.5%) above what the fast setting had achieved, and this setting didn’t even apply an memory overclock, giving DDR3-1182 MHz. I was kind of disappointed by this.
Manual Overclock: Using the auto overclocks as a guide, I set my CPU voltage to 1.5 volts, the NB voltage to 1.15 volts, and the memory to 1.65 volts. Throughout the overclocking, I attempted to keep the NB Link frequency and HyperTransport frequency at their default levels by adjusting the straps.
My manual overclock attack has a three pronged approach:
a) Max base frequency. For this test, I reduce the multiplier down to a low level (x8), and then raise the base frequency until it is unstable. Then I raise the multiplier back up until the system is stable. Doing this, I managed 13x CPU multiplier at 320 MHz, giving 4160 MHz as a total overclock. This gave a load voltage of 1.56 volts due to automatic load line calibration, but only hit 57ºC maximum during a Blender stress test.
b) Default base frequency, high multiplier. This test is easy to understand – just keep upping the multiplier until the system is unstable. The issue with this is that AMD systems are unlike Sandy Bridge systems – rather there being a definite frequency the processor does or doesn’t work, there is a gradual decline. Nevertheless, I found that 20.5x multiplier at 200 MHz was the best I could do at 1.5 volts on the CPU, giving a CPU frequency of 4100 MHz.
c) Mix of base frequency and multiplier. For this test, I raise the base frequency until I am happy with the memory clock (as changing one changes the other), then raise the multiplier until it is stable. This is a little trickier to pin down, as there could be variations in stability across a range of frequencies. The best result which was fully Blender stable was with a 18.0x multiplier at 230 MHz, giving a total overclock of 4140 MHz.
Bulldozer FX-8150
The FX-8150 starts life as a 3.6 GHz component, rising to 3.9 GHz on heavy loads and 4.2 GHz on light loads. By default, this is a 18.0x multiplier at 200 MHz base frequency. Testing is as the Thuban core.
OC Button: Similar to the Thuban, using ASUS’ onboard OC button applied a 10%/20 MHz base frequency overclock (18.0x @ 220 MHz = 3960 MHz) and raised the CPU voltage to 1.4 V. However, this disabled the Turbo Core functionality, meaning that performance is actually decreased, especially in lightly threaded loads. Memory also received a 10% bump, to 1760 MHz at XMP sub timings. This overclock was Blender stable, reaching 57ºC peak temperature.
AI Suite: Using the AI Suite software in the operating system, again the Fast setting gave exactly the same as the OC button. With the Extreme setting, we got a little more in the system – the CPU/NB voltage was raised to 1.4 volts, but ended up with a stable 18.0x multiplier and 225 MHz base frequency, giving 4050 MHz total.
Manual Overclock: Using the auto overclocks as a guide, I set my CPU voltage to 1.5 volts, the NB voltage to 1.15 volts, and the memory to 1.65 volts, exactly the same as the Thuban setup. Again, throughout the overclocking, I attempted to keep the NB Link frequency and HyperTransport frequency at their default levels by adjusting the straps.
a) Max base frequency. For this test, I reduce the multiplier down to a low level (x8), and then raise the base frequency until it is unstable. Then I raise the multiplier back up until the system is stable. Doing this, I managed 14.5x CPU multiplier at 320 MHz, giving 4640 MHz as a total overclock. This gave a load voltage of 1.512 volts due to automatic load line calibration, and hit 77ºC maximum during a stress test.
b) Default base frequency, high multiplier. This test is easy to understand – just keep upping the multiplier until the system is unstable. Unfortunately, due to the nature of AMD systems, this was a very flawed approach. While the system often acted stable for a given multiplier, during the Blender stress test it would work fine initially then overheat and protection would kick in, causing the system to reboot. Bulldozer runs hot! From 23.0x multiplier down to 21.0x, it would keep restarting when it overheated.
c) Mix of base frequency and multiplier. For this test, I raise the base frequency until I am happy with the memory clock (as changing one changes the other), then raise the multiplier until it is stable. My attempt at 266 MHz (to give DDR3-2133) and 17x multiplier worked well, until about 12 minutes into the Blender test, where it would overheat. Consequently at lower multipliers, this would occur as well.
ASUS Crosshair V Formula In The Box
For a top of the range Republic of Gamers’ motherboard, we all want goodies in the box. With the Crosshair V Formula, we get plenty of SATA cables and SLI connectors to fit the bill.
IO Shield
Driver CD
User Guide
Six SATA cables (locking, right angled)
Tri-SLI bridge
SLI bridge
Crossfire Cable
Q-Connectors
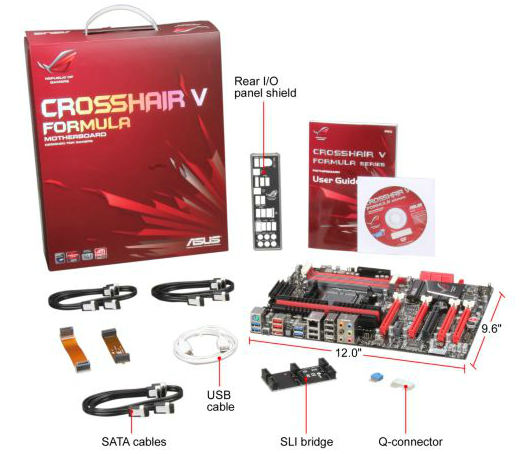
Image courtesy of Newegg
Board Features
| ASUS Crosshair V Formula (990FX) | |
| Price | Link to Newegg |
| Size | ATX |
| CPU Interface | AM3+ |
| CPU Support | AMD FX/Phenom II/Athlon II/Sempron 100 |
| Chipset | AMD 990FX |
| Base Clock Frequency | 200.7 MHz |
| Core Voltage | Auto, 0.675 V to 2.300 V |
| CPU Clock Multiplier | Auto, 4.0x to 39.5x |
| DRAM Voltage | Auto, 1.20 V to 2.90 V |
| DRAM Command Rate | Auto, 1T or 2T |
| Memory Slots |
Four DDR3 DIMM slots supporting up to 32 GB Up to Dual Channel Support for DDR3, 1066-2133 MHz, ECC or Non-ECC |
| Expansion Slots |
3 x PCIe Gen2 x16 (x16/x16 or x16/x8/x8) 1 x PCIe Gen2 x4 1 x PCIe Gen2 x1 1 x PCI |
| Onboard SATA/RAID |
6 x SATA 6 Gbps, Support for RAID 0, 1, 5, 10 1 x SATA 6 Gbps (ASMedia ASM1061) |
| Onboard |
7 x SATA 6 Gbps (6 Chipset, 1 Controller) 8 x Fan Headers 2 x USB 2.0 Headers 1 x USB 3.0 Headers 1 x S/PDIF Output Header 1 x Front Panel Header 8 x Measure Points 1 x Clear CMOS Header 1 x 4-pin Molex Connector Power/Reset Buttons OC / ROG Level Up Button 1 x Go Button |
| Onboard LAN | Intel 82583V |
| Onboard Audio | SupremeFX X-Fi 2 |
| Power Connectors |
1 x 24-pin ATX connector 1 x 8-pin 12V connector 1 x 4-pin 12V connector 1 x 4-pin Molex connector |
| Fan Headers |
2 x CPU Fan Headers (4-pin) 3 x CHA Fan Headers (4-pin) 3 x OPT Fan Headers (4-pin) |
| IO Panel |
1 x Keyboard/Mouse PS2 Port 1 x Clear CMOS Button 1 x Optical SPDIF Output 8 x USB 2.0 4 x USB 3.0 1 x eSATA 3 Gbps 1 x Gigabit Ethernet Audio Outputs |
| BIOS Version | 1003 |
| Warranty Period | 3 Years |
The ROG board is the only 990FX we are testing today to have an Intel network controller, a non-Realtek audio solution, and one of only two to support ECC memory according to the specifications.
Software
The bulk of ASUS’ software is always to be found in AI Suite, and in the land of ROG motherboards, we get a ROG specific skin. Also to hand is a ROG themed CPU-Z, in order to detect accurately the clock speed of the processor.
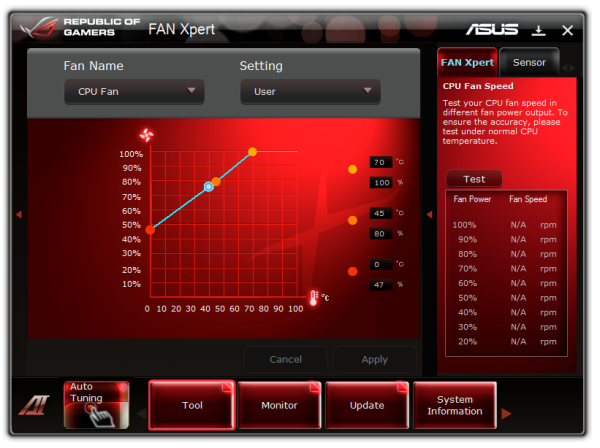
AI Suite II: As this software is now a few generations into the ASUS blood line, the effort from ASUS to have seamless integration and complete functionality is paramount. Needless to say, on the whole we are not disappointed. We have full control over the fans in the case through the Fan Xpert utility:
Overclocking through this utility is also part of the package. For users wanting a quick, permanent overclock, the Auto Tuning offers two modes labeled Fast and Extreme (see the overclocking section on the previous page to see the results of this on both Thuban and Bulldozer). For in operating system overclocking, users can proceed to the TurboV Evo section to select voltages, CPU ratios and base frequencies on the fly. These unfortunately are not permanent; however they do help overclockers find the limits of the system inside the OS so that when it comes to setting something stable in the BIOS, it is very easy to just plug in the correct values. I would like to see some options in TurboV Evo for ‘automatic’ voltages when applying overclocks (for those not wanting to touch voltage), and this idea has been planted into the ASUS hive mind as an option.
Stalwarts of the AI Suite are still available, such as DIGI+ VRM (primarily to give overclockers more headroom), EPU (energy saving), AI Charger+ (quick charging of Apple devices from specific USB ports), and ASUS update, which should make BIOS updating easier and simpler for a lot of users.
ROG CPU-Z: As mentioned, ASUS has collaborated with the makers of CPU-Z to get a ROG themed version, which allows users to verify their overclocks online, or check that the CPU or the memory is running as stated.
ASUS Sabertooth 990FX
In similar ilk to covering ASUS ROG boards last year, we also never touched upon the ASUS Sabertooth range. The Sabertooth range hits a very specific niche in their goals, and as such ASUS has dedicated designers and engineers working solely for the Sabertooth ranges. In a nutshell, Sabertooth boards are aimed to complete control, stability, temperatures, and all coupled in a five year warranty. The fan headers onboard have more control than other competitors', and there is also a set of specialized software to go along with it. The Sabertooth 990FX is thus ASUS’ answer for this niche in the 900-series.
Overview
As the major selling point of the ASUS Sabertooth range is the warranty and the features on the board that contribute to temperature. ASUS is playing to its strength in this area – the software provided with the system is fully featured to deal with any manner of fan settings and combination settings (i.e. pulling temperatures from different sensors on board) and all of this is completely configurable. The Fan Xpert software from ASUS is a joy to play with, and well constructed.
On the board itself, we are spoilt slightly for features, with extra SATA 6 Gbps from a JMicron JMB362 controller, six fan headers, and room enough for tri-card GPU setups. We are missing a set of on/off buttons on board (and two-digit debug LED), but this seems to be more a feature of the Sabertooth range in general.
Despite that attention to detail, at default the temperatures on board were a little warm, with some difficulty in overclocking the FX-8150 (Bulldozer) processor and keeping the temperatures in check. Performance wise, the Sabertooth 990FX was decently respectable with both Thuban and Bulldozer, however it does suffer at the hands of AI Suite a little during the DPC (Audio) Latency test due to the sensor sub-program. This situation is easily rectified by closing AI Suite however.
Being in the ~$180 range means that the Sabertooth is side by side with the MSI and Gigabyte boards in this roundup. On the whole, it does perform well and has a feature set which befits its price. However that warranty is hard to ignore when considering this price range, coupled with ASUS’ strong backing of software and support.
Visual Inspection
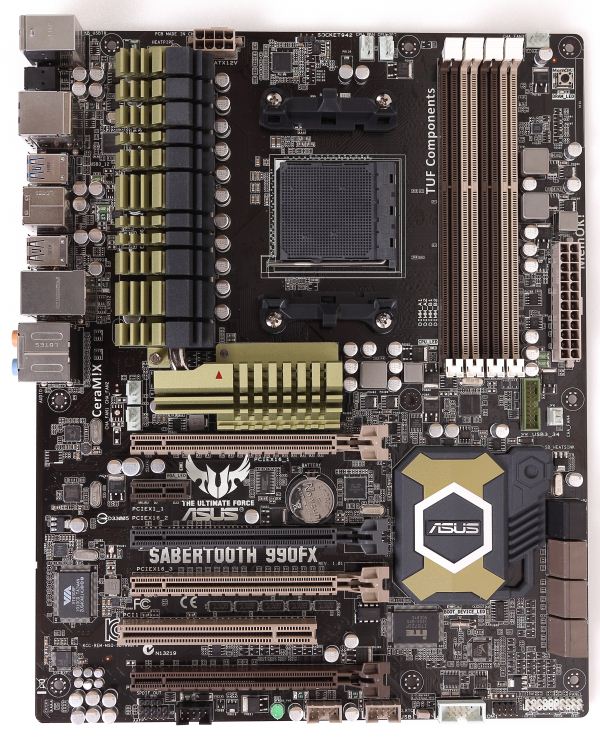
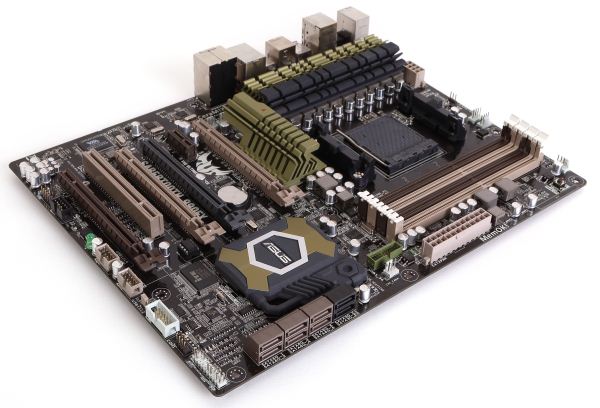
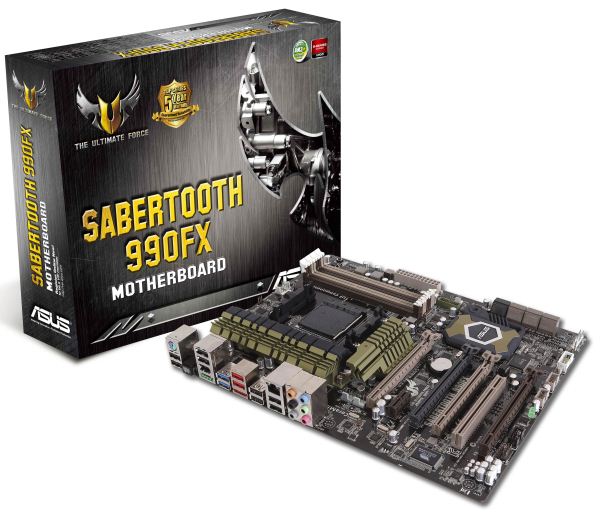
From the start, the board sports distinct military camouflage colors – shades of brown or grey that you might be able to take from an army desert uniform swatch catalogue. This is a lot different from other ASUS products, which helps to distinguish the Sabertooth as a brand.
The heatsinks are jagged affairs but feel fairly beefy in design. The heatsink covering the VRMs is linked to another below the socket by an enclosed heatpipe – this design covers what would typically be the area used by an initial PCIe x1 at the top of the PCIe section, but with good reason. The segment of this board and design is such that a top PCIe x1 isn’t an issue, even if the user would like to run tri-GPU with a x1 audio solution or similar.
If you want fan headers, then the Sabertooth has them. All six are within easy reach of the CPU socket – two 4-pin CPU headers above the socket itself, another 4-pin chassis fan header above the DIMM slots, two 4-pin chassis headers above the PCIe slots, and a 3-pin header below the 24-pin ATX power connector. As I will discuss later, all these 4-pin headers are completely controllable thanks to the fan controllers that ASUS use, with specialized software to help fine tune the speed of each fan as required.
Along the right hand side, at the top is the ASUS Mem-OK! Button, which allows the board to recover from failed memory overclocks that fail to get through the initial POST screen by setting defaults. Further down, below the 24-pin ATX connector is a USB 3.0 header. The position of this (and one of the 4-pin chassis headers) is a little odd – if the user has a very beefy GPU in the first slot which has a large (>4mm) back plate, it could possibly intrude into the USB header, making it rather annoying. I see a current trend to put USB 3.0 headers at right angles like the SATA ports, for dedicated USB 3.0 front panel support – perhaps this will occur on later models, depending on the design philosophy.
While the chipset heatsink does not look like it will remove a lot of heat (very few fins), it does look pretty substantial in terms of bulk. The SATA ports are beside this, with two SATA 3 Gbps from a JMicron JMB362 controller in black, and the six SATA 6 Gbps ports from the chipset below. The bottom of the board is standard – a trio of USB 2.0 headers, a COM port, front panel audio and front panel connectors.
For PCIe layout, we have a design that rather than maximize the number of GPUs available, tries to make sure that there is enough airflow. So from the top, we have an x16, x1, x4, x16, PCI, x8. This means that there is plenty of space for a trio of GPUs (the second x16 will reduce to x8 if a card is in the x8 slot) and an x4 card. But the common usage will be in dual GPU mode, which leaves a one slot gap between cards (unlike the Gigabyte board later).
The IO back panel is representative of a 9-series board at $185, though personally there could be score for improvement. We have a combination PS/2 port, eight USB 2.0 ports in black, two more USB 2.0 ports in red, two USB 3.0 ports in blue, an IEEE1394 port, a Power eSATA 3 Gbps port, a standard eSATA 3 Gbps, optical SPDIF output, Realtek 8111E gigabit Ethernet, and standard audio headers. Personally it could have been arranged a little nicer – it does look a bit of an up-and-down skyscraper landscape. There is space for another Ethernet port, and I have a feeling that Sabertooth users might be interested in another one.
ASUS Sabertooth 990FX BIOS
The ASUS BIOS is now firmly cemented in a motherboard reviewer's mind. That tactic of ‘easy organizational screen’ followed by ‘advanced mode’ has been integrated and copied by other manufacturers wanting to build on the success of the ASUS system. With the Sabertooth series, the focus of the product in terms of hardware and software is stability and the ability to manipulate everything to do with cooling. For the BIOS however, ASUS has decided to stick with what works best, and we get a similar system to their channel products to play around with.
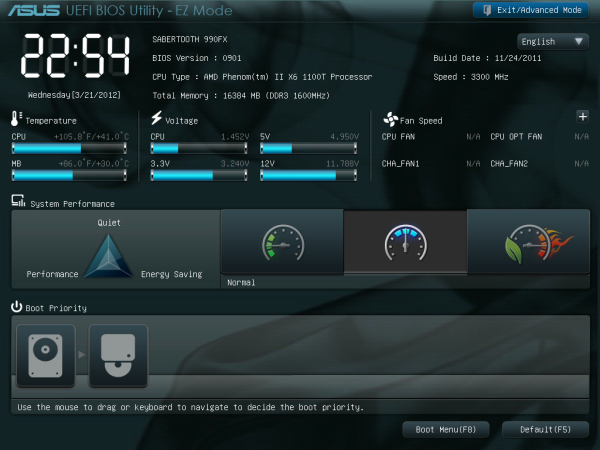
Easy mode comes with the information we want from a BIOS – the name of the motherboard, the processor (and speed of that processor), the memory (and the speed of the memory), temperatures, voltages and fan speeds. Users can use the ‘system performance’ presets in the EZ BIOS for low power consumption or a fast overclock, as well as manipulate the boot priority by dragging and dropping. To boot from a device, press F8 and a menu appears to select the appropriate device.
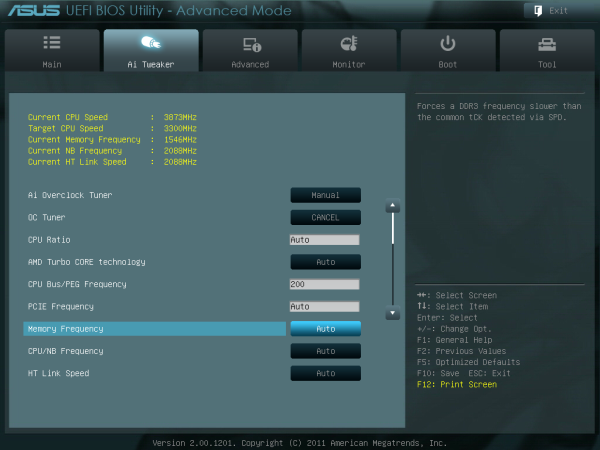
To manipulate the system in terms of CPU clocks, the advanced mode is the place to be. ASUS’ AI Tweaker has been a feature in their graphical BIOS implementations since the early Sandy Bridge concepts, and here it is utilized on their 990FX boards. Full control of the CPU frequency and multipliers are available, as well as Digi+ VRM settings and memory. The only confusing part for me was the selection of the OC Tuner, ASUS’ automatic overclocking option. In previous iterations I have used, a menu comes up with Yes/No selection. In this instance, if a user selects it, it causes an automatic reboot and implements the OC Tuner.
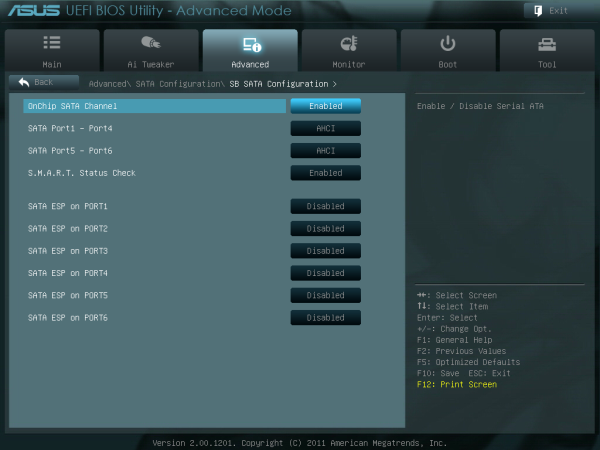
SATA controls are also a little different – rather than being directly underneath the South Bridge controls, they are in their own little subsection of the SATA controls. By default, ASUS bucks the trend by implementing AHCI as standard (compared to other vendors on 990FX who have IDE as standard).
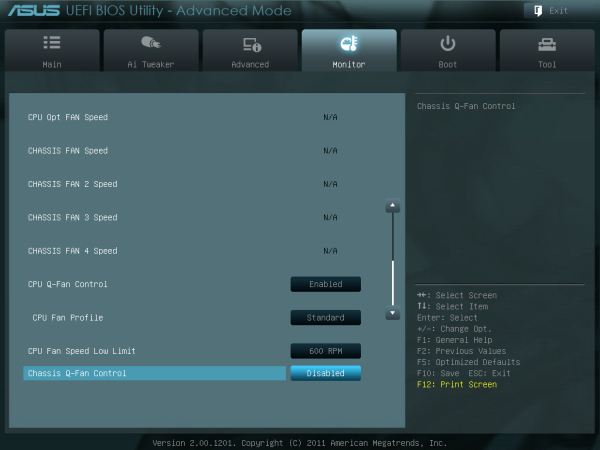
Fan controls for the BIOS are disappointingly limited; the chassis controls are all grouped under one selection. This is due to the strength of the operating system software, which provides a much more detailed selection of options for the user. I would like to see in the future the functionality of the OS software implemented into the BIOS at some stage, however if that was the case then we may come up against the 8 MB size limitations of the BIOS system.
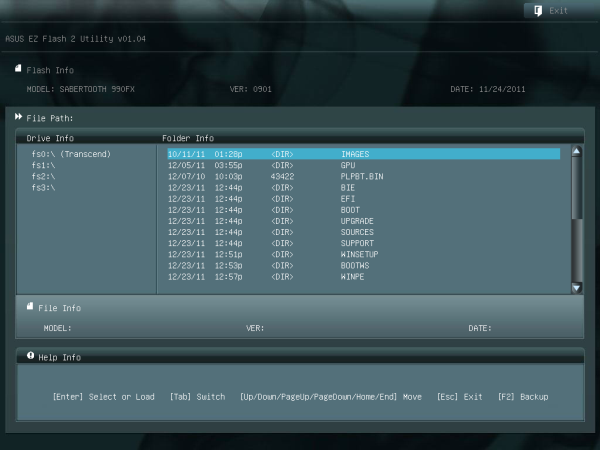
Flashing the BIOS requires using the EZ Flash sub-software (in the BIOS). Just put the file on a USB stick and put it in a non-USB 3.0 slot (I suggest non-USB 3.0, just for compatibility) and select it in EZ Flash.
Overclocking
Overclocking performance on the Sabertooth 990FX experienced distinct extremes. On the one hand the Thuban X6-1100T processor gave respectable overclocks for our voltage limitations, however attempting to overclock the Bulldozer FX-8150 came up against a pretty solid brick wall quite a lot of the time.
Options for overclocking come in the form of OC Tuner, ASUS’ auto overclocking software, or a manual overclock. The best way to perform the manual overclock was to attempt speeds in the OS with the TurboV software (part of ASUS’ AI Suite), and then attempt them permanently in the BIOS. As always with these AMD processors, users should be careful regarding NB Link (Northbridge) and HT Link (HyperTransport) speeds which could increase with base frequency (FSB) increases.
Overclock recovery on the Sabertooth 990FX was not as sleek as other ASUS products – while a bad overclock was caught the majority of the time, infrequently the system would refuse to catch it. A hard reset was required to catch the overclock, at which the settings could be retrieved.
Each overclock is tested for stability and temperature by a full run of PovRay and Blender, two 3D image generators that utilize both the CPU and memory. Our methodology is as follows:
1) Auto Overclock
2a) Manual Overclock, High FSB (Tune to a high FSB, then raise multiplier)
2b) Manual Overclock, Stock FSB, High Multiplier
2c) Manual Overclock, Combination
Thuban X6-1100T Overclock
1) Auto Overclock: With the OC Tuner located in the BIOS, the system increased the base frequency from 200.7 MHz to 232.77 MHz, leaving the multiplier at 16.5x, giving a total increase in speed from 3.3 GHz to 3.84 GHz, more than a 16% overclock. This in turn boosted the memory a similar amount (default 1333 MHz to 1550 MHz).
For the Manual Overclock settings, the CPU voltage was set to 1.5 volts, the memory to 1.65 volts, and the NB/HT Links kept as near to 2000 MHz as possible. As this is an ASUS board, we also placed all the Digi+ VRM settings to their extreme to maximize the available overclock.
2a) Manual Overclock, High FSB: The Sabertooth does well in the high FSB test, however at 340 MHz and 330 MHz, while the system reached the operating system, gave a blue screen under high load (suggesting more voltage needed). However at our voltage limit, an overclock of 325 MHz was stable with a multiplier of 12.5x, giving a total speed of 4062 MHz. This gave 1.512 volts at full load, reaching 58°C under PovRay and 57°C with Blender.
2b) Manual Overclock, High Multiplier: Luckily, multiplier testing is straightforward. We were able to reach 20.5x multiplier at 200 MHz, giving a total CPU speed of 4100 MHz. However at this setting, the CPU voltage rose to 1.560 volts under load, but this only gave 57°C under both PovRay and Blender.
2c) Combination Overclock: In order to keep the memory straps nice and usable, the aim is to get the best overclock under 233 MHz or 280 MHz. At 280 MHz, the system was not being nice, even at 4060 MHz. With 233 MHz, the system was limited to the 17x multiplier, giving 3961 MHz, worse than both the high FSB test and the high multiplier test. At this setting, the system gave 1.560 volts to the CPU under load, and reached 57°C with PovRay (56°C with Blender).
Bulldozer FX-8150 Overclock
1) Auto Overclock: Using the OC Tuner setting in the BIOS, the motherboard gave the processor a bump in the base frequency from 200.7 MHz to 230.78 MHz, resulting in a 15 % overclock (4154 MHz total), just above the basic Turbo boost for single core operation. The memory received a similar boost, jumping from 1333 MHz on Auto to 1532 MHz.
For the Manual Overclock settings, the CPU voltage was set to 1.5 volts, the memory to 1.65 volts, and the NB/HT Links kept as near to 2000 MHz as possible. As this is an ASUS board, we also placed all the Digi+ VRM settings to their extreme to maximize the available overclock.
2a) Manual Overclocking, High FSB: Starting at 340 MHz, the level at which the X6 1100T processor was able to boot into the operating system, unfortunately this was a no-go. Dialing back the base frequency to 330 MHz gave a successful load into the operating system, however at multipliers which I know this processor works (14.5x for 4785 MHz and 14.0x for 4620 MHz), the system would rise above 90°C during the PovRay/Blender stress tests. At this temperature (either CPU or VRM), even with ASUS’ raised Digi+ VRM options, the system would declock to 3600 MHz, its base multiplier.
2b) Manual Overclocking, High Multiplier: With the high multiplier settings, the CPU temperature limit was also hit early on, showcasing 90°C+ at the 22x multiplier. This means that to get anywhere with this CPU on this board, more substantial cooling is needed than the AMD All-In-One Liquid cooler which was used as the standard cooler in these tests. As a result, 2c) was not performed.
ASUS Sabertooth 990FX In The Box
In comparison to the Crosshair V Formula, the Sabertooth does not come with as many goodies in the box. This may be indicative of the price difference (~$45 cheaper for the Sabertooth), and that part of the price of the Sabertooth is due to that five year warranty. In the box, we receive what I would deem the bare minimum for a product of this price:
IO Shield
Driver CD
User Guide
Four SATA Cables (Locking, right angled at one end)
Flexible SLI bridge
ASUS Q-Connector
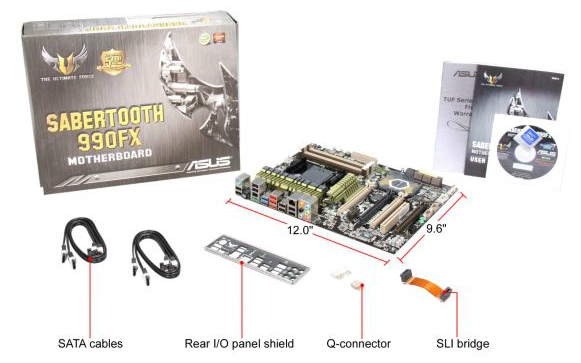
Image Courtesy of Newegg
Board Features
| ASUS Sabertooth 990FX | |
| Price | Link to Newegg |
| Size | ATX |
| CPU Interface | AM3+ |
| CPU Support | AMD FX/Phenom II/Athlon II/Sempron 100 |
| Chipset | AMD 990FX |
| Base Clock Frequency | 200.66 MHz |
| Core Voltage | Auto, 0.675 V to 2.075 V |
| CPU Clock Multiplier | Auto, 4x to 35x |
| DRAM Voltage | Auto, 1.2 V to 2.5 V |
| DRAM Command Rate | Auto, 1T or 2T |
| Memory Slots |
Four DDR3 DIMM slots supporting up to 32 GB Up to Dual Channel Support for DDR3, 1066-1866 MHz, ECC or Non-ECC |
| Expansion Slots |
3 x PCIe Gen2 x16 (x16/x16 or x16/x8/x8) 1 x PCIe Gen2 x4 1 x PCIe Gen2 x1 1 x PCI |
| Onboard SATA/RAID |
6 x SATA 6 Gbps, Support for RAID 0, 1, 5, 10 2 x SATA 3 Gbps (JMicron JMB362) 1 x Power eSATA 3 Gbps 1 x eSATA 3 Gbps |
| Onboard |
6 x SATA 6 Gbps (Chipset) 2 x SATA 3 Gbps (JMicron JMB362) 6 x Fan Headers 2 x USB 2.0 Headers 1 x USB 3.0 Headers 1 x S/PDIF Output Header 1 x Front Panel Header 1 x COM Port Header 1 x Clear CMOS Header 1 x IEEE1394 Header 1 x MemOK! Button |
| Onboard LAN | Realtek 8111E |
| Onboard Audio | Realtek ALC892 |
| Power Connectors |
1 x 24-pin ATX connector 1 x 8-pin 12V connector |
| Fan Headers |
1 x CPU Fan Header (4-pin) 4 x CHA Fan Headers (one 4-pin, three 3-pin) 1 x OPT Fan Headers (4-pin) |
| IO Panel |
1 x Keyboard/Mouse PS2 Port 1 x Power eSATA 3 Gbps 1 x eSATA 3 Gbps 1 x IEEE1394 Port 1 x Gigabit Ethernet 2 x USB 3.0 10 x USB 2.0 1 x Optical SPDIF Output Audio Outputs |
| BIOS Version | 0901 |
| Warranty Period | 5 Years |
Instead of bleating continuously about that five year warranty, on the board we have a set of six fan connectors, and the SATA ports are bolstered by a SATA 6 Gbps controller in the form of the rarely seen JMicron JMB362. Lacking on the Sabertooth products are the Power/Reset buttons and two-digit debug LED which is unfortunate, plus there is extra space on the back panel for perhaps an extra network controller. The board uses also a Realtek NIC/Audio combination.
Software
ASUS Software revolves around its AI Suite package. This attempts to bring together all the features of the product into one interface, which for the most part is simple enough to use. One downside of the AI Suite software is on the DPC Latency, our audio test. This test performs a deferred procedure call and times how long it takes the system to process it – these calls are queued based on priority. The DP calls done by AI Suite as part of its sensor software have higher priority than audio, thus causing the DPC Latency to increase from ~200 microseconds (sub-500 is a good result), to over 2000 microseconds. Ideally this means that if you are expecting to record audio with an ASUS system, AI Suite should be switched off. I should note that other manufacturers are victims of this also – any vendor that includes sensor software as part of its package and by default causes it to boot with the operating system is liable to these spikes in performance for the DPC Latency test.
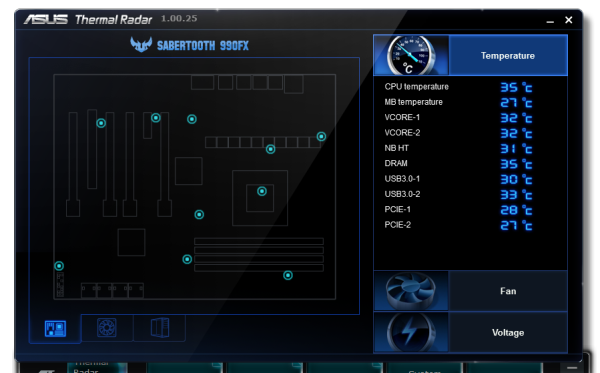
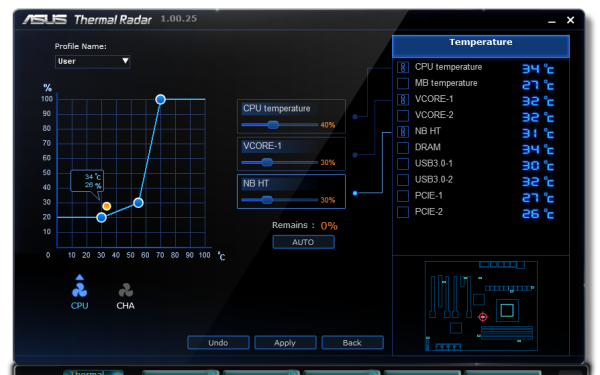
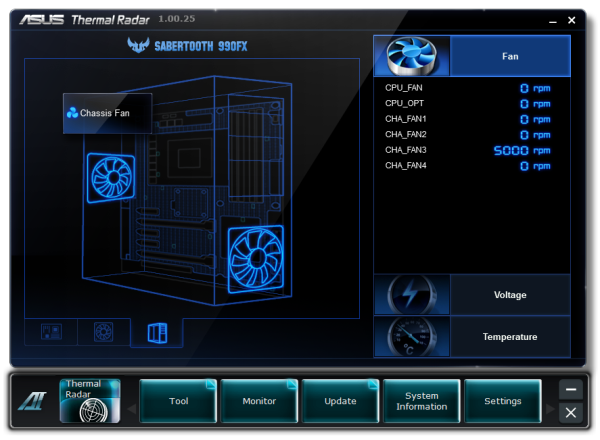
With that being said, AI Suite is good at what it does. As this is a Sabertooth product, we get Sabertooth specific features. Instead of the AI Tuner we normally get on an ASUS product, this is replaced by the Thermal Radar:
This integrated fan technology allows the user to associate fans connected on the board to certain temperature sensors. So a chassis fan at the back of the case directed air in or out can be connected to the CPU and VRM sensors (at a ratio determined by the user), and have its speed adjust appropriately using a customized multi-ramp speed profile. If you wanted customizability with your fans, ASUS has got it with their Sabertooth product.
Elsewhere on the AI Suite software is the TurboV Evo option, allowing the user to apply temporary overclocks until the system is restarted, and Digi+ VRM, giving the user control over the limitations of the power delivery on board (applicable to overclocked systems). AI Charger as part of the AI Suite gives extra current to a particular header on the motherboard, allowing it to charge your Apple device (iPod, iPhone or iPad) at a faster rate. Users can also update the BIOS through the AI Suite software.
Gigabyte 990FXA-UD5
In the land of Gigabyte marketing, we have market segregation. The UD3/4 and below are considered primarily low end with a large dollop of mainstream at the UD3 level, and anything bearing the name UD5 or UD7+ is where their enthusiast section lies. Gamers have the G series, consisting of models named Sniper and Assassin, depending on your needs. Gigabyte also like to come out with one-off products, such as the X58A-OC, a board dedicated for extreme overclocking at sub-zero temperatures, or when pairing Sandy Bridge boards with onboard SSDs to take advantage of caching.
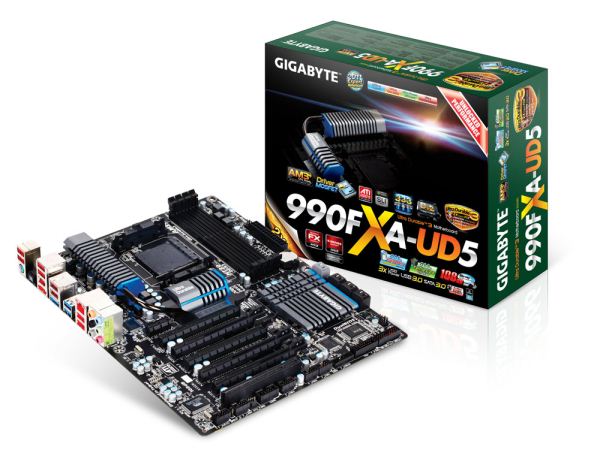
The board we have here representing the 900-series is the 990FXA-UD5, so we are talking for the most part here about the enthusiast end of the market that comes in at a steady price of $180, below both the MSI and the ASUS Sabertooth counterparts. But does it measure up?
Overview
When it comes to selecting an appropriate 990FX board for your AMD processor, a Gigabyte model is going to appear somewhere. At around the $180, the 990FXA-UD5 does come as an option filling a lot of requirements – plenty of PCIe functionality with some extra SATA ports. You miss out on a little bit though, with only basic Realtek Audio/NIC functionality, and the box of goodies is not particularly numerate. The PCIe layout could be a little improved, as to use dual video cards at maximum bandwidth leaves no gap between the GPUs. I would have liked to see power/reset buttons on the board with a debug LED just for testing purposes.
We still have access to the old-school way of presenting a BIOS in blue and white, but this lends itself easily to overclocking the system. There were some minor issues with reading the voltages on Bulldozer processors, resulting in some not-so-stellar overclocks which caused the VRMs to get hot. One of the main issues with the motherboard that may irritate some users is the temperature of the VRMs, which gets obscenely high at serious loads and overclocks. It may have been an idea to beef up the heatsinks or add active cooling in this regard.
Fan controls are not the best in the world as well, but overall the board was easy enough to use. Looking at the notes I wrote while testing the board, the fact that my fan was essentially stopped while at idle is good, but on this revision of the board the CPU voltage ripple under load was of concern. Audio users will want to close EasyTune6, as it causes spikes in DPC Latency which could filter through to the audio.
Visual Inspection
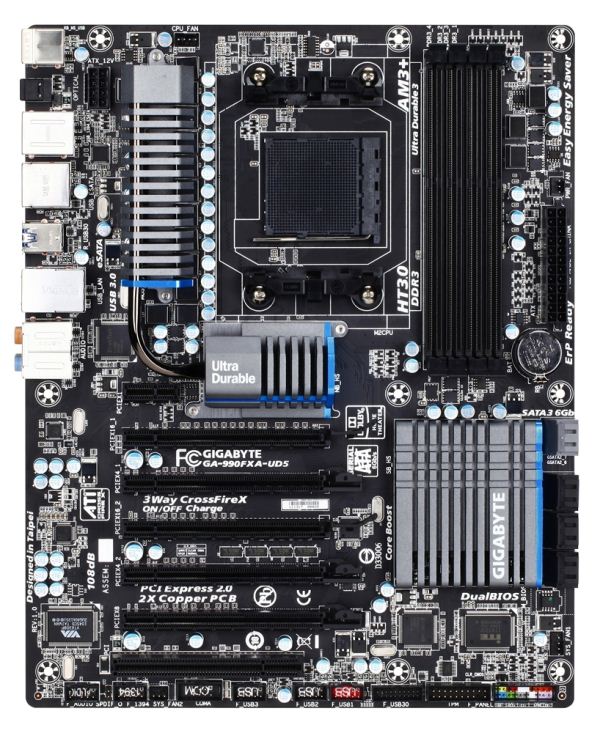
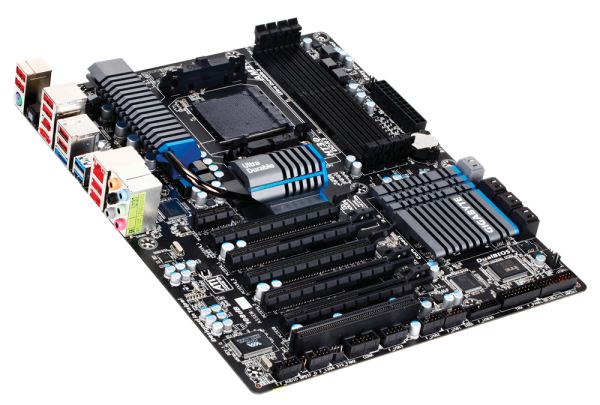
The Gigabyte 990FXA-UD5 does not immediately jump out in terms of looks. The board sports the Gigabyte higher end black PCB and slots, and is combined with silver heatsinks that feel relatively substantial. With the AM3/AM3+ socket being the size that it is, there should not be any trouble installing substantial CPU coolers, though as with previous Gigabyte models, the DRAM slots seem to be further in from the edge of the board compared to other companies designs. This should not have much effect on the overall usage of the board.
Gigabyte has fitted the board with only four fan headers, with the 4-pin CPU fan header located at the top left of the socket. The nearest header to this is the PWR 3-pin on the right side of the board above the 24-pin ATX connector – this is potentially frustrating for users of water cooling who would like to equip two fans to their radiator in a standard location. The other headers are located on the bottom of the board – a 4-pin SYS header is below the SATA ports, and a 3-pin SYS header is in the bottom left below the PCIe slots.
For the heatsink design, the Gigabyte board uses a substantial sized heatsink for the VRMs, which is connected via a heatpipe to another cooler below the socket. The chipset cooler in the bottom right is fairly big and flat, attempting to provide a balance of mass, surface area and cooling efficiency (not to mention advertising space). Below the 24-pin ATX header is the battery, which is a little deviation from almost every other board out there – normally we see it between the PCIe slots, but as there are a lot of full length PCIe slots on the UD5, it makes sense to put the battery out of harm's way.
SATA layout starts with a Marvell 88SE9172 controller offering two SATA 6 Gbps ports (support for RAID 0, 1) in grey, followed by the six SATA 6 Gbps ports from the PCH (support for RAID 0, 1, 5, 10). The Gigabyte board has more SATA 6 Gbps ports (non-eSATA) than any other product tested in this review.
Continuing around the board, below the chipset heatsink we find an EtronTech controller for the onboard USB 3.0 header, next to the Gigabyte standard Trusted Platform Module (TPM) header. I have mentioned in previous reviews that Gigabyte like including this feature of the chipset as it incurs no extra cost and they apparently have enough of a user base who uses the feature. I was told by another manufacturer that a feature is typically included in the board design if around 25% of users would use it, so it would be interesting to hear from Gigabyte regarding take up numbers.
Further along the bottom of the board are the standard array of USB 2.0 headers, a COM header, an IEEE1394 header and front panel audio. Unfortunately, there are no signs of onboard power or reset buttons, or a Clear CMOS button even on the back panel.
It may seem odd to find the front panel audio at the bottom left of the board, when typically the front of the system is on the right – this is due to the audio subsystem being located primarily in the back panel. This Gigabyte board sports a Realtek ALC889 audio solution which is focused to the back panel and then routed to a header. If they were to route to the front of the board and still keep audio quality high, it would need another layer in the PCB (if not two) and would incur extra costs to the consumer.
For PCIe layout we have a single PCIe x1 at the top, but this is blocked for long PCIe x1 cards due to the heatsink. The full length slots underneath are labeled x16, x4, x16, x4, x8, x4, PCI – this layout raises a few issues and questions. For two GPUs to fully utilize x16/x16, they are placed in full slots in position 2 and 4 of the layout – if the GPUs are double slot wide, then this will cause the top GPU to be restricted to the air flow. The third GPU then goes in to position 6 – what would make more sense is to have the second x16 slot in position 6, giving both GPUs room to breathe. I should also mention that when three GPUs are used, the second x16 reduces to an x8.

The back panel is typical of a board at this range. We have eight USB 2.0 ports in red, two USB 3.0 ports in blue, a combination PS/2 port for mice and keyboards, an optical S/PDIF output, IEEE1394 output, one eSATA 3 Gbps in red, one eSATA 3 Gbps in blue, a Realtek 8111E gigabit Ethernet port, and standard audio jacks.
Gigabyte 990FXA-UD5 BIOS
With the advent of all singing and all dancing graphical BIOS interfaces and UEFI implementations, Gigabyte was slow off the mark. Their first iterations were observed in X79 - so while their main competitors were enjoying the highlife since P67 and Sandy Bridge, Gigabyte was always playing catch-up. This is, as a result, also seen on their 9-series motherboards, as we have nothing more to look at than a very simple Award software implementation.
Nevertheless, this suggests that this system should be stable and rock solid, given that Gigabyte has been using it a long while and that the 9-series AMD boards are just a step up from the 8-series. Whilst navigating the BIOS, it is indeed stable and I found few issues in using it. The primary downsides however are a distinct lack of options and functionality, to which I will go into detail. But first, I would like to consider CPU voltage.
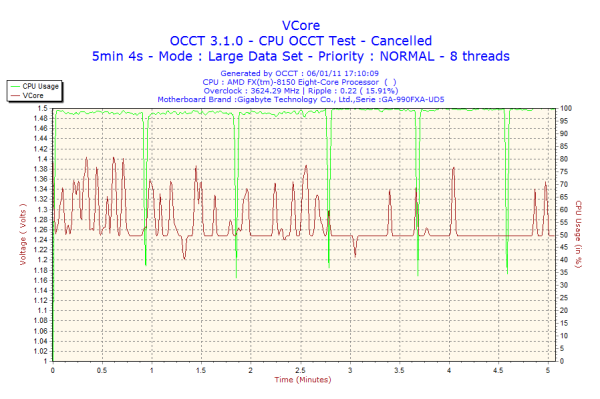
The whole backbone of a system is the power plane – the part of the motherboard that distributes the power to where it is needed and gets everything going. Using a series of FETs and other utilities, the board has to deliver a clean source of power to ensure stability of its components, and thus also the longevity. In this instance, the CPU is an excellent component requiring stable voltages to run at required speeds. Load Line Calibration is a feature on motherboards that reduces voltage drop across the processor at high loads, and to ensure that the processor has enough voltage to cope with the extra requirements. All this boils down to one issue I saw whilst running a five minute OCCT – OCCT measures the voltage of the system during its stress test, and then outputs into a graph:
The green line shows CPU usage whilst using an FX-8150 Bulldozer processor, which is essentially 100% all the time. The red line indicates the voltage, which as shown on the graph, can vary between 1.2 volts and 1.4 volts, rippling around the 1.25 volt base line. Naturally, this is not good for stability (~16% ripple) during high load scenarios. Unfortunately I have here the 1.0 revision of this board – there has since been a minor revision (1.1 and 1.2) which changes little on the board functionality wise, but improves this ripple. This would point the finger at a fundamental design change with the power placement or its management, so it might be worth a user checking your board revision if there are issues at high load. After this review, where possible, CPU voltage ripple testing will become a more prominent feature in our AnandTech testing.
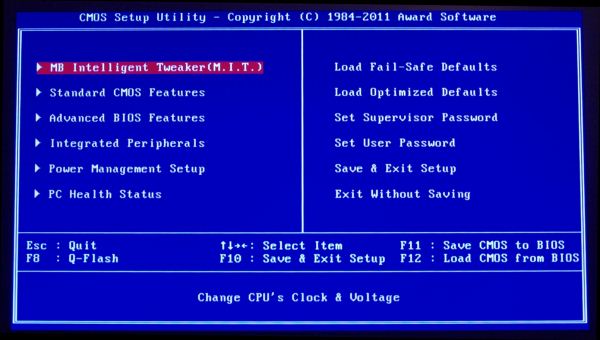
As for the actual BIOS interface which users can see and manipulate, welcome back to the era of blue screens and white writing:
The limitations of this system stem from the base on which it is built – these types of BIOSes are limited in terms of applicability and features. Almost everything comes under the three important headers – MB Intelligent Tweaker, Advanced BIOS Features and Integrated Peripherals, where options are bunched together.
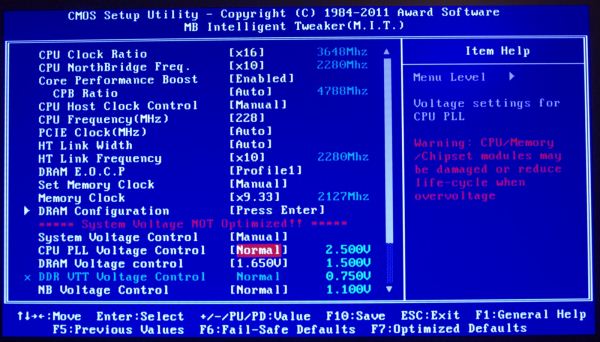
The image above shows one of my tweaked overclock setups, where we have access to the entire main overclock features for the motherboard. I actually found this easy to use and adjust all the options, although it is worth noting that for the voltages, the +/- buttons were configured the wrong way – pressing + would cause it to raise up one option, which then translated into a negative change in voltage. Also, in an effort to support XMP on AMD boards, we have EOCP which allows users to select memory profiles, but it may adjust the CPU multiplier/frequency to achieve that result.
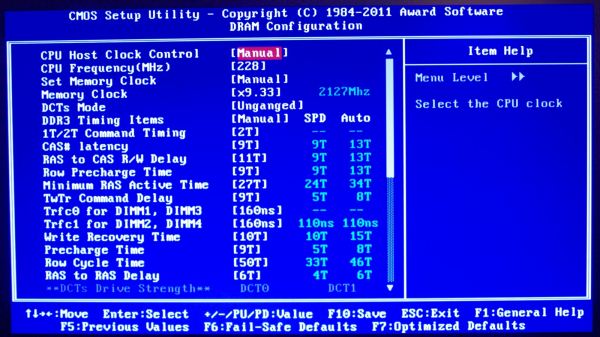
Memory overclocking works right if you have a set of memory with good JEDEC values installed – selecting the memory clock will apply the appropriate divider and sub-timings when they are on auto. When they are not on auto, it gets a little tricky. Rather than have each sub timing as a separate auto switch, it is either all auto or not all auto. This means that if a user wants to change one sub timing, they have to make sure they know all the rest as well in order to ensure stability. Unfortunately, the fine details of all the sub timings are not often made to consumers.
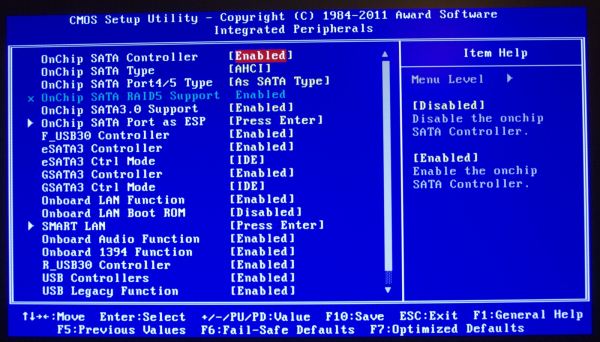
As we are on the 990FX platform, by default, the SATA type for the ports is listed as IDE. Users of SSDs and modern HDDs may wish to switch this to AHCI to get the best benefits from their products.
Overclocking
Similar to the previous reviews, I am testing both a hex-core X6-1100T (Thuban) and octo-‘core’ FX-8150 (Bulldozer) in three overclocked scenarios of highest bus frequency, standard bus frequency but high multiplier, and then a mix of the two. Auto overclock settings were also tested.
Thuban X6-1100T Overclocking
For automatic overclocking, the only options here are to utilize Gigabyte’s software in the OS – EasyTune6. Normally, and as seen on the Bulldozer processor, the software offers three levels of overclock with pre-defined settings. There was no such luck with the Thuban processor, meaning the only option available was an ‘Easy Boost’ setting. When clicked, this option is supposed to stress test the system while increasing the overall frequency of the system. In reality, I did see it stressed the system that much, and slowly raised the base frequency by 1 MHz per minute. This led to a slow overclock scenario! Twice in a row, the software crashed after 4 MHz, closing the EasyTune software. On the third attempt, I got a little further – when the base frequency has been raised to ~15MHz, the system increases the multiplier by 0.5x, then starts again at 200 MHz base frequency. In the end, the application crashed again at 17.5x and 212 MHz, giving 3710 MHz. This is a long and arduous way to achieve an overclock for just clicking an ‘auto’ setting, and pales in comparison to other comparative systems that dynamically determine decent overclocks on a system.
In terms of manual overclocking, there is a small hitch with the Gigabyte board. The voltage for the CPU is given as an offset, and thus we cannot set it at an exact value similar to our other testing. Thus it was set to the nearest available value (~1.4 volts) to provide comparison. When this was adjusted in EasyTune6 in the OS (either voltage or base frequency), the OS would blue screen, meaning tweaking via the OS on Thuban processors is not appropriate with the CD version of ET6. Also, for all the overclocks, the HyperTransport Link and Northbridge Link frequencies were adjusted via their multipliers to remain approximately 2000 MHz.
a) High Base Frequency: To start, as with the other boards, the CPU multiplier was lowered to 10x, and the base frequency risen until it was unstable then backed a little bit, then the multiplier was risen back up. In this case, I was able to hit 325 MHz base frequency, but this was not stable when running a Blender stress test. I had to back the base frequency back to 310 MHz to get a stable running system. At this frequency, the automatic memory sub timings were reported to be quite odd, at DDR3-1650 11-11-11-15. This last number should have been around 31, making it oddly tight. Nevertheless, at 310 MHz, the multiplier was raised back up to the maximum stable – this was at 13x, giving a total frequency of 4030 MHz. At this speed, the system was Blender stable, hitting 53ºC under full CPU load.
b) Default Frequency, Maximum Multiplier: This test, whilst reminiscent of most Sandy Bridge testing, it the easiest to perform. The system was stable up to and including the 20x multiplier, giving an overall speed of 4000 MHz. At this frequency, the CPU reported 1.456 volts at full load, and reached 53ºC maximum during the Blender stress test.
c) Combination: The best way to tackle a combination overclock is to go for a base frequency which aids your memory the most. So when running 2133 MHz memory for example, choose a memory strap and base frequency which goes for 2133 MHz easily. In this case, I went for 266 MHz base frequency, and adjusted the multiplier until it was stable. This only led to a 15x multiplier, giving 3990 MHz on the CPU (2130 MHz NB/HT). This also registered 1.456 volts at full load and 53ºC during the Blender stress test.
Bulldozer FX-8150 Overclocking
I almost became a cropper when it came to tackling the FX-8150. Normally when you replace a CPU in a motherboard, the motherboard detects it is a new CPU and sets the BIOS to default automatically. However on the 990FXA-UD5 this did not happen – it kept all my X6-1100T settings and then applied them to the FX-8150. This could have been a disaster; however I was quick to act in setting the BIOS to default before anything happened. I am surprised at this action, and am told it happens across the 990FX range. I will test on the next boards to see what happens.
Also of note is that even the F7h version of this BIOS has issues with Bulldozer processors, in terms of CPU voltages. While I was able to apply an offset to the CPU voltage, in the operating system I got a completely different set of values. CPU-Z (my normal voltage monitoring tool) was saying that although I had 1.4V set in the BIOS, only 1.28 volts were being applied in the OS. This is also different to EasyTune6’s reading. Thus for these overclocks, I had to use my own judgment when it came to applying the appropriate voltage.
For automatic overclocking, EasyTune6 actually gives a series of buttons for easy overclocks, rather than the slow system we encountered with the X6-1100T. The options are 4.0 GHz, 4.1 GHz and 4.2 GHz. These are not stellar overclocks by any means – 4.2 GHz is the turbo speed of this processor when under light loads. But 4.2 GHz all the time is not to be ignored, and EasyTune6 applied it (with a restart) without any hassle. Also of note is that with the Bulldozer processor, the ratio and base frequency can be adjusted without the computer crashing on every change (unlike the X6-1100T).
a) High Base Frequency: Given the disparity in the CPU voltage readings, we should not expect much from any of our overclocking results. With the base frequency testing, this was shown in the fact that at our ‘1.4 V’ BIOS setting, we could only hit 285 MHz with any degree of stability (tested with both Blender and PovRay). Upping the multiplier gave 285 MHz at 15x multiplier, which is 4275 MHz for a total overclock – barely above the automatic overclocking. While this led to a 63ºC CPU temperature under load in Blender, the VRM heatsinks were noticeably hot to the touch, allowing only several seconds before I had to remove a finger. Users should consider some good VRM cooling when utilizing this board.
b) Default Base Frequency, High Multiplier: Many issues were encountered in this testing. At the higher frequencies and under load, the system would trigger a clock back of the CPU multiplier to 16.5x (3.3 GHz) in order not to overheat the VRMs. As such, even at the 22x multiplier, while the CPU was approximately 65ºC during the PovRay benchmark, the CPU would fluctuate between 4.4 GHz and 3.3 GHz. This does not bode well for users inside a case and Turbo modes.
c) Combination: Using a 250 MHz base frequency, I was pushing the memory to DDR3-2000 speeds, and upping the multiplier to achieve something of a decent overclock. The highest multiplier on which success was had was 16.5x, meaning a total CPU clock of 4125 MHz. This gave a respectable 59ºC during Blender, meaning no throttling.
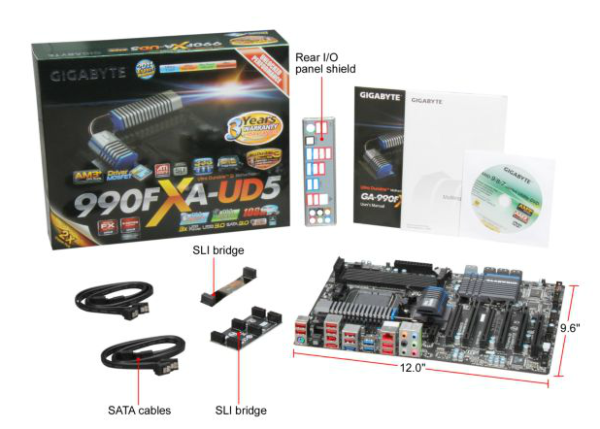
Gigabyte 990FXA-UD5 In The Box
Gigabyte packages of late have often been criticized for being bleak and uninteresting. This is typically because Gigabyte employ the model of trying to hit the price point for as cheaply as possible – the extra kit in the box costs, and if Gigabyte can hit a channel board in the next price bracket down, they feel it is beneficial to the consumer. With that being said, this bundle has:
Driver CD
User’s Manual
IO Shield
4 x locking SATA cables
3-way fixed SLI bridge
A long non-fixed SLI bridge
Image Courtesy of Newegg
Board Features
| Gigabyte 990FXA-UD5 | |
| Price | Link to Newegg |
| Size | ATX |
| CPU Interface | AM3+ |
| CPU Support | AMD FX/Phenom II/Athlon II |
| Chipset | AMD 990FX |
| Base Clock Frequency | Auto, 200 MHz to 500 Mhz |
| Core Voltage | Normal, -600 mV to +600 mV |
| CPU Clock Multiplier | Auto, x7 to x35 |
| DRAM Voltage | Normal, 1.025 V to 2.135 V |
| DRAM Command Rate | Auto, 1T or 2T |
| Memory Slots |
Four DDR3 DIMM slots supporting up to 32 GB Up to Dual Channel Support for DDR3, 1066-2000 MHz, |
| Expansion Slots |
3 x PCIe Gen2 x16 (x16/x16 or x16/x8/x8) 2 x PCIe Gen2 x4 1 x PCIe Gen2 x1 1 x PCI |
| Onboard SATA/RAID |
6 x SATA 6 Gbps, Support for RAID 0, 1, 5, 10 2 x SATA 6 Gbps, Support for RAID 0, 1 (Marvell 88SE9172) 2 x eSATA 6 Gbps |
| Onboard |
8 x SATA 6 Gbps (6 SB950, 2 Controller) 4 x Fan Headers 1 x Front Panel Header 1 x S/PDIF Output Header 3 x USB 2.0 Headers 1 x USB 3.0 Headers 1 x IEEE1394 Header 1 x Serial Port Header 1 x Clear CMOS Header 1 x TPM Header |
| Onboard LAN | Realtek 8111E |
| Onboard Audio | Realtek ALC889 |
| Power Connectors |
1 x 24-pin ATX connector 1 x 8-pin 12V connector |
| Fan Headers |
1 x CPU Fan Header 2 x SYS Fan Headers 1 x PWR Fan Headers |
| IO Panel |
1 x Keyboard/Mouse PS2 Port 1 x Optical SPDIF Output 2 x eSATA 3 Gbps 1 x Gigabit Ethernet 2 x USB 3.0 8 x USB 2.0 Audio Outputs |
| BIOS Version | F7h |
| Warranty Period | 3 Years |
To keep costs down Gigabyte has gone with a Realtek Audio/NIC combination which is often sold to manufacturers at a discount as a combo. As always, Gigabyte has included a TPM module header on board for those that require that functionality. What Gigabyte tend to skip out on is a pair of power/reset buttons, or onboard Clear CMOS button rather than pins. I would like to see those rolled out over the range if at all possible.
Software
Where certain other manufacturers have increased and improved their software over the years, Gigabyte has essentially kept to the same set of software for a good while with minimal updates. If you discount the 3D BIOS offerings of X79, all we have to play with is, for the most part, EasyTune – Gigabyte’s monitoring and overclocking center.
EasyTune6
EasyTune takes on a slightly different look if you use a Thuban processor or a Bulldozer processor, especially when it comes to overclocking. The Thuban does not get a set of easy overclock buttons:
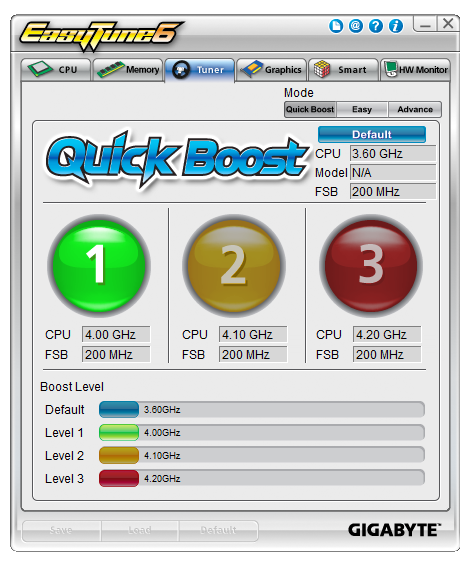
In terms of functionality, there is not much we have not seen before from previous Gigabyte outings. Overclocking is done via the base frequency or the multiplier (and depending on the processor, this may work or not as the case may be), and fan controls are a major issue when it comes to Gigabyte products:
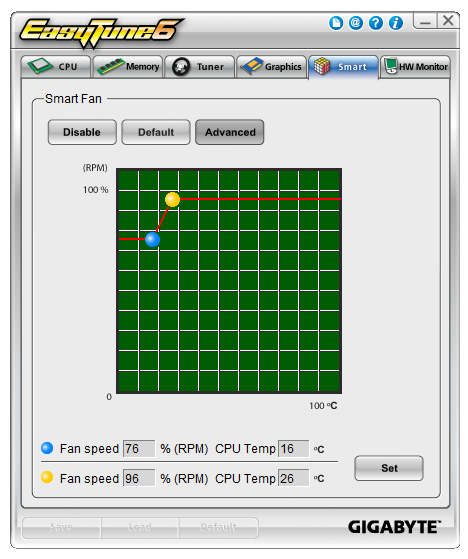
From the operating system, this is all we get for fan control of all the controllable headers on board – one little graph with two points. This is rather disappointing, especially when other manufacturers splash out on some more expensive fan headers to get the control in the hands of the user (and then put in the software to back it up).
As EasyTune also features a hardware monitor which polls the various sensors on board for voltages and temperatures every three seconds, this caused issue with a little of our testing, especially in our DPC test. These sensor readings take CPU priority, and hence the DPC results were often 20x bigger than would be reasonable for performing audio on the board with any degree of accuracy. There is a simple solution though – just close ET6.
@BIOS
Gigabyte also has a tool for updating the BIOS. It does exactly what it says on the tin, and is needed from time to time if a big enough change is performed from BIOS version to BIOS version.
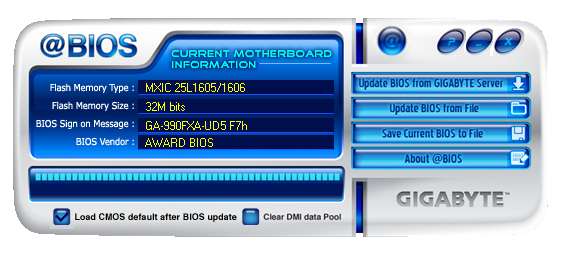
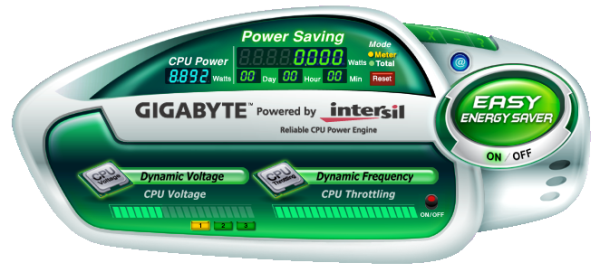
Easy Energy Saver
In an effort to appear ‘green’, motherboard vendors are now applying software to their products in an effort to reduce the carbon footprint of the motherboard. In the simplest terms, these software packages attempt to reduce the voltage of the processor at all the load states in order to save energy. The more intelligent systems will also look at other components to save energy, either by power gating through software, or adjusting operational voltages. This is all at the limit on the processor you have at hand (as some will work happily at lower voltages), and at the potential expense of stability. For Gigabyte, this comes in the form of Easy Energy Saver:
Using the ‘intelligent’ driver MOSFETs onboard, they can be controlled and the CPU can be throttled to save power. As a person interested in stability and performance, personally I would shun away from these types of software, but for the more energy conscious, they are here to be used.
MSI 990FXA-GD80
Where the ASUS channel boards are called the LE, the standard, the Pro, and the Deluxe, Gigabyte has the UD3, UD4/H, UD5, UD7, UD9, and ASRock has Extreme3, Extreme4, Extreme6, Extreme7 and Extreme9. For MSI, this rears itself as a set of numbers preceded by the letters G or GD: we have the 80, 65, 55, 45, and 43, amongst others.
Channel boards are very important to all these manufacturers – they represent the bulk of consumer level sales whereas the gaming / overclocking / stability products are purely for niche environments. In most cases, the home user will only need a channel board, either at the high, medium or low end depending on need. So here we have the MSI 990FXA-GD80, which represents MSI’s higher end ‘mainstream’ offering.
The board itself currently e-tails for $195, slightly more than the ASUS Sabertooth 990FX and the Gigabyte 990FXA-UD5 in this combination review, but should offer a good comparison point. As it is up to $15 more than the Gigabyte, I hope that we can pin down where the $15 goes.
Overview
As a manufacturer, MSI has come up with some good products in their time (e.g. X79 Big Bang XPower II), and some that made me turn around and wonder ‘why?’ (e.g. the BIOS on the P67A-GD65). With our first look at some MSI AMD action in a fair while, I can say that while the 990FXA-GD80 is a nice board to work with, it is perhaps not the feature packed product to cover certain market areas. Do not get me wrong, MSI has some strong areas such as what comes In The Box with the board, however certain features like their fan header placement are not exactly optimal.
Performance wise, the MSI 990FXA-GD80 is no slouch, roughing it toe-to-toe with the other products we have in this review. Features such as the OC Genie, Power/Reset Buttons and a USB 3.0 header at right angles to the board are to be well received. The heatsink design and shape fits in well with the products image (despite the Military Class II paraphernalia obligatorily pasted across it), and the onboard PCIe layout has some thought behind it.
Users will note that different BIOS versions have different BIOS screens. If you update this beyond BIOS B5, the system will display the new graphical BIOS which MSI is very proud about (and it works rather well). However on startup, the board caused my AMD graphics cards (note, 5850s) to spin at 100% for several seconds. Somewhat odd behavior – the cards did not do this in other boards, and neither did our NVIDIA testing cards.
For overclocking, under Thuban the 990FXA-GD80 performed well giving respectable numbers. However while using the Bulldozer processor we were severely limited in terms of voltages and base frequency adjustments, limiting the range to which the overclocks can be performed. More on this is detailed in the Overclocking section.
This board, at $195, performs well for its money compared to other boards in its bracket, and with some bonuses in the box, would fit well into a 990FX system. With a few minor modifications/suggestions, this could have been the ultimate 990FX product, but nonetheless, I can see a lot of people using this board and enjoying it.
Visual Inspection
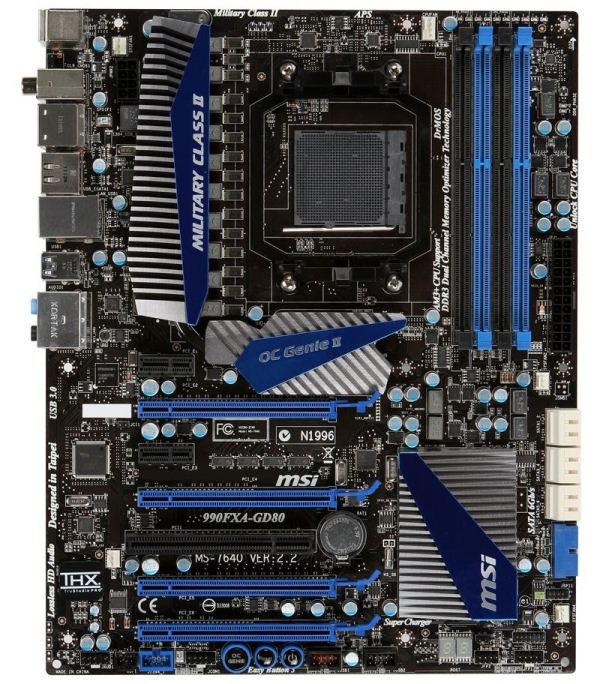
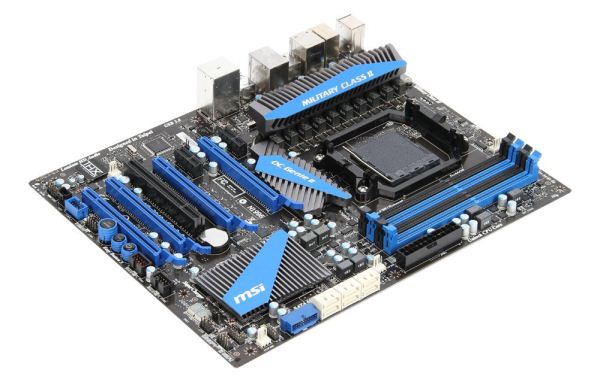
In keeping with MSI’s mainstream color scheme, the 990FXA-GD80 comes in with a distinct blue and black livery, sporting a very edge-heavy angular design on the heatsinks. The heatsinks, like on the previous three boards, provide a large amount of surface area and cover the VRMs to the left of the socket. This heatsink is connected via a heatpipe to another heatsink, in an effort to improve the cooling, and provide a little bit more advertising space on the board for features. The chipset heatsink is rather similar to that from the Gigabyte board, covering a large area of the board with fins but very low profile. It also all fits into the angular style.
In terms of the socket itself, despite the AM3 socket providing space, MSI has gone a bit further, giving more horizontal space than most other boards here and thus should not be an issue for large air coolers. For water coolers however the fan headers on board are neither that numerate (five in total) nor in ideal locations. The sole CPU header (4-pin) is next to the DIMMs in the top right of the socket, and the other socket fan header is above the 8-pin 12V header, but this is a 3-pin system header. Other fan headers on board are a 3-pin system fan header between the 24-pin ATX connector and the SATA ports, a 3-pin system fan header below the SATA ports (would be blocked by a GPU in the appropriate slot), and a three-pin system fan header to the left of the PCIe slots (would be blocked by an appropriate GPU). So if a user is running three large GPUs in this board, two fan headers instantly become inaccessible.
Down the right hand side of the board, below the 24-pin ATX power connector, are our SATA ports. MSI has decided to keep the standard set of six SATA 6 Gbps from the chipset, rather than add to it with controllers. However what MSI does do is give a USB 3.0 header at right angles to the board below the SATA ports. This suggests that this header is purely aimed at front panel USB 3.0 ports, either through the case or by a front panel addition.
The bottom of the board points to a couple of reasons as to why this board is $15 more expensive than the Gigabyte – we get power and reset buttons, as well as a two-digit debug LED. Also on board is the MSI standard OC-Genie button, offering a set overclock when pressed. Alongside these buttons are the standard array of USB 2.0 headers, front panel audio, a COM header, and an IEEE1394 header.
In terms of PCIe layout, MSI has done similar to Gigabyte with an x1 at the top, but this time the heatsink does not impede any long x1 cards. Below this we see a three GPU layout being emphasized, with full length PCIe slots being alternated such that we have: x1, x16, x1, x8, PCI, x8/16, x4.
The back panel is varied enough for this platform. We have two PS/2 ports, a Clear CMOS button, both optical and digital S/PDIF outputs, two eSATA ports, IEEE1394, four USB 3.0 ports, two USB 3.0 ports, Realtek 8111E gigabit Ethernet, and standard audio jacks. What MSI has done here is to try and include as many different protocols as possible, at the expense of USB 2.0 ports. Having four of them on the back panel of a board (and a pair of USB 3.0) covers most usage scenarios, and there are still a few front panel headers on board for more. It begs me to wonder if motherboard vendors should just use a single set of four USB 2.0 ports in one segment of the board, and then focus on all the other functionality. Some motherboard vendors do have that stack of four, but as with the Sabertooth and Gigabyte boards previously that have had 10 and 8 USB 2.0 respectively – are there usage models for this? If you personally use 8 back panel USB 2.0 ports (ignore front panel), then let me know in the comments – it will be interesting to see what is used.
MSI 990FXA-GD80 BIOS
As mentioned in the overview of this board, the BIOS of the 990FXA-GD80 is different depending on which BIOS it is flashed to. When MSI released their X79 products, their BIOS had changed to the style we see today (which was actually determined by an internal MSI contest) – and it seems that through BIOS updates, MSI is backdating all of its products to match this new direction. Thus if you flash to a BIOS beyond B5 (as per the MSI website), you will see the BIOS I will talk about below.
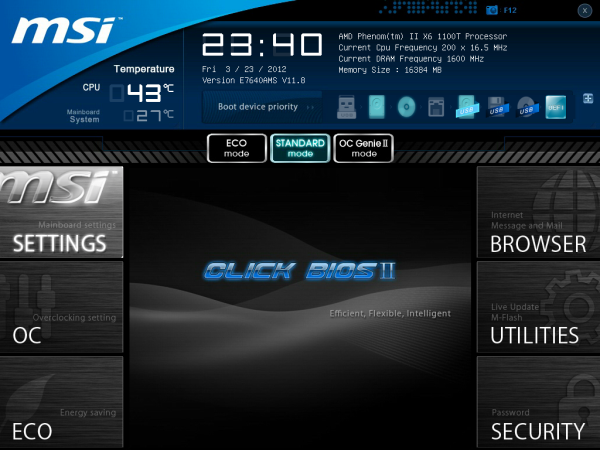
In my view, this MSI BIOS is laid out pretty well. From the start, we have a top screen which lists the CPU, the CPU frequency (multiplier and base frequency), memory size and speed, the BIOS version, and the CPU/System temperatures. This is a little less than what we see with the ASUS BIOS, but the added advantage with the MSI BIOS that is it persistent – the top bar and the two side bars are all constant, while the center console in the middle is fixed. If we ever move into a higher resolution with the BIOSes (and a bigger BIOS chip), then this could be a winning layout and design. As of today, in my view, it is one of the best.
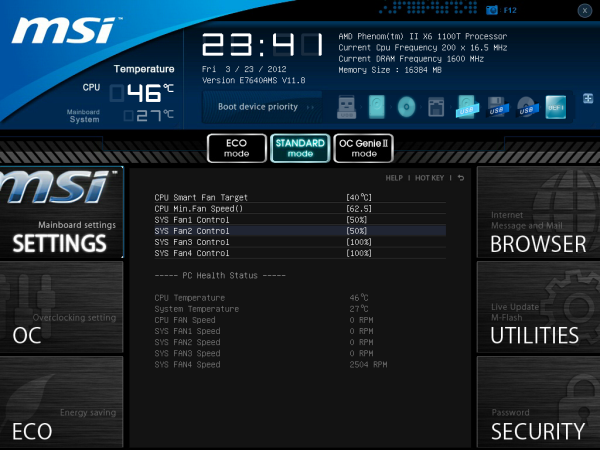
By default, the BIOS sets the SATA ports to IDE rather than AHCI, indicative that MSI believes this product will be bought by users with older non-AHCI drives. The setting for this option is not under the ‘South Bridge’ option that we see on other 990FX boards, but under the ‘Integrated Peripherals’ of Settings -> Advanced. Fan control is also under the Advanced Menu, in the Hardware Monitor. The controls for the fans are pretty basic, with the CPU fan aimed at a given temperature and the system fans given distinct percentage options only.
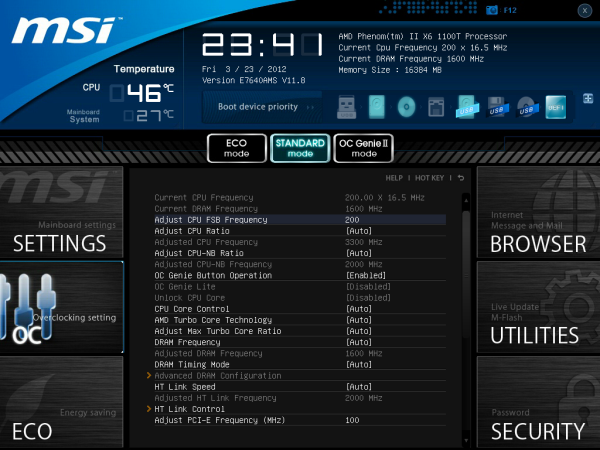
Overclock settings are neatly found in the OC menu, and the standard range is offered. Luckily, the numbers of ‘target’ frequencies are also given, helping users in their adjustments. Almost the full range of adjustments can be made on the one screen, from multiplier to base frequencies, memory straps as well as HT/NB Link speeds. We also have access to core unlocking tools and voltages in this one screen. Up to six overclock profiles can be stored.
Overclocking
Similar to the ASUS Sabertooth 990FX, overclocking on the MSI 990FXA-GD80 was a mixed bag of extremes. In general, the Thuban X6-1100T performed as it has done on the other products in this review. However the latest BIOS from MSI could not handle the Bulldozer FX-8150 as competently as other boards have done, being restricted in terms of voltage and base frequency.
Auto overclock options came in the form of OC Genie II, which is enabled either by a switch on the motherboard or within the BIOS. For manual overclocks, the user could either play with the Control Center software within the operating system (which limits Bulldozer frequency from 190 MHz to 250 MHz), or utilize the BIOS options. The major downside of the BIOS is that in terms of voltages and memory sub timings, it does not tell you want what is the automatic setting, thus leaving the user to guess what is appropriate or relevant.
Each overclock is tested for stability and temperature by a full run of PovRay and Blender, two 3D image generators that utilize both the CPU and memory. Our methodology is as follows:
1) Auto Overclock
2a) Manual Overclock, High FSB (Tune to a high FSB, then raise multiplier)
2b) Manual Overclock, Stock FSB, High Multiplier
2c) Manual Overclock, Combination
Thuban X6-1100T Overclock
1) Auto Overclock: The OC Genie auto-overclock system enables a set of pre-programmed overclock settings within the BIOS to achieve the overclock. When enabling OC Genie, the first boot is longer than normal. With the X6-1100T, the processor base frequency was increased from 200 MHz to 220 MHz (10% OC), and at the base 16.5x multiplier, this gives 3630 MHz overall. In terms of voltages, under load the operating system reported a load voltage of 1.360 volts. This automatic overclock is somewhat less than what we have seen from other manufacturers, which is a little disappointing.
For the manual overclocks, the CPU was set at 1.5 volts, the memory at 1.65 volts, and the NB/HT Link options adjusted to keep around 2000 MHz.
2a) Manual Overclock, High FSB: By keeping the initial multiplier low (10x), the base frequency was adjusted until unstable under PovRay and Blender then reduced slightly and the multiplier subsequently increased to the maximum possible overclock. This lead to a 320 MHz setting on the base frequency and 12.5x on the multiplier, totaling a 4 GHz overclock. At these settings, the memory was automatically set at DDR3-1700 9-10-10, and the CPU was showing a rather alarming 1.584 volts under load. This suggests that the load line calibration on the MSI board is rather aggressive. Despite this, the processor showed a maximum of 59°C for both PovRay and Blender. Nonetheless, this overclock is still ~50-150 MHz less than what we have seen on the other boards at this voltage.
2b) Manual Overclock, High Multiplier: By raising the multiplier and keeping the base frequency constant, other variables such as memory and the NB/HT link frequencies can be ignored as they are untouched by the CPU multiplier. In this mode, a multiplier of 20.5x was reached, leading to an overall CPU frequency of 4100 MHz. This was both PovRay and Blender stable, giving 60°C as a maximum temperature on both. Similar to the high base frequency overclock, the operating system reported a peak voltage of 1.584 volts under load.
2c) Combination Overclock: As with previous tests, the combination overclock is primarily aimed at a base frequency of 233 MHz or 280 MHz, as this keeps the memory strap rather happy in terms of absolute frequency. In this case, a combination overclock of 233 MHz and 17.5x on the multiplier was the best in terms of stability, giving an overall overclock of 4078 MHz and DDR3-1866 9-11-11. At this frequency and at load, PovRay reported a temperature of 60°C, whereas Blender gave 59°C. The operating system still showed 1.584 volts under load.
Bulldozer FX-8150 Overclock
Bulldozer overclocking on the MSI 990FXA-GD80 was a case of trial and extreme error. In terms of OC Genie auto overclocking, the system would refuse to even boot into the operating system, either hanging or giving a blue screen and restarting. This is a poor show from the MSI board in this regard.
For manual overclocking the system also came up short, liming the CPU voltage to 1.45 volts. Every so often, the system would allow up to 1.8 volts for the Bulldozer processor, but I was unable to determine what exactly caused this change in behavior. As a result, it was difficult to get a good reading for an overclock.
When testing for high base frequency, with the CPU set at 1.45 volts, not even 230 MHz on the base frequency would cause the system to reach the operating system, even when adjusting the HT/NB links to reasonable values. In the end I left the system on automatic settings for everything, and just adjusted the base frequency. This limited the system to only 215 MHz on the base frequency, but still kept Turbo Core enabled (4515 MHz on low loads, 4192 MHz on high loads). With the voltage at 1.45 volts now, the multiplier was upped to 20.5x, giving 4407 MHz at all times. This led to 1.368 volts at load (something odd with the load line calibration again), with the CPU giving 59°C under PovRay and 57°C for Blender. Given this voltage limit I saw little point in attempting the other overclock scenarios as they would not be comparable to the other boards.
MSI 990FXA-GD80 In The Box
For a 990FX board, MSI has put thought and effort into what we get in the box here. For $195, it is good to see this much in the box! As the USB 3.0 port is at a right angle, the USB 3.0 bracket supplied has the option of going to the back of the case or in the front by removing the bracket. In terms of what we get:
IO Shield
Driver CD
User Guides
Three flexible SLI connectors
Six SATA cables (locking, right angled)
Two Molex to SATA power cables
USB 3.0 bracket
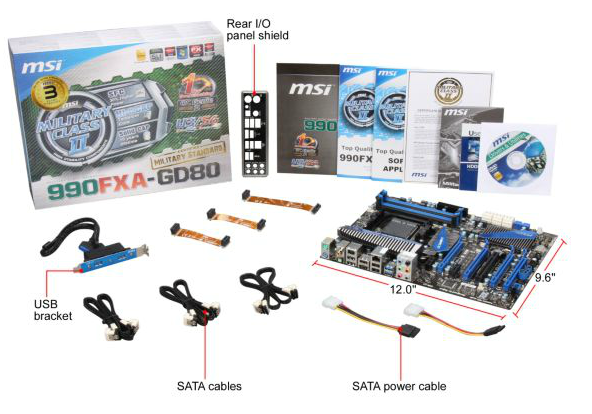
Image courtesy of Newegg
Board Features
| MSI 990FXA-GD80 | |
| Price | Link to Newegg |
| Size | ATX |
| CPU Interface | AM3+ |
| CPU Support | AMD FX/Phenom II/Athlon II/Sempron |
| Chipset | AMD 990FX |
| Base Clock Frequency | 200.02 MHz |
| Core Voltage | Auto, Range Dependant on CPU |
| CPU Clock Multiplier | Auto, 4x to 32.5x |
| DRAM Voltage | Auto, 1.199 V to 2.460 V |
| DRAM Command Rate | Auto, 1T or 2T |
| Memory Slots |
Four DDR3 DIMM slots supporting up to 32 GB Up to Dual Channel Support for DDR3, 800-2133 MHz, |
| Expansion Slots |
3 x PCIe Gen2 x16 (x16/x16 or x16/x8/x8) 2 x PCIe Gen2 x4 2 x PCIe Gen2 x1 1 x PCI |
| Onboard SATA/RAID | 6 x SATA 6 Gbps, Support for RAID 0, 1, 5, 10 |
| Onboard |
6 x SATA 6 Gbps (SB950) 5 x Fan Headers 1 x Front Panel Header 1 x S/PDIF Output Header 2 x USB 2.0 Headers 1 x USB 3.0 Headers 1 x IEEE1394 Header 1 x Serial Port Header 1 x Clear CMOS Header Power/Reset Buttons 1 x OC Genie Button 1 x TPM Module Header |
| Onboard LAN | Realtek 8111E |
| Onboard Audio | Realtek ALC892 |
| Power Connectors |
1 x 24-pin ATX connector 1 x 8-pin 12V connector |
| Fan Headers |
1 x CPU Fan Header 4 x SYS Fan Headers |
| IO Panel |
2 x Keyboard/Mouse PS2 Port 1 x Optical SPDIF Output 1 x Coaxial SPDIF Output 1 x Gigabit Ethernet 2 x USB 3.0 4 x USB 2.0 2 x eSATA / USB 2.0 Combo Ports 1 x Clear CMOS Button Audio Outputs |
| BIOS Version | B80 |
| Warranty Period | 3 Years |
Amazingly the MSI board is the only one which hits the 200 MHz base frequency spot on. The other boards hover at 200.7 MHz (or 201.3 MHz) due to the way the frequency is determined. As a result, you would expect the performance to be a little worse on the MSI, unfortunately. For features, there is not anything out of the ordinary here compared to the other 990FX products apart from the odd fan header arrangement. We also have another Realtek NIC/Audio combination, as well as a three year warranty.
Software
Rather than attempt an all-in-one solution for their software, MSI are using the ‘bombard’ approach, as the majority of their software features come under different installations and names. The major one is Control Center:
Control Center is the face of overclocking, voltages and the limited fan controls. With this software you can apply OC Genie, unlock cores in your processor, or turn the LEDs on the motherboard off if they bother you.
Another important element in the MSI arsenal is Live Update 5, a piece of software I rather like. Live Update 5 will analyze your system in terms of BIOS, drivers and utilities and double check with the MSI servers if you have the latest versions. If you do not, then the system will ask if you want to download the necessary files. While it sounds like a good system, there is one major drawback – it does not tell you how big the files are! It also likes to download whole packages, and waiting for a 130 MB audio driver update does not sound like fun. However, it is useful for BIOS updates.
Also available from MSI is Network Genie, an application designed to prioritize certain types of network traffic over others, and Teaming Genie, which combines network ports into single transmissions (however users will need to add network cards to use this functionality).
Biostar TA990FXE
Coming in at the cheapest 990FX board of this roundup, we have AnandTech’s first Biostar board in almost a year and a half. To me, as an enthusiast, when I hear the name ‘Biostar’, certain adjectives come to mind – the most prominent of which is ‘inexpensive’. As a home system builder and enthusiast, I have come across Biostar offerings when looking at motherboards online, and they are usually quite cheap. At those prices, I always think there is a catch – either the design may not be the best, or perhaps the warranty or support could be a dodo. I plan to cover more of Biostar's boards in the future, so from here on out I plan to put all the prejudice aside and concentrate on what matters – does it do what it says on the tin, would home users want it, and is it worth the money?
Overview
$130 is not a lot for a motherboard in the 990FX space. It comes in at the cheapest board in this multi-board review, and judging on an overview of the results and features, people might be inclined to agree.
The PCIe layout, for example, is not well thought out - the manual contradicts the layout of the board by stating that the full-length PCIe slots 1 and 3 are the primary GPU outputs, but in reality, dual GPUs should be placed in full-length PCIe slots 1 and 2. SATA ports are split between the main ones and eSATA, leaving five internal SATA ports rather than using another controller. The LAN port is non-standard as most other manufacturers use a Realtek solution, here we have the Atheros AR8151, even with Realtek ALC892 audio on board.
For the most part, performance wise, the board is down in terms of pure computation, repeatedly coming in the bottom half of most of our CPU based tests - in particular, it comes bottom of our DPC Latency tests by quite a long way. However it makes a resurgence in the GPU tests, coming near the top in almost every GPU test on both AMD and NVIDIA, single card or dual card. Overclocking was reasonable and straightforward, with a variety of auto overclock settings, although the board refused to push the CPU base frequency to the level of the other boards in this review.
The package may not include much, but the software is easy to use for overclocking, and the BIOS update utility automatically pulls the latest BIOS from online and updates the system. Users will be partially confused though by what Biostar calls 'GPU', or Green Power Utility, designed to lower the power of the system. This sort of acronym is not good. The BIOS was easy to work with and befits the style of the board, though there are a few things that could have been moved to slightly easier places to find.
At this price, compared to the other products in the review, I expected this board to not perform well or even reasonably ok in comparison. It may not have the top of the line features like the others, or the applicable software or updates, but for a board that you just need to put a processor in, it works wonderfully.
Visual Inspection
Red and white is the order of the day with the Biostar TA990FXE, on top of a black PCB with a multi-colored headers at the bottom of the board. Personally I think it does not work that well - there needs to be an element of complimentary blending, and that includes the PCB and headers. However the heatsink design looks relatively well constructed, with a lot of surface area and we again see the two heatsinks connected via a heatpipe. In contrast, the chipset heatsink is quite poor, being very small and bland. Either minimal effort was put in, or having a plain heatsink cuts down on the bill of materials.
There looks to be plenty of space around the socket for air coolers, however fan headers are few and far between. I do not think I have ever seen less than four or five on a full sized ATX board before, but Biostar take the (coveted) title by only having three. The 4-pin CPU fan header is located above the socket, a 3-pin system header is found to the bottom left of the socket almost in the center of the board, and the final 3-pin is at the bottom of the board. To be honest, this amount of fan headers is absolutely woeful. It does not instil confidence in their fan software, or the quality of the fan controllers.
Working through the board down the right hand side, Biostar has taken an oddball approach by separating the six SATA 6 Gbps ports from the chipset into two sets of two, then one straight up out of the board. That is five, and the sixth is no-where to be seen. You might consider it as an eSATA in the IO panel, but that is technically listed as 3 Gbps, which begs the question why it was downclocked. Biostar are paying for the chipset, so it seems a little wasteful to restrict the consumers’ use of all of it when there is plenty of space on the board.
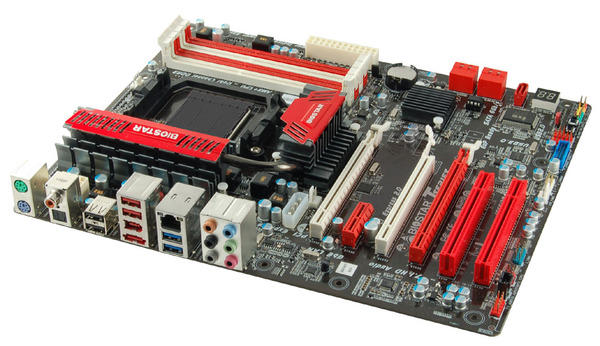
What is good to see on this board though is a two-digit debug LED and a set of power and reset buttons. This gives us a perfect excuse to question Gigabyte who does not have them on a motherboard that is $50 more expensive. Back to the Biostar, and they have crammed enough on the bottom of the board such that the USB 2.0 headers are at 90 degrees to other manufacturers representations. Alongside the USB 2.0 headers, we also have a USB 3.0 header, a COM header, and front panel audio.
The PCIe layout is another oddball bit of design that stinks of laziness. In order, we have a 4-pin molex connector, an x16, x1, x16, x4, PCI, PCI. The 4-pin molex is there usually to provide more power to the PCIe slots, though it is in a really awkward place, as users will have to route over the CPU cooler or over GPUs to put something in it. The whole layout as well has me scratching my head – if I want a dual GPU setup, then there is no space between the cards, which makes my top card run very hot. Do we really need access to two PCI slots and no PCIe x1 when running dual GPUs? I wonder who came up with that layout – sure it is easier in terms of routing traces around the board, but it is bad from just a functionality point of view when you have space to spare.

The back panel is sparse, which again is probably attributable to the price. Alongside a pair of PS/2 ports, we get dual S/PDIF outputs, two USB 2.0 in black, two USB 2.0 in red, IEEE1394, an eSATA, two USB 3.0 in blue, Atheros AR8151 gigabit Ethernet, and audio outputs via a Realtek ALC892. More questions arise – we know that Realtek sell an audio/NIC combo at a low price, so why ditch that and get in the Atheros? Is it cheaper? What does that mean to the consumer? Hopefully I will get to the bottom of it.
Biostar TA990FXE BIOS
So far this review, we have seen the graphical implementations of the BIOS from ASUS and MSI, and the old version of the BIOS layout courtesy of Gigabyte. Given the status of Biostar as a motherboard manufacturer in the western world to enthusiasts, I would have put money on the TA990FXE having a BIOS similar to that of the Gigabyte. However I was pleasantly surprised.
While the BIOS may not be as grandiose as the ASUS or MSI implementation, it does harness the main intention of the graphical BIOS model - the ability to plaster the user with more advertising to enhance the user experience. Biostar use a mixture of light grey and white on a dulcet grey for text, and white on black for changeable options. The BIOS is laid out with information on the right hand side, as well as control descriptions. Almost every option the user hovers over, help text comes up to explain what it is and what it does in regular lay terms.
There is still a lot of work to do on this BIOS. As I mention repeatedly in my reviews, I want the main screen to display all the important information about the system - processor, motherboard, BIOS version, CPU temperature, CPU speed (multiplier and base frequency), amount of memory in the system, speed of the memory (sub-timings if possible), and a brief description of voltages and fan speeds. Unfortunately, we do not get that much from Biostar, as the front screen is more reminiscent of the non-graphical style BIOSes.
The PC Health menu contains a lot of this information, including voltages and temperatures. Fan speeds are set in the Smart Fan menu, but only the CPU fan can be calibrated. The calibration can either be manual, automatic, or a set of predefined controls (silent, turbo, aggressive):
By default, the BIOS is set up in IDE mode. In order to change this to AHCI, navigate to the Chipset -> South Bridge -> SB SATA Menu. Given the layout of the BIOS, this should have also been added under Advanced -> SATA Configuration. This is indicative of a mentality I have seen in BIOS design for a while - only letting options be in one place. There is no penalty to have a BIOS option in two places.
Overclocking is performed in the O.N.E menu. The automated overclock system has three options, named after types of engine in increasing order of expected power: V6, V8 or V12. In the software in the BIOS, other options from V3 to V15 are available. In terms of a manual overclock, the options are a little confusing. While on this O.N.E screen a user can set the base frequency (or FSB equivalent), they cannot change the multiplier. In order to change the multiplier the option is in the 'AMD Pstate Configuration' menu instead:
Here the multiplier can be changed, as well as the CPU VID. This means that rather than use the offset options, users can use the VID option to change the default load voltage of the processor, and then also apply an offset. One downside about these options (and when selecting HT/NB Link frequencies) is that if you apply a base frequency increase, these options to not adjust like-for-like. So if you increase the base frequency by 10%, the user must mentally also calculate the adjustment for the other options, including memory.
Memory overclocking is also a little idiosyncratic. The BIOS has three main options - Auto, Limit or Manual. Under Limit, the BIOS will refuse to let the memory go above the rated amount, and reduce the memory divider (at boot time) as appropriate so it does not go over that speed. Manual allows adjustment to a specific memory divider.
It should also be noted that BIOS 24 enables users to utilize SLI on the TA990FXE. The board will not detect a new CPU, so please make sure that settings are at default when changing CPUs.
Overclocking
Overclocking on the Biostar was a mixed bag of surprise and disappointment. Surprise as the board handled both Thuban and Bulldozer rather well. Disappointment in the form of the confusing BIOS settings to get things to work, and a couple of nuances related to the overclocking.
In terms of Automatic overclocks, the user can either implement them in the operating system via the TOverclocker software (which requires the software to be loaded on boot to be applied each time), or in the BIOS using the Automatic Overclock System. Both use an engine analogy to describe the levels of overclock - V6, V8 and so on; however the number after the letter V does not correlate in the OS with the number in the BIOS. There is also a system to 'determine' maximum overclock in TOverclocker, which will raise the base frequency of the board by 1 MHz every 1.5 seconds, until the system crashes. Then on the next boot, when TOverclocker is run, it will have pulled back 5 MHz from that overclock.
Each overclock is tested for stability and temperature by a full run of PovRay and Blender, two 3D image generators that utilize both the CPU and memory. Our methodology is as follows:
1) Auto Overclock
2a) Manual Overclock, High FSB (Tune to a high FSB, then raise multiplier)
2b) Manual Overclock, Stock FSB, High Multiplier
2c) Manual Overclock, Combination (not performed as max FSB was not high)
Thuban X6-1100T Overclock
1) Auto Overclock: In the OS, the TOverclocker software was used at each of the stages available - V3, V6, V9, V12, V15 and Auto. From V3 to V12, each stage raised the base frequency 2 MHz, to a maximum of 210 MHz (5% overclock) at V15. Under the auto setting, the system raised the FSB until 229 MHz, and then the system gave a blue screen and restarted. On loading back into the operating system, the system was still at 200 MHz. On loading TOverclocker again, the system raised up to 224 MHz. This frequency caused another blue screen under load - after the restart TOverclocker was loaded again and the system gave a 219 MHz base frequency, which was stable under PovRay and Blender.
In the BIOS, the Automated Overclock System gave three options - V6, V8 and V12. Under V6, the base frequency was set to 220 MHz, which gave 1.344 volts under load and a load temperature of 44ºC under PovRay and Blender. At V8, the system gave a blue screen on first boot, and reached the OS on the second boot. This showed the system to be at 230 MHz, but this gave memory errors in PovRay. At V12, the system refused to boot at all.
For the manual overclocks, the CPU was set at 1.5 volts, the memory at 1.65 volts, and the NB/HT Link options adjusted to keep around 2000 MHz. The Green Power Utility was also turned off.
2a) Manual Overclock, High FSB: The highest base frequency the board successfully booted at was 245 MHz, however this was unstable. 235 MHz proved to be the stable base frequency, and the stable multiplier was 17x (total 3994 MHz) with NB/HT at 1880 MHz. Under these conditions, the CPU reached 51ºC in both PovRay and Blender.
2b) Manual Overclock, High Multiplier: With the multiplier being changed, the NB and HT Links were left on auto as well as the memory. Given that the best clocks with this test were around 4100 MHz, the board was booted at 200x20, to give 4000 MHz. This provided 1.488 volts on load, reaching 52ºC in PovRay and 51ºC in Blender. At the 21x multiplier, while the system passed a PovRay run, it unfortunately made Blender crash.
While this clocks are good on the Blender chip, they are unfortunately 50-100 MHz lower that the best we have in this review at this voltage. For a $130 motherboard, that is quite good!
Bulldozer FX-8150 Overclock
1) Auto Overclock: In the operating system, TOverclocker acted as much as it did with the Thuban, with V3 to V15 giving rises of 202 MHz to 210 MHz respectively. The 'Auto' setting this time gave a blue screen at 227 MHz, and on reboot this adjusts to 223 MHz, but the NB/HT Links were at 2453 MHz. The CPU voltage seemed rather low, with 1.212 volts at load. This was confirmed when the system crashed in Blender. On restart, TOverclocker would give 223 MHz again, an unstable speed.
Through the BIOS, the Automated Overclock System faired a little better than it did on Thuban. At V6 mode, the system overclocked from 200 MHz to 210 MHz, and then at V8 to 215 MHz. At V12, this was raised to 220 MHz, but this gave a NB/HT Link speed of 2420 MHz, and crashed out on any load.
For the manual overclocks, the CPU was set at 1.5 volts, the memory at 1.65 volts, and the NB/HT Link options adjusted to keep around 2000 MHz. The Green Power Utility was also turned off.
2a) Manual Overclock, High FSB: After putting the CPU at the 10x multiplier, the system remained stable up until 240 MHz on the base frequency. The multiplier was then raised to 19x, giving 4560 MHz. This was stable, giving 1.404 volts on load while the NB/HT Links were set at 1920 MHz. At this speed, PovRay gave 60ºC, however there were issues with Blender - it would not initialize full speed. In order to get it to run at full speed, the C6 State and PowerNow options under CPU Configuration were disabled. This let Blender run at full speed, hitting 58ºC maximum.
2b) Manual Overclock, High Multiplier: Unlike other motherboards in this review which have refused to play nice with Bulldozer, the Biostar did rather well in terms of just upping the multiplier while at 1.5 volts on the CPU. The highest stable speed was at 23x multiplier, giving 1.380 volts at load and showing 60ºC/58ºC in PovRay/Blender respectively. At the 23.5x multiplier, the system booted but froze under any load, suggesting more voltage is needed.
Biostar TA990FXE In The Box
In The Box
For a cheap board, we would expect a bare box with limited additions, reminiscent of what certain other manufactures may put in there. But I was quite surprised:
IO Shield
Driver CD
User Manual
Six SATA cables (locking)
Two Crossfire bridges
The addition of Crossfire bridges is odd, as typically SLI bridges are given in boards (although the initial BIOSes of this board did not support SLI). Also worthy of note is that the CPU back bracket on the board did not function with AMD all-in-one cooler.
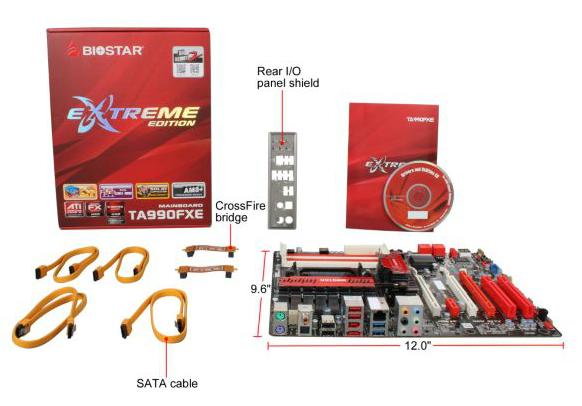
Image courtesy of Newegg
Board Features
| Biostar TA990FXE | |
| Price | Link to Newegg |
| Size | ATX |
| CPU Interface | AM3+ |
| CPU Support | AMD FX/Phenom II/Athlon II/Sempron |
| Chipset | AMD 990FX |
| Base Clock Frequency | Auto, 200 MHz to 600 MHz |
| Core Voltage | Auto, 0.70 V to 1.55 V, Offset +0.50 V to +1.450 V |
| CPU Clock Multiplier | Auto, x8 to x31.5 |
| DRAM Voltage | Auto, -0.25 V to +0.49 V |
| DRAM Command Rate | Auto, 1T or 2T |
| Memory Slots |
Four DDR3 DIMM slots supporting up to 32 GB Up to Dual Channel Support for DDR3, 800-2000 MHz, |
| Expansion Slots |
2 x PCIe Gen2 x16 (x16/x16) 1 x PCIe Gen2 x4 2 x PCI |
| Onboard SATA/RAID | 5 x SATA 6 Gbps, Support for RAID 0, 1, 5, 10 |
| Onboard |
5 x SATA 6 Gbps (SB950) 3 x Fan Headers 1 x Front Panel Header 1 x S/PDIF Output Header 2 x USB 2.0 Headers 1 x USB 3.0 Headers 1 x IEEE1394 Header 1 x Serial Port Header 1 x CIR Header |
| Onboard LAN | Atheros AR8151 |
| Onboard Audio | Realtek ALC892 |
| Power Connectors |
1 x 24-pin ATX connector 1 x 8-pin 12V connector 1 x 4-pin Molex connector |
| Fan Headers |
1 x CPU Fan Header 2 x SYS Fan Headers |
| IO Panel |
2 x Keyboard/Mouse PS2 Port 1 x Optical SPDIF Output 1 x Coaxial SPDIF Output 1 x Gigabit Ethernet 2 x USB 3.0 4 x USB 2.0 1 x eSATA 3 Gbps Port 1 x IEEE1394 Port Audio Outputs |
| BIOS Version | 29/02/2012 |
| Warranty Period | 3 Years from Manufacture date |
As I mentioned in the TA990FXE overview, there are a few oddities. The placement of the PCIe slots is questionable as it doesn't allow a gap between multi-GPU systems, and the inclusion of the Atheros network controller rather than a Realtek (for the combo discount) is odd. The lack of fan headers is a concern.
Software
As we have never covered Biostar software before, it was worth my time to dig deep into what makes Biostar tick in this regard. The myriad of software comes down a few key utilities - eHotLine, BIOS Update, TOverclocker and G.P.U.
eHotLine: This software seems to be part of Biostar's bug reporting. Have an issue with your board, and this software pulls almost all the necessary info for you to send to them to help diagnose it.
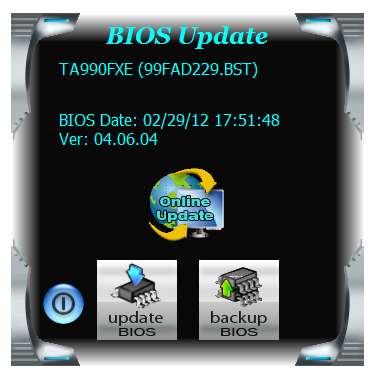
BIOS Update: Does exactly what it says on the tin - even better if you are connected to the internet, as then it will search for the latest BIOS it can find from the Biostar servers, then download it and install.
TOverclocker: The main hub of software action takes place in TOverclocker. On loading, it will apply any overclock previously set (even if it crashes your system), but offers information on the CPU, Motherboard and memory. The OC Tweaker allows the user to change the base frequency and select the overclocking mode - the voltage options did not work on the Bulldozer processor. H/W Monitor shows the voltages and temperatures, and even offers a CPU fan calibration tool.
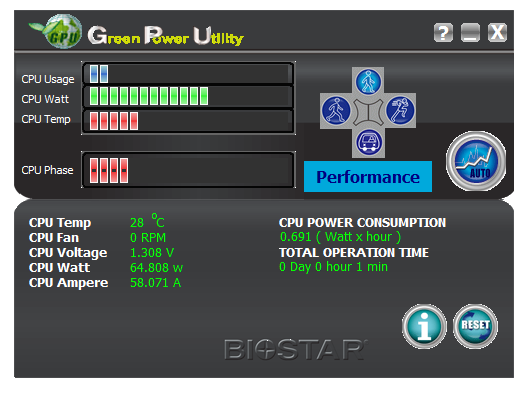
G.P.U: The confusing part of the software is this - the Green Power Utility. Why it was called GPU I have no idea, but this software takes a while to load and attempts to adapt the system to use less voltage.
Test Setup
| Processor |
AMD Phenom II X6 1100T (6C, 3.3 GHz) AMD FX-8150 (8C, 3.6 GHz) |
| Motherboards |
($230) ASUS Crosshair V Formula (990FX) ($185) ASUS Sabertooth 990FX ($180) Gigabyte 990FXA-UD5 ($195) MSI 990FXA-GD80 ($130) Biostar TA990FXE |
| Cooling | AMD All-In-One Liquid Cooler, made by Asetek |
| Power Supply | Silverstone 1000W 80 PLUS Silver |
| Memory |
Patriot Viper Extreme 2x4 GB DDR3-2133 9-11-9 Kit GSkill RipjawsX 4x4 GB DDR3-1866 9-10-9 Kit |
| Memory Settings | Default |
| Video Cards |
XFX HD 5850 1GB ECS GTX 580 1536MB |
| Video Drivers |
Catalyst 11.8 NVIDIA Drivers 285.62 |
| Hard Drive | Micron RealSSD C300 256GB |
| Optical Drive | LG GH22NS50 |
| Case | Open Test Bed - CoolerMaster Lab V1.0 |
| Operating System | Windows 7 64-bit |
| SATA Testing | Micron RealSSD C300 256GB |
| USB 2/3 Testing | Patriot 64GB SuperSonic USB 3.0 |
System Power Consumption
Power consumption was tested on the system as a whole with a wall meter connected to the power supply, while in a dual GPU configuration. This method allows us to compare the power management of the UEFI and the board to supply components with power under load, and includes typical PSU losses due to efficiency. These are the real world values that consumers may expect from a typical system (minus the monitor) using this motherboard.
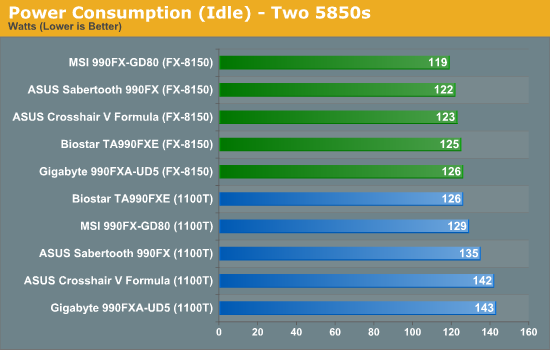
In idle power consumption, the FX-8150 with its newer architecture is able to more efficiently power gate itself. The Gigabyte board comes last on both processors, while the MSI has a good showing.
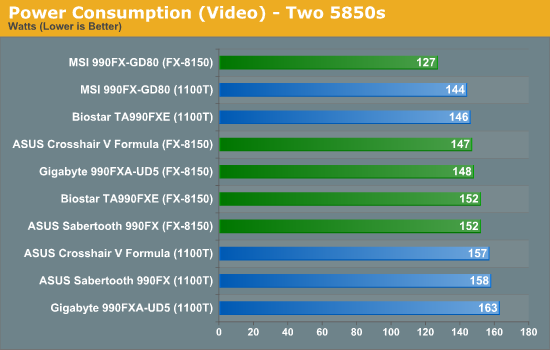
In video mode, it's all about how the motherboard decides to activate cores and/or turbo modes. Again, the FX-8150 seems to be the (in general) processor of choice, with the MSI again taking command of low power usage.
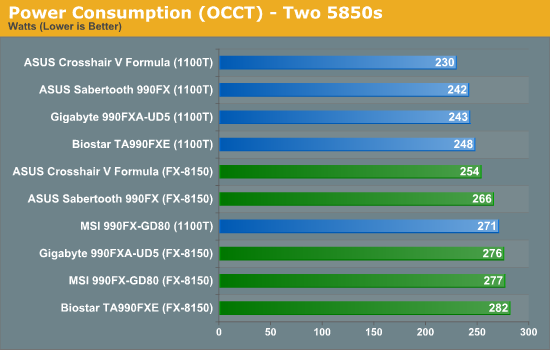
For OCCT, our CPU stress test, the FX-8150 starts to draw that extra power it needs. In this circumstance, the ASUS boards tend to use less power under either processor than their competitors.
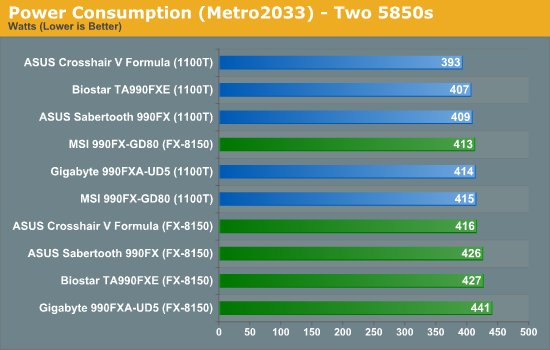
In the case of Metro2033, as both GPUs are running equally at large load, it is all about how the motherboard decides to power up the CPU and assign turbo states. The Crosshair V Formula performs well on both processors.
CPU Temperatures
With most users’ running boards on purely default BIOS settings, we are running at default settings for the CPU temperature tests. This is, in our outward view, an indication of how well (or how adventurous) the vendor has their BIOS configured on automatic settings. With a certain number of vendors not making CPU voltage, turbo voltage or LLC options configurable to the end user, which would directly affect power consumption and CPU temperatures at various usage levels, we find the test appropriate for the majority of cases. This does conflict somewhat with some vendors' methodology of providing a list of 'suggested' settings for reviewers to use. But unless those settings being implemented automatically for the end user, all these settings do for us it attempt to skew the results, and thus provide an unbalanced 'out of the box' result list to the readers who will rely on those default settings to make a judgment. CPU Temperatures are not really indicative of quality or performance, even though one would postulate that worse parts may produce higher temperatures. However, if a manufacturer uses more conductive material in the power plane, this reduces resistance and increases the voltage at the CPU, causing a higher temperature but potentially better stability.
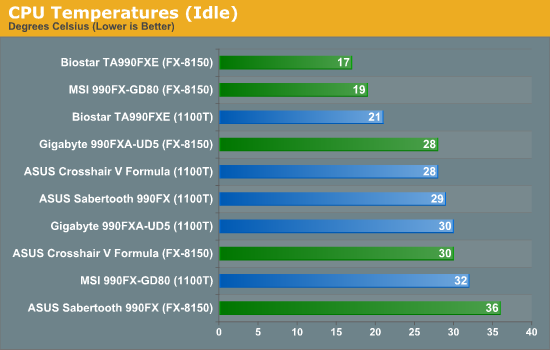
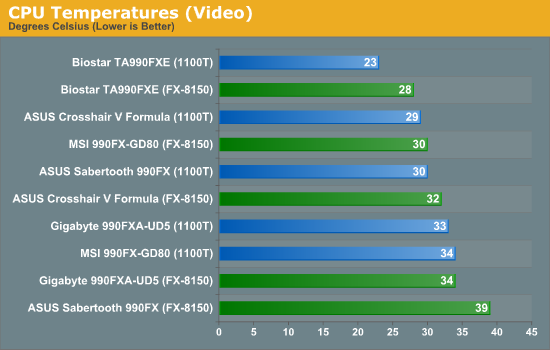
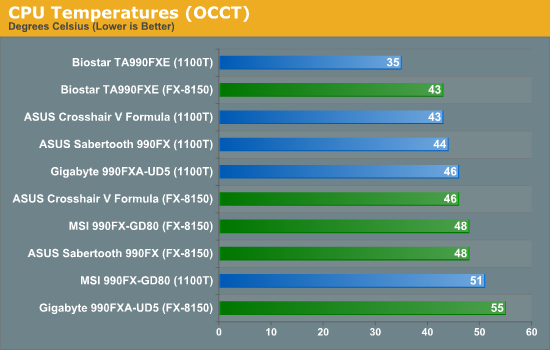
Analysing CPU temperatures is an observational science under our methodology, restricted by the fact that different motherboards use different sensors to report the temperature - some use the response back from the CPU to show temperature, while some connect themselves to onboard sensors. This has a direct result on any default fan profiles, as the Gigabyte board gave us almost zero fan speed while at idle, indicating perhaps a quieter (but potentially hotter) system. The Biostar seems to take advantage of this the most to represent the lower temperature (possibly to confuse reviewers...?), or there is a slight mis-calibration on the sensor readouts.
USB Speed
For this benchmark, we run CrystalDiskMark to determine the ideal sequential read and write speeds for the USB port using our 64GB Patriot SuperSpeed USB 3.0 drive. Then we transfer a set size of files from the SSD to the USB drive, and monitor the time taken to transfer. The files transferred are a 1.52 GB set of 2867 files across 320 folders – 95% of these files are small typical website files, and the rest (90% of the size) are the videos used in the Sorenson Squeeze test.
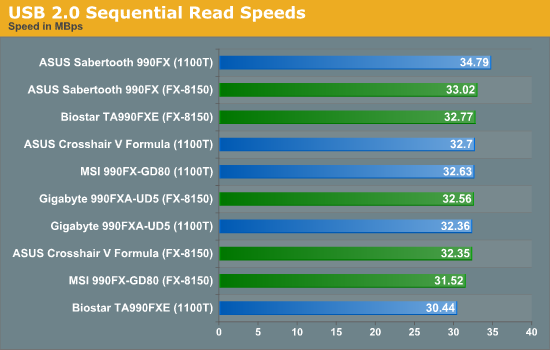
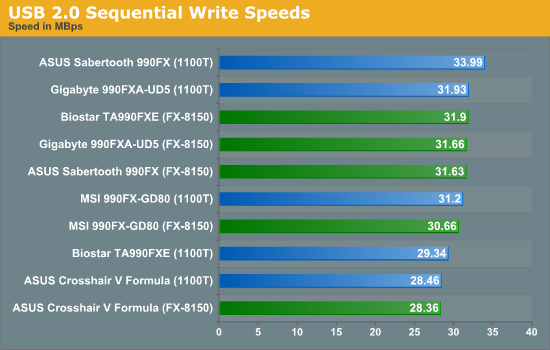
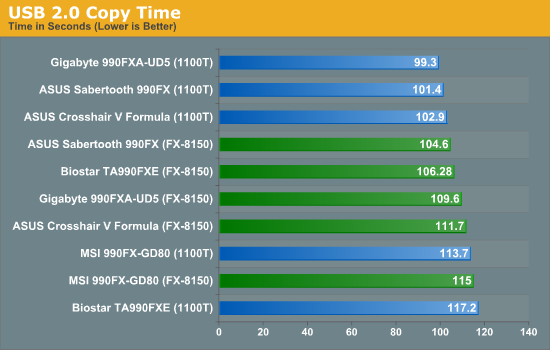
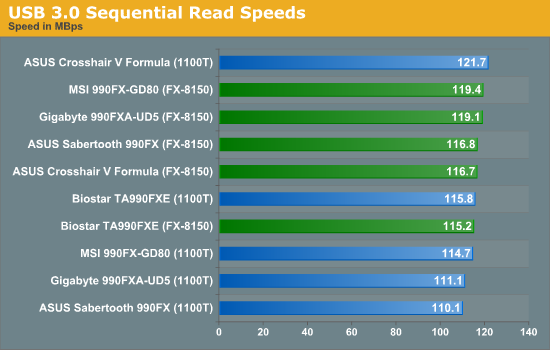
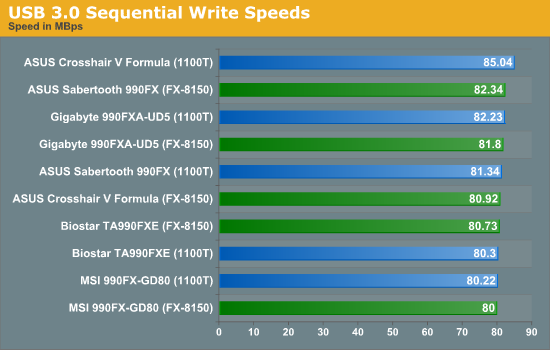
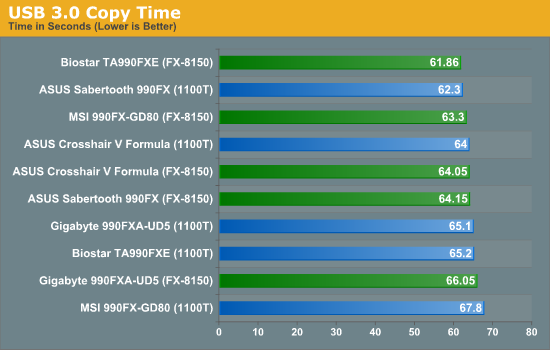
A lot of how the system deals with USB interactions is based on the hardware, including BIOS stated priorities, but also on the software and drivers supplied. This results in our spread on USB 2.0 and USB 3.0 speeds/times. On the whole the Sabertooth 990FX is a good performer, while the MSI tends to lag behind in real world testing.
SATA Testing
We also use CrystalDiskMark for SATA port testing. The operating system is installed on the SSD, and the sequential test is run at the 5 x 1000 MB level. This test probes the efficiency of the data delivery system between the chipset and the drive, or in the case of additional SATA ports provided by a third party controller, the efficiency between the controller, the chipset and the drive.
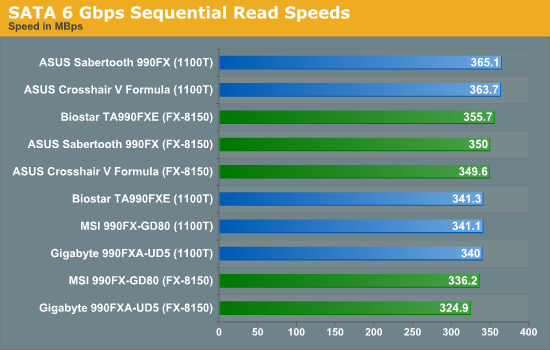
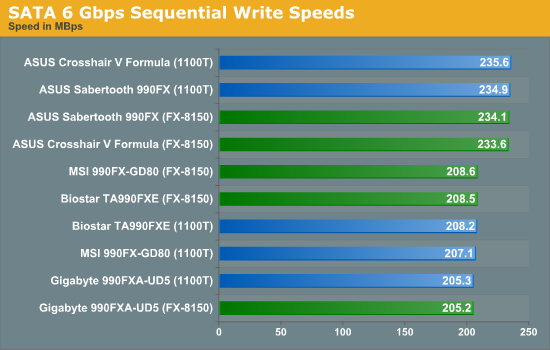
For SATA testing, again we get a processor independent spread. The interesting thing here is the SATA 6 Write results, in which the ASUS boards clearly have an advantage over the other products. This is most likely due to more agressive BIOS settings at default.
DPC Latency
Deferred Procedure Call latency is a way in which Windows handles interrupt servicing. In order to wait for a processor to acknowledge the request, the system will queue all interrupt requests by priority. Critical interrupts will be handled as soon as possible, whereas lesser priority requests, such as audio, will be further down the line. So if the audio device requires data, it will have to wait until the request is processed before the buffer is filled. If the device drivers of higher priority components in a system are poorly implemented, this can cause delays in request scheduling and process time, resulting in an empty audio buffer – this leads to characteristic audible pauses, pops and clicks. Having a bigger buffer and correctly implemented system drivers obviously helps in this regard. The DPC latency checker measures how much time is processing DPCs from driver invocation – the lower the value will result in better audio transfer at smaller buffer sizes. Results are measured in microseconds and taken as the peak latency while cycling through a series of short HD videos - less than 500 microseconds usually gets the green light, but the lower the better.
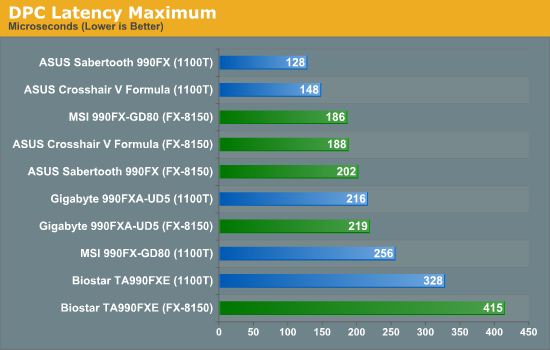
DPC Latency always shows the biggest differences between our motherboards. It is hampered by the fact that it can be disturbed by software. In particular, ASUS' AI Suite and Gigabyte's EasyTune software, when installed, initialise themselves on startup and continuously monitor the motherboard sensors (by pinging them every 3-5 seconds). This request for data has a higher priority, and thus when we do our DPC checks, those boards when the software is enabled shoot up to 3000 microseconds or more. For these tests, we disable the software (as it shows uncharacteristic spikes) to take a reading while playing HD video. In this case, we can confirm that ASUS do it best, and you get what you pay for with respect to the Biostar motherboard.
3D Movement Algorithm Test
The algorithms in 3DPM employ both uniform random number generation or normal distribution random number generation, and vary in various amounts of trigonometric operations, conditional statements, generation and rejection, fused operations, etc. The benchmark runs through six algorithms for a specified number of particles and steps, and calculates the speed of each algorithm, then sums them all for a final score. This is an example of a real world situation that a computational scientist may find themselves in, rather than a pure synthetic benchmark. The benchmark is also parallel between particles simulated, and we test the single thread performance as well as the multi-threaded performance.
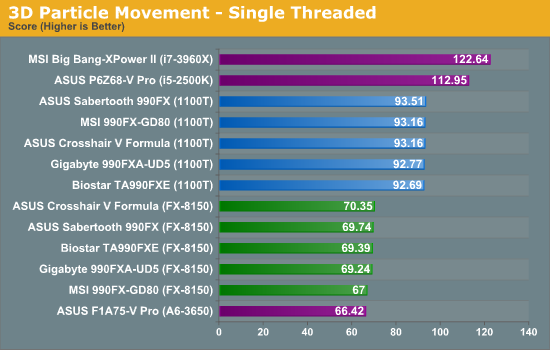
The biggest difference between the processors is shown in our CPU tests. In Single thread mode, we see characteristically that the FX-8150 is a lot lower than the X6-1100T even with Turbo Boost. This is because 3DPM is a wholly floating-point driven benchmark, and the FX-8150 is geared up to be an integer processor. In an ideal optimised world, all programs would use a hex base to calculate numbers (for example, highly optimised calculators of Pi), however the modern scientist may input code they understand to get results, even if it is floating point numbers. In this circumstance, Thuban is the way to go.
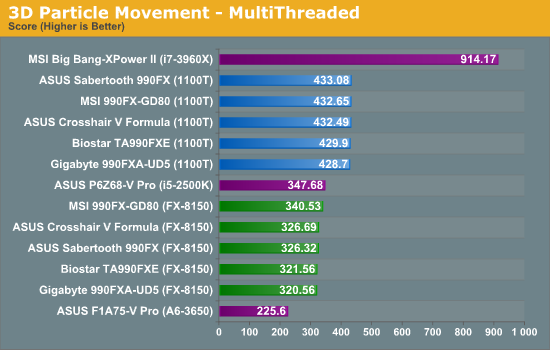
This is echoed even more strongly in the multi-threaded test, where the FX-8150 acts like a quad core (due to its FPU architecture) rather than an octo-core because of the floating point calculations in 3DPM.
WinRAR x64 3.93 - link
With 64-bit WinRAR, we compress the set of files used in the USB speed tests. WinRAR x64 3.93 attempts to use multithreading when possible.
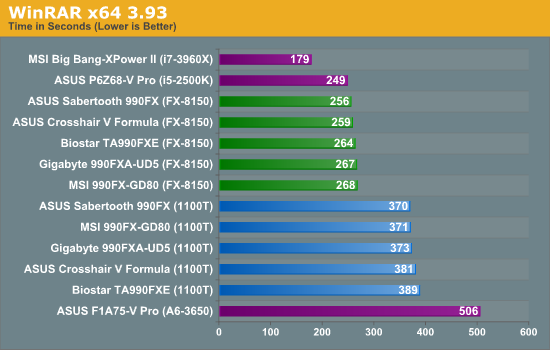
WinRAR seizes the multi-threaded nature of the processors, and the FX-8150 acts better than the X6-1100T, but is still only on par with a quad-core i5-2500K. In terms of the motherboards, the Sabertooth once again takes credit here.
FastStone Image Viewer 4.2 - link
FastStone Image Viewer is a free piece of software I have been using for quite a few years now. It allows quick viewing of flat images, as well as resizing, changing color depth, adding simple text or simple filters. It also has a bulk image conversion tool, which we use here. The software currently operates only in single-thread mode, which should change in later versions of the software. For this test, we convert a series of 170 files, of various resolutions, dimensions and types (of a total size of 163MB), all to the .gif format of 640x480 dimensions.
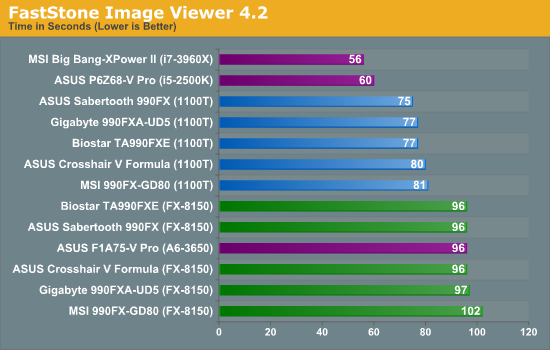
Due to the single thread nature of FastStone, despite the increased frequency of the FX-8150, it's all about how the pipeline is managed. In this case, the MSI seems to fall by the wayside on both processors, while the Sabertooth again plays near the top.
Sorenson Squeeze 6.0 - link
Sorenson Squeeze is a professional video encoder, complete with a vast array of options. For this test, we convert 32 HD videos, each a minute long and approximately 42 MB in size, to WMV 512KBps format. Squeeze can encode multiple videos at once, one for each thread.
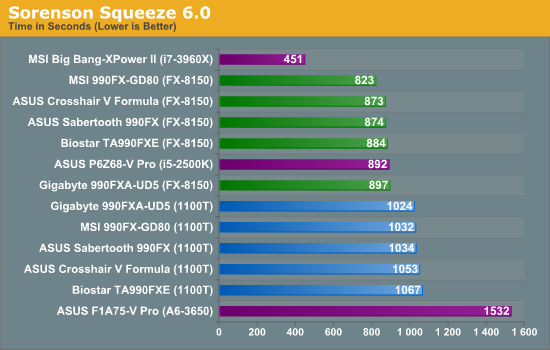
Video decoding and encoding is a purely optimised INT calculation unit affair, where multiple threads reign supreme. Thus we have the FX-8150 pulling ahead of the 1100T, and the MSI boards actually having a good showing.
Aliens vs. Predator Benchmark
Aliens vs. Predator is a DirectX 11 science fiction first-person shooter video game, developed by Rebellion Developments. Available as a standalone benchmark, on default settings the benchmark uses 1920x1080 with high AF settings. Results are reported as the average frame rate across 4 runs.
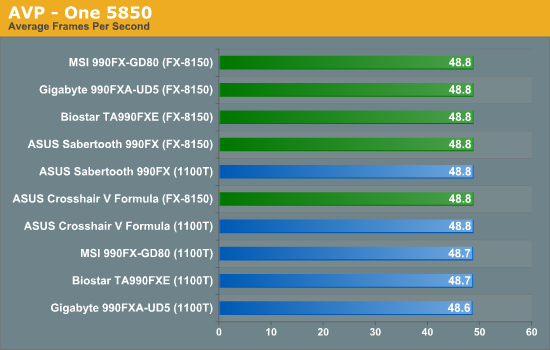
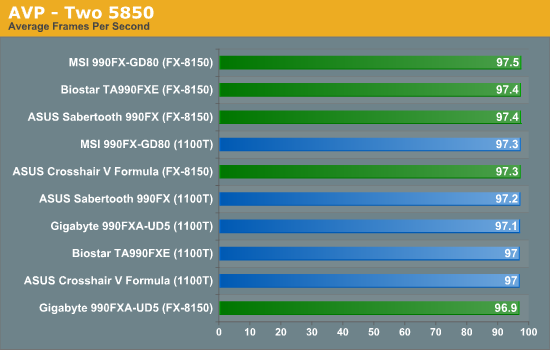
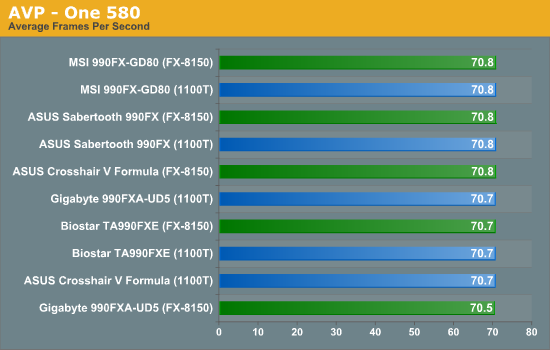
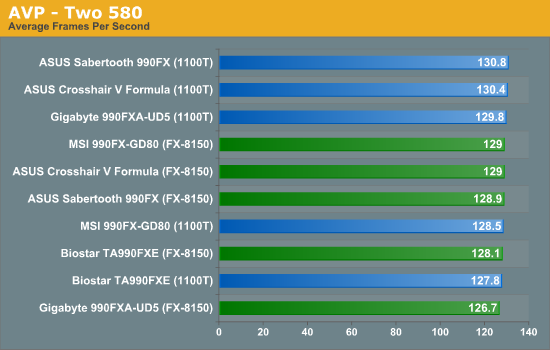
AVP is seemingly a GPU limited benchmark all the way through, with no apparent difference between the processors until you get to the dual 580 usage scenario. However, at 130 FPS, it is unlikely a difference will be spotted.
Dirt 3
Dirt 3 is a rallying video game and the third in the Dirt series of the Colin McRae Rally series, developed and published by Codemasters. Using the in game benchmark, Dirt 3 is run at 1920x1080 with full graphical settings. Results are reported as the average frame rate across 4 runs.
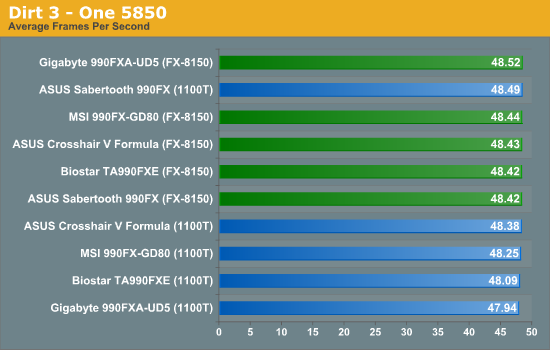
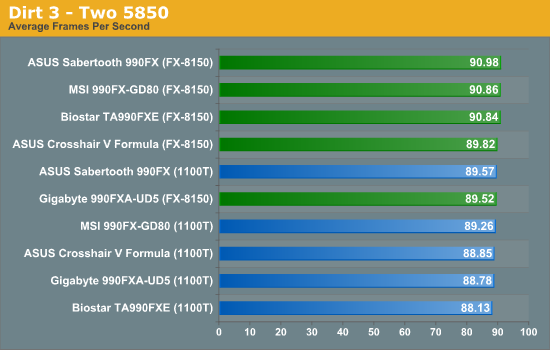
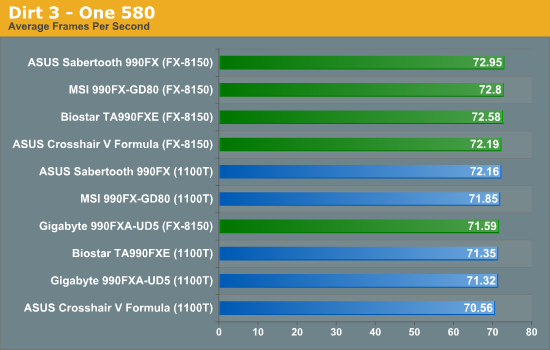
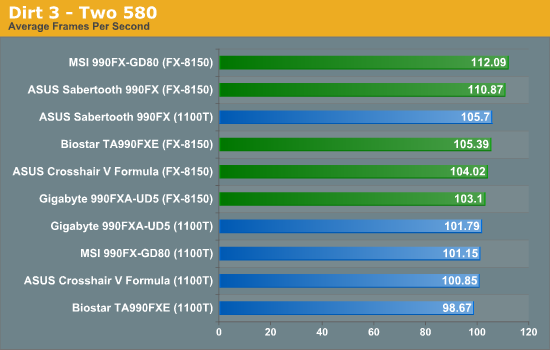
Dirt3 always ends up showing a big difference between boards, as it is all about how well the runs are and how often the motherboard decides to tell the GPU to use more or less cores, or implement turbo states. In this case, the FX-8150 tends to reign over the 1100T, but the choice of motherboard at high GPU rates will cause up to a 9 FPS difference. The Sabertooth in this instance comes near the top.
Metro2033
Metro 2033 is a challenging DX11 benchmark that challenges every system that tries to run it at any high-end settings. Developed by 4A Games and released in March 2010, we use the inbuilt DirectX 11 Frontline benchmark to test the hardware at 1920x1080 with full graphical settings. Results are given as the average frame rate from 10 runs.
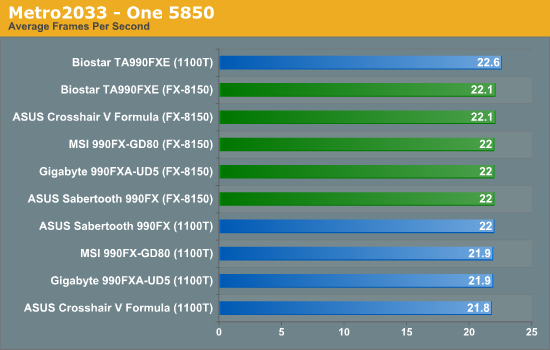
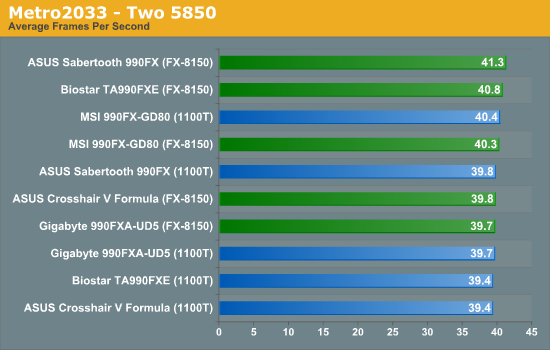
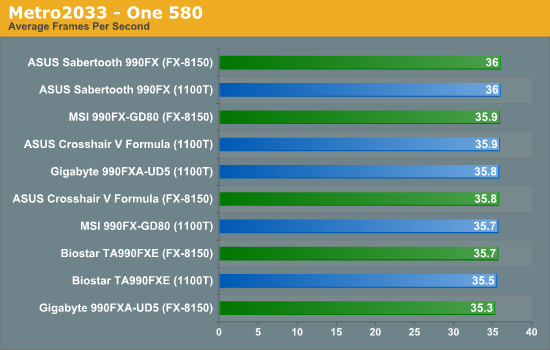
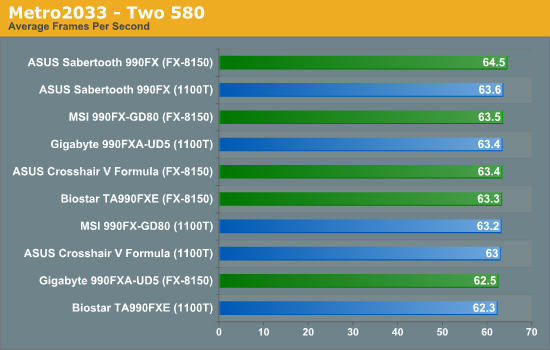
The most demanding benchmark in our suite this time round is Metro2033, requiring a lot of GPU grunt to give even a nice 60 FPS at 1920x1080. The processor doesn't seem to matter much here, as all our results are within statistical variance. Though the Sabertooth again comes rather near the top most of the time.
ASUS Crosshair V Formula
As the most expensive board in our tests, the Republic of Gamers branded Crosshair V Formula has to pack a punch in every area. I found it surprisingly easy to test, and it comes with a good bundle in the box. For users wanting a little more of an experience from their product, ASUS also has dedicated forums to their ROG lineup so similar minded users can exchange setups, ideas, and read ASUS materials on how to get the most out of their system.
Onboard, the use of an Intel NIC and the X-Fi 2 audio solution are big bonus points, which more than likely attribute to the price tag. The BIOS is also a good representation of what the BIOS should be, and we have it here garnished in Republic of Gamers’ flair. The AI Suite software too is a nicely packaged system well worth investigating if you own an ASUS board. If you want supreme control over your onboard fans, you will not do much better than having fun with the ASUS solution.
I was a little disappointed with the overclocking scenario, with the Extreme function not being that much more than the Fast setting, and trying to push the processors, especially the Bulldozer, led to a certain amount of instability under heavy loads.
Performance wise the board is no slouch as anyone would expect. However it does come in at under twice the price of the Biostar, so users will have to decide whether they want a system that just runs, or one that costs an extra $85 and the extra features will be used.
You could do a lot worse than the Crosshair V Formula, but with the feature set it provides (NIC + Audio especially), the only thing that may hold you back is the price. If you have the cash to splash, this board ends up being a good part of any AMD build.
ASUS Sabertooth 990FX
The main selling point of the ASUS Sabertooth range is a magical five-year warranty. With this in hand, ASUS are confident that their product will run and run and run. In order to preserve this warranty, the Sabertooth range gives options and software in order for users to customize their cooling capacity. The six fan headers on board, coupled with almost a dozen temperature sensors, are conjoined by the AI Suite software to allow the user to determine which fans are controlled by which sensors (or a combination therein), as well as the temperature ramp of each of the fans.
This being said, the Sabertooth 990FX as a product actually runs very warm with a Bulldozer product in it. With the FX-8150, the overclocks were horrendously limited by the CPU temperature sensor going above 90 degrees Celsius, causing the processor to declock. However, with a Thuban processor, the board flew quite well with its overclock range, with more than one occasion suggesting that if more voltage had been applied than our standard testing, it would be perfectly stable and within a power envelope. Such is the difference between the processor families, and it seems that this Sabertooth is more optimized for Thuban than Bulldozer.
At around $185, coupled with that warranty, the Sabertooth comes with what I would consider the bare minimum in the box – several SATA cables and a single SLI connector. In terms of on the board features, we are also treated to a Realtek NIC/Audio combination, and a lack of Power/Reset buttons on the product itself. Of the audio, the AI Suite software and its sensor control causes our DPC Latency test to spike by a factor 10x, so I would suggest users turn AI Suite off if they are dealing with sensitive audio work.
The Sabertooth is a great board to have at stock or with a Thuban, and the level of customizability is nothing to be sniffed at. A lot of people will be happy with this board, and at the price at the time of writing, offers more than its competitors. A serious contender for a 990FX AMD system is right here.
Gigabyte 990FXA-UD5
When you go through so many motherboards and motherboard reviews in a given space of time, the writers block runs high and the amount of adjectives (superlative or not) runs low. It is hard to describe how I exactly feel about this Gigabyte board. Gigabyte is a master of advertising, and by scraping together here and there, they can offer a seemingly better board in a lower price bracket.
However this is the 990FXA-UD5, near the top of the 9-series range. So hopefully they should not be trying to compromise the user experience. When you read the specifications sheet and see a dual Realtek Audio/NIC combination, that is usually where it starts, and with an ALC 889 nonetheless. Despite the board I tested being an earlier version (with pronounced CPU voltage ripple), the later boards have the same functionality but it should all be tightened in a bit and a little more optimized.
The main concern to note over the whole product was the temperature of the VRM heatsinks when under load (and overclocked). There seems to be a lot of heat under there, and when it reaches a certain temperature (in my case, when the X6-1100T CPU read 65ºC), the CPU will throttle down to preserve the life of the components. Some form of active cooling should have been employed if this was the case.
Layout is a little flaky as well, with dual GPU users needing to put their GPUs together in order to maximize PCIe lane usage. Audio users will have to turn off the Gigabyte monitoring software to ensure that audio remains as smooth as possible. Fan controls, as with previous Gigabyte iterations, are not that fancy, with only one OS control for all the fan headers on the motherboard.
For $180, the 990FXA-UD5 does come up a little short, and in my mind, it would be worth digging a little deeper into the pocket to pick up something else from the 9-series range.
MSI 990FXA-GD80
When considering the MSI 990FXA-GD80 as a product to purchase, it comes with its highs and its lows. On the bright side, we have a good performing system that comes with a mountain of extras in the box compared to other products, and the BIOS is a great system. However, it becomes slightly negative if you want to overclock a Bulldozer, or want any distinct control over the fans.
Users should update their launch BIOSes to F5 or later to take advantage of that new BIOS system, and flashing the BIOS is very simple through the Live Update 5 software provided. Unfortunately the BIOS does not show the user what is auto for voltages, so a little insight is needed when changing these options. There was also a minor problem with my AMD 5850 graphics cards, spinning up to 100% for a few seconds after boot, but this did not happen with my NVIDIA 580 test cards.
Performance wise, nothing stuck out like a sore thumb and the MSI 990FXA-GD80 kept up in pace with the other products we have tested.
For $195, and the bonus in the box, the MSI 990FXA-GD80 is a nice board to run at stock, or a good one to have with a Thuban based processor.
Biostar TA990FXE
As the cheapest board in our test, it was fair to assume that perhaps the TA990FXE would not amount to much when in came to a direct comparison with the other boards in this review - with $50-$100 difference, it was to be expected. On some levels of testing, it shows - the layout isn't optimal, the DPC Latency is hideous compared to the other boards, there are not many fan headers and there is an odd choice of network controller.
However, the Biostar TA990FXE came across as pleasantly surprising. The BIOS works well (even if the options are sometimes in confusing places), it overclocks Bulldozer on par or better than some of the other boards and comes with more kit in the box than expected.
Performance wise it doesn't break into the top half much when discussing CPU benchmarks, however it has a relatively decent showing in the GPU benchmarks. Essentially, this is a board for people who just need something cheap to run their processor. It fits that niche quite well, especially if you only have one GPU and need a PCI slot or two.
While the Biostar TA990FXE isn't the best board in the world, and it could use a little insight and design change to be consumer optimal, it is a cheap board that works.
Conclusion
This combination review has been a long time coming, repetitively pushed back by other releases or events. However we have now crossed through the land of 990FX, examining boards ranging from $130 to $215, and there is a lot to choose from.
Each of the boards can be separated by styling, by BIOS function, any by software utilities. As a direct minor evolution of the 8-series for Bulldozer, it does seem amazing that some motherboards really take to Bulldozer like an old friend, while others prefer it left alone running at stock speeds.
Each board can have its own minor flaws; however one major flaw comes across most of the range - about which CPU temperature sensor to believe when it comes to determining fan speeds. Using HWMonitor, on some motherboards it would report ~14ºC at idle and the CPU fan would be slow, and on others it would be around 30ºC, a more realistic number. This all comes down to whether the system will read the onboard CPU temperature, or a different sensor placed on the board specifically for reporting different temperatures.
This aside, each board has its plus points. If I was a gamer, the ASUS ROG Crosshair V Formula would be my major priority - as it was the board AMD prioritized for Bulldozer release, it is tweaked to run as best as it can. For fan control and performance, nothing comes close to the ASUS Sabertooth 990FX. The Gigabyte 990FXA-UD5 took advantage of that alternative CPU temperature reading and reduced my CPU fan to off or almost off at idle, resulting in a near silent system. The MSI 990FXA-GD80 performs well with a Thuban and provides a nifty USB 3.0 bracket in the box. The Biostar TA990FXE represents full sized ATX on a budget with AMD that is easy to update. If I were to take one, money no object, then I would plunge for one of the ASUS boards.

