ASUS P9X79-E WS Review: Xeon meets PLX for 7x
by Ian Cutress on January 10, 2014 10:00 AM EST- Posted in
- Motherboards
- Asus
- Workstation
- X79
- Prosumer

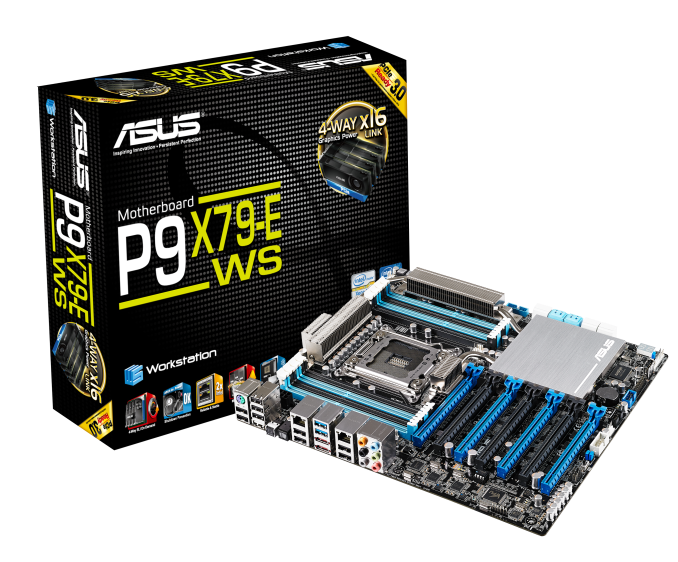
Alongside their line of channel and ROG motherboards, ASUS also has business (B/Q chipset) and Workstation (WS) lines for professional markets. The goal of these products is compatibility and stability – the desire to be a rock solid product in the face of any computational conundrum. Today we are reviewing hopefully the first of many ASUS WS motherboards – the P9X79-E WS, for the socket 2011 / performance Xeon market. This is an upgrade over the P9X79 WS, featuring a PLX chip giving seven full length PCIe slots.
The goal of the P9X79-E WS is to be able to tackle anything a user wants to use in it: in order to ensure this, ASUS try to validate as many RAID cards, 10 GbE cards, FPGA and PCIe devices as possible. The goal of the P9X79-E WS is to be the final frontier in single socket performance, suggesting that a 12 core Xeon E5-2697W and several of the latest Xeon Phi cards is just a walk in the park, as well as any consumer level CPU. If a user needs to run seven RAID cards should not be a problem here.
Several of the main features of workstation motherboards are hard to test from a review point of view. Compatibility is wholly taken from the QVL list: either a device works or it does not – if I find a device that does not and tell ASUS, chances are it will probably be working in the next BIOS update. Stability and longevity is hard to test as well – these motherboards are built to withstand several years at full throttle in high ambient temperatures, so if I tested it like that and it fails or works, then it might be up to the sample and I would have to take a statistical look at MTBF (mean time between failures) – a test not within my remit and could take a while to perform! Feature comparisons and performance are thus vital to our testing – aesthetics for gaming motherboard evaluations are not required here. It needs to work, ideally out of the box, and work well.
ASUS P9X79-E WS Overview
After reviewing ASUS’ X79, Z87 and ROG ranges, it seems almost nostalgic to start looking at the blue and black of ASUS again. The P9X79-E WS has actually been on the market for a number of months, and one of the first features to note is usually the seven full length PCIe slots. The P9X79-E WS uses two PLX PEX 8747 chips to increase the number of PCIe 3.0 lanes on the motherboard from 40 to 72 – if a user needed to, this motherboard will support PCI 3.0 x16/x16/x16/x16 and x16/x8/x8/x8/x16/x8/x8. We covered the operation of the PLX 8747 chip in a previous review – each of these chips requires ~7W of power hence the extended heatsinks around the motherboard.
Along with the two PLX chips, the P9X79-E WS also uses a Marvell PCIe 9230 controller for four more SATA 6 Gbps ports (over the standard two SATA 6 Gbps and four SATA 3 Gbps), an ASMedia controller for two eSATA 6 Gbps ports with port multiplier support, two Intel I210 NICs, the Realtek ALC1150 audio codec, a VIA 6315N controller for FireWire/IEEE1394 support and an ASMedia controller for four USB 3.0 ports. All these chips require heat removal, again a cause for a large extended heatsink array.
Being a Workstation board, the P9X79-E WS is designed to accept any socket 2011 Xeon, as well as ECC memory – up to 64GB is listed on the specification sheet. After speaking with ASUS, they also suggest using the P9X79-E WS in a high airflow environment – I found the system hot to touch due to no active fan on the motherboard for all the extra controllers.
Like the ASUS Rampage IV Black Edition we reviewed previously, ASUS are moving as many modern (read: latest in use) chipsets to the new BIOS layout involving a My Favorites screen, Quick Note, Last Modified, and plenty of CPU/Memory calibration options very similar to the ROG range. One thing worth noting is the lack of SSD Secure Erase which we see on the ROG boards: I would have thought it appropriate to include it on the workstation range as well. One new feature called ASUS Ratio Boost is in the BIOS, which implements MultiCore Turbo for Xeon CPUs.
The software for the P9X79-E WS is the older AI Suite II, in line with the X79 launch, with features such as TurboV Evo for non-Xeon overclocking, EPU for power conservation, Fan Xpert+ for tuning fans, Dr.Power for monitoring the power supply, USB 3.0 Boost, AI Charger, SSD Caching and ASUS Update.
In terms of performance, not much differentiates the P9X79-E WS from the other X79 counterparts. Despite the workstation status, the system even implements MultiCore Turbo when XMP is enabled, giving our i7-4960X sample the full turbo mode (4.0 GHz) no matter the loading. The difference with this motherboard is all going to be in the functionality it provides and QVL of extra PCIe products rather than raw performance. To that extent we at least hit the limit of our CPU overclock at 4.5 GHz without too much difficulty, although the platform and heatsink arrangement did get relatively warm.
POST time is reasonable in our standard test (dual GPUs) at just under fifteen seconds, although idle power usage is higher than most due to the extra controllers on board. DPC Latency is low (115 microseconds), which is always a good thing.
Being a workstation board, price is always going to be a factor. ASUS covers the P9X79-E WS with a 3 year warranty and provides the ASUS Premium Service for North America customers in case of any issues. The only issue we really had was that USB 3.0 boost would not disable UASP on our drives, although this was fixed with an update to the latest software. ASUS (and others) need to get into the groove of providing an update tool for software and drivers in the OS that works well to avoid future issues.
Visual Inspection
The first image of the P9X79-E WS is in striking contrast to the Rampage IV Black Edition I reviewed previously. We are back to the old blue, white and black styling that ASUS will look to keep for their workstation line (at least for the time being) but again, this being a WS motherboard, functionality is more important than looks.
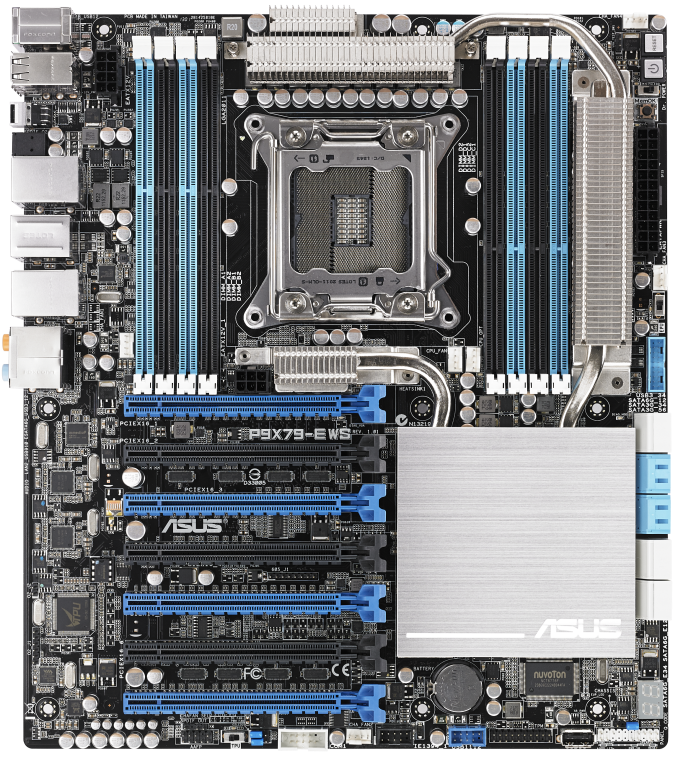
A full bodied X79 motherboard comes equipped with eight DRAM slots, and ASUS have taken single side latches again so as not to encroach onto any PCIe devices in the first slot. This means users should make sure that all DRAM is firmly inserted. The power delivery, again like on the RIVBE, is above the socket, although this time ASUS has an extended heatsink arrangement around the side of the motherboard and onto a very large chipset heatsink. As mentioned in the overview, this is due to the sizable number of controllers (at least four, plus a chipset) requiring heat removal, as well as the VRMs which need to handle an Intel 150W Xeon processor (the E5-2687W v2, the high frequency 8-core option) if a user specifies a high end build.
There are six 4-pin fan headers on board in total, five of which within easy reach of the socket: two 4-pin CPU fan headers to the bottom right of the socket area, a 4-pin to the left of the DRAM slots, a 4-pin at the top right of the motherboard next to the power/reset buttons and a fifth 4-pin just underneath the 24-pin ATX power connector. The final 4-pin header is on the bottom of the board, and all can be controlled via the BIOS and OS.
Due to the non-focus of overclocking a Xeon based system, only a single 8-pin CPU 12V EPS power connector is provided. This should provide 150W for any CPU over and above anything the 24-pin ATX power connector can provide – there is no need for an 8+4 or two 8-pins here. There is a 6-pin PCIe power connector below the socket, although this is for the VGA slots. That connector in itself is in a slightly awkward position (between the DRAM, PLX heatsink and the PCIe slots), and is the only one for the PCIe slots which could create power issues (more on that later).
Moving clockwise around the motherboard, the top right contains the common power and reset buttons (a must for almost any system I find, especially the more expensive models), a ‘Dr. Power’ switch which enables the PSU monitoring circuits, a Mem OK button (for recovering a bad memory overclock) and the 24-pin ATX power connector. Due to the heatsink in this area of the motherboard, it does look quite cramped up against the edge of what is already an E-ATX (or technically, CEB) sized motherboard. Further on is one of the fan headers, an EPU switch (for power saving modes) and a USB 3.0 header, powered by an ASMedia USB 3.0 controller.
The P9X79-E WS features 10 SATA ports in total: the six from the PCH (two SATA 6 Gbps, four SATA 3 Gbps) and four SATA 6 Gbps from a Marvell PCIe 9230 controller. Although the Marvell is used in order to enable SSD caching via software, one of the reasons X79 needs an update is this: Intel needed to push for more SATA 6 Gbps ports so we can move away from controllers altogether. Technically X79 has the silicon workings for six SAS/SATA ports, but requested that manufacturers did not use them (the X79R-AX we reviewed decided to) unless they employed the enterprise C6xx versions of the chipset which were validated (like the X79S-UP5). The only difference between the X79 and C606 chipsets, as far as I can tell, is cost and the SAS connectivity, and thus ASUS went for the X79 chipset here either because they did not want SAS or to reduce cost.
Along the bottom of the motherboard, from right to left, we have a two-digit debug LED, the front panel headers, an internal USB 2.0 port (useful for servers that require license dongles), a TPM header, two USB 2.0 headers, a fan header, a COM port header (often advised in WS builds in case a user requires one), a TPU switch (for one option CPU overclocking) and a front panel audio connector. What surprised me about the specification list for the P9X79-E WS is that for this front panel audio, ASUS went for the Realtek ALC1150 codec rather than a cheaper option. The ALC1150 is rated for superior SNR in one of the outputs, but less in the others, and unlike the SupremeFX variants on the consumer ROG motherboards, there is no PCB separation or headphone amplifiers here. We still managed 105 dB in our audio test however.
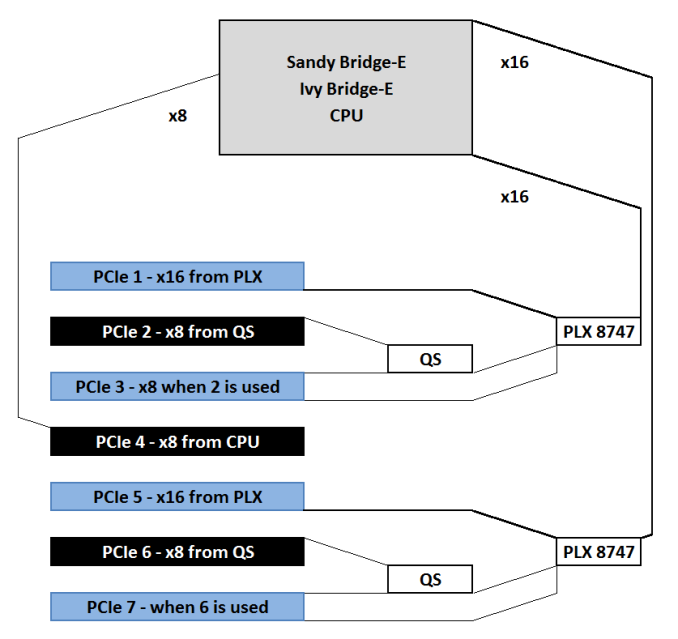
So while the PCIe layout is a full array of PCIe 2.0/3.0 x16 slots, the way that it is all wired up via PLX switches to the CPU is actually rather interesting (from my point of view). A socket 2011 CPU offers 40 PCIe lanes direct, and ASUS are transcribing a total of 72 lanes via the specification list of x16/x8/x8/x8/x16/x8/x8 when all the slots are populated. This requires a PCIe switch, such as a PLX chip, to be used. The most common one in use is the PLX PEX 8747, which takes x8 or x16 lanes from the CPU to provide 32 lanes as output. We covered the workings of the PLX chip in a previous review. However, 40 – 8 + 32 = 64, or 40 – 16 + 32 = 56, and thus there either ASUS are using two PLX 8747 chips (40 – 16 + 32 – 16 + 32 = 72) or using a different PLX chip, such as the 8780 which takes 16 lanes and creates 48 (40 – 16 + 48 = 72), like we saw on the Galaxy Z87 HOF at Computex. To put this into perspective, manufacturers like ASUS use PLX 8747 switches enough to get a nice discount (~$20 each), whereas PLX 8480 are rare enough to add $100 to the price. In this situation, it is almost like SLI/CFX, whereby one PLX chip uses less power (and requires less engineering) than two. Thankfully ASUS provided a PCIe diagram layout to dispel any inaccurate hypotheses:
In this diagram the thick lines are where x16 lanes are directed, and the thin lanes are x8. So PCIe 3 has 8 lanes from the PLX and 8 lanes from the Quick Switch normally, but when PCIe 2 is populated, the Quick Switch will move the eight lanes over to PCIe 2.
So in order to get the best layout from your devices, start with the blue slots for a full x16/x16/x16/x16 bandwidth and rearrange as necessary. Beyond this, black slots should be used only when the situation is pertinent, and selecting the right black slots will keep PCIe bandwidth as high as it can be. In our gaming testing at least, older NF200 PCIe switches used to add a sizable difference in performance, but the PLX chips are ~1-2% at most / on a bad day in terms of non-PLX based performance.
One feature that ASUS might come into issues with is if a user decides to put graphics cards in every single GPU slot. Typically a graphics card will draw up to 75W through the PCIe slot and when 3+ GPUs are to be used the manufacturer will add an extra power cable to help supply the juice. With seven GPUs, this would be up to 525 watts, which the single 6-pin PCIe on board will not be able to cope with. The system would then draw more power through the 24-pin PCIe connector to compensate, which would cause issues (so a good thing that Dr. Power is there!). For a comparison, the EVGA SR-2 uses two extra 6-pin PCIe connectors to satisfy the similar PCIe layout it provides.
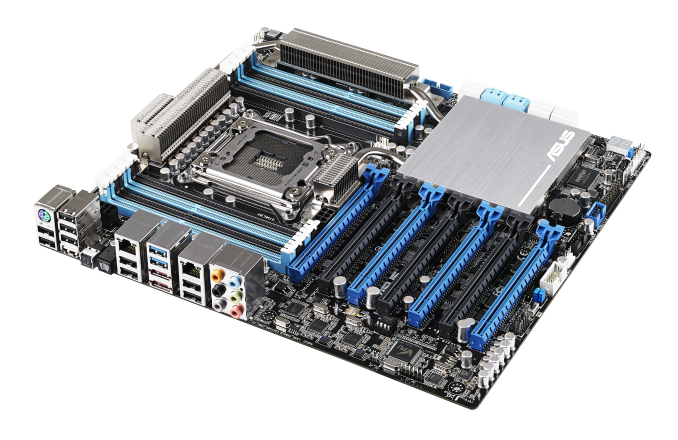
At some point, we will see top end motherboards in the performance segment of ASUS' lineup having Thunderbolt 2, but today is not that day. Due to X79’s positioning and the CPUs therein, something needs to be updated to provide this long-term addition. As it stands, our rear IO is thus standard enough for any WS product. From left to right there is a PS/2 combination port, ten USB 2.0 ports (one in white for USB BIOS Flashback), a USB BIOS Flashback button, SPDIF output, two USB 3.0 ports in blue, two eSATA ports in red (another controller), and two Intel I210 NICs and then the audio jacks. It is safe to assume that WS builders are within reach of Ethernet, and thus while WiFi would be a welcome addition, nothing is inherently lost by not having it. There are plenty of PCIe lanes to pick up a WiFi card if needed.
Board Features
| ASUS P9X79-E WS | |
| Price | Link |
| Size | SSI CEB (12" x 10") |
| CPU Interface | LGA-2011 |
| Chipset | Intel X79 |
| Memory Slots |
Eight DDR3 DIMM slots supporting up to 64 GB ECC and non-ECC supported Up to Quad Channel, 1333-2400 MHz |
| Video Outputs | None |
| Onboard LAN | 2 x Intel I210 |
| Onboard Audio | Realtek ALC 1150 |
| Expansion Slots |
7 x PCIe 3.0 x16 via 2x PLX 8747 - x16/-/x16/x8/x16/-/x16 or - x16/x8/x8/x8/x16/8/x8 |
| Onboard SATA/RAID |
2 x SATA 6 Gbps (X79), RAID 0, 1, 5, 10 4 x SATA 3 Gbps (X79), RAID 0, 1, 5, 10 4 x SATA 6 Gbps (Marvell PCIe 9230) 2 x eSATA 6 Gbps (ASMedia) |
| USB 3.0 / IEEE 1394 |
4 x USB 3.0 (ASMedia ASM1042) [1 header, 2 back panel] 12 x USB 2.0 (PCH) [10 back panel, 1 headers] 1 x Vertical USB 2.0 1 x IEEE 1394a Header (Via 6315N) |
| Onboard |
6 x SATA 6 Gbps 4 x SATA 3 Gbps 1 x USB 3.0 Header 1 x USB 2.0 Headers 6 x Fan Headers 1 x Vertical USB 2.0 1 x TPM Header TPU/EPU Switches Clear_CMOS Jumper MemOK! Button Dr. Power Switch Power/Reset Buttons Two Digit Debug |
| Power Connectors |
1 x 24-pin ATX Power Connector 1 x 8-pin CPU Power Connector 1 x 6-pin PCIe Power Connector |
| Fan Headers |
2 x CPU (4-pin) 4 x CHA (4-pin) |
| IO Panel |
10 x USB 2.0 1 x USB 3.0 2 x eSATA 6 Gbps 1 x PS/2 Combination Port 2 x Intel I210 NIC 1 x USB BIOS Flashback Button Audio Jacks |
| Warranty Period | 3 Years, APS in North America |
| Product Page | Link |
Big motherboard means big feature set – 12 SATA ports in total including the four extra SATA 6 Gbps and two eSATA provided by controllers, and PCIe devices are well fed and positioned due to the all-out slot configuration.
The Realtek ALC1150 is a little odd given its status in many of the high end audio solutions in the mainstream consumer range, although its presence is not unwelcome. The vertical USB 2.0 port on board might be strange for some – this is typically a server feature whereby expensive software that requires USB dongle licenses can place the license onto the machine without having to worry about anyone stealing it / it knocking off, as well as keeping it cool in the case if needs be.
Dr. Power is a feature we have not come across before at AnandTech, but it is a hardware and software implementation to monitor abnormal power supply readings via the 24-pin ATX power connector and others. With the installed driver and software, the OS will report if the power supply is near abnormal in some of its ranges.
Although not required by any stretch, absent from the motherboard is a management tool to allow users to configure the system over a network without the system being powered on. We typically see this on server level motherboards (such as the ones we have reviewed previously) in combination with an ASpeed 23xx 2D video chip. One could argue that as this is a workstation product rather than a server product, there is no need, but it would be interesting to see the crossover.


53 Comments
View All Comments
dstarr3 - Friday, January 10, 2014 - link
"If a user needs to run seven RAID cards should not be a problem here."Is that strictly true without any onboard video?
Ian Cutress - Friday, January 10, 2014 - link
Run it headless with desktop remote or Teamviewer over a network.nightbringer57 - Friday, January 10, 2014 - link
Or a USB video adapter.JlHADJOE - Friday, January 10, 2014 - link
Can you overclock a Xeon on it?dgingeri - Friday, January 10, 2014 - link
yes/no. You can control the turbo frequencies on a Xeon though a motherboard, and make it goe full turbo no matter the load, but not go beyond the multiplier range of the chip. So, you could potentially make an E5-2687w v2 go 4GHz on all 8 cores, but not any faster than that. With an E5-2603, you'd still be stuck at 1.8GHzHale_Kyou - Monday, March 3, 2014 - link
No! You can't! ASUS says NO. There's not proof in the internet, no screenshot telling it is possible. The only time Xeon was overclocked is in Intel's demo with a test chip.Hale_Kyou - Monday, March 3, 2014 - link
I.e. neither overclock, nor all-core full turbo. Full 4GHz is not possible.Ian Cutress - Friday, January 10, 2014 - link
The problem is the CPUs, not the motherboard. In this server space, all the Xeons are locked - you can play around with BCLK at best, although do not expect much headroom. Even the CPU straps (1.00x, 1.25x, 1.66x) are locked down. It's an Intel issue - they do not want to sell unlocked Xeons any more. That being said, a picture was shared on twitter a few months ago by an Intel engineer trying to gauge interest in unlocked Xeons - whether that comes with or without warranty we will have to see, but I wouldn't get any hopes up just yet.jasonelmore - Friday, January 10, 2014 - link
If i wanted to make a uber machine for the whole family and VM everything to their respective rooms, how would i do this in a "true headless" fashion? ie: no computer required in their room, just a screen and somehow beam video wirelessly to a monitorAny solutions exist?
extide - Friday, January 10, 2014 - link
You are talking about a VDi infrastructure, and you do need some sort of very basic pc at each terminal to run the remote desktop connection. Probably not really a great idea for home use, as things like 3d and video do not work very well in that scenario.